By default, the built-in Windows VPN client does not attempt to reconnect to the VPN server if the connection is lost. If the connection is dropped, the user must manually reconnect to the VPN server. Windows has several tools that you can use to set up automatic VPN reconnection after a connection loss.
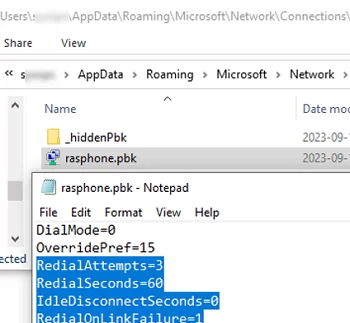
Reconnect settings are missing from the Windows VPN client GUI. However, you can configure them using the rasphone.pbk configuration file stored in the user profile (%userprofile%\AppData\Roaming\Microsoft\Network\Connections\Pbk). The settings of all user VPN connection profiles are stored in this file.
%ProgramData%\Microsoft\Network\Connections\Pbk\rasphone.pbk file.Open the rasphone.pbk file with a text editor, look for the section of the VPN profile you want to use (for example [L2TP-VPN]), and scroll down to the following options:
- RedialAttempts=3 – number of reconnect attempts (maximum 99)
- RedialSeconds=60 – seconds between reconnect attempts
- IdleDisconnectSeconds=0 — the waiting time before it becomes clear that a connection has been lost (0 –don’t wait)
- RedialOnLinkFailure=1 — redial if the connection fails (1 – yes, 0 – no)
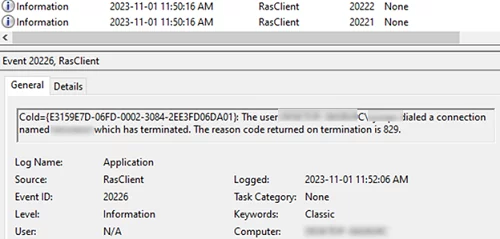
However, the rasphone.pbk settings may not work correctly in all cases. It is therefore recommended that you automate VPN reconnection using a scheduler task that reconnects to the VPN when the connection is lost or when the computer is connected to the network (Wi-Fi or Ethernet). We are interested in the following events
| EventID | Source | Event description |
| 20226 | RasClient (Application log) | The user username dialed a connection named VPNConnectionName which has terminated. The reason code returned on termination is 829. |
| 10000 | NetworkProfile (Microsoft-Windows-NetworkProfile/Operational log) | Network Connected |
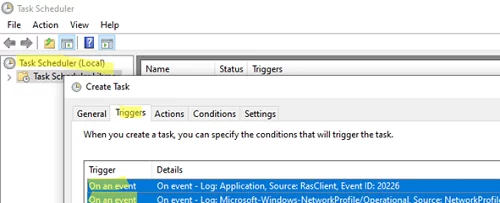
Open Windows Task Scheduler (taskschd.msc) and create a new task. Set a task name: AutoReconnectVPN.
Go to the Triggers tab and create two event triggers (Begin the task: On event):
- Log:
Application, Source:RasClient, EventID:20226 - Log:
Microsoft-Windows-NetworkProfile/Operational, Source:NetworkProfile, EventID:10000
Now you need to configure the action to be taken when one of these events occurs. Go to the Actions tabs -> click New.
- Action: Start a program
- Program/script:
%windir%\System32\rasdial.exe - Argument:
YourVPNCOnnectionName

In this example, a VPN profile with a saved password is used for the connection. To explicitly specify the VPN connection name and password, set them as follows:
"YourVPNCOnnectionName" username password
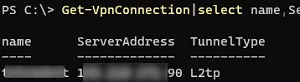
Get-VpnConnection|select name,ServerAddress,TunnelType
Test the scheduler task: temporarily unplug the network cable from the computer, disable the network adapter, or disconnect the VPN. Check that Windows automatically reconnects to your VPN server when the network connection is restored.
1 comment
Thanks SO much for this guide. After upgrading from W7 to W10, this was bugging the hell out of me. Thank to this, I was even able to create a “VPN Alternate” task, which looks for an 809 Error Code (ERROR_VPN_TIMEOUT aka VPN server unresponsive) in the Event Log and then dial an alternate VPN server. I simply created the same Tricky Task as above, but edited this line of the XML query:
*[EventData[Data[4]=’829′ or ‘629’]]
…to this:
*[EventData[Data[4]=’809′]]