Wi-Fi signal strength affects the quality of your Internet connection. On Windows, you can check the current Wi-Fi signal strength in several ways. I tried to learn how to check the current Wi-Fi strength using PowerShell, display a notification if the signal quality has dropped, and display a list of all available wireless networks with their parameters.
A Windows 10 user can evaluate the Wi-Fi strength of the current connection with a wireless network icon in the taskbar. Click on the icon and you will see a list of available Wi-Fi networks.
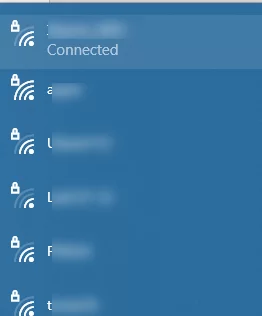
Each Wi-Fi network has an icon with bars. The more bars, the better the signal strength of the wireless access point. Three bars mean that the signal quality is between 75% and 100%. If the connection icon has two bars, the Wi-Fi signal strength is between 50% and 75%, etc.
You can get a more accurate value of the signal strength with the command prompt. List all parameters of the current wireless connection using the command:
netsh wlan show interfaces
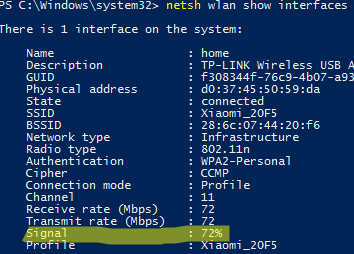
The Wi-Fi signal strength is highlighted in the screenshot (Signal: 72%).
Using PowerShell, you can get only the signal strength value in a percent:
(netsh wlan show interfaces) -Match '^\s+Signal' -Replace '^\s+Signal\s+:\s+',''

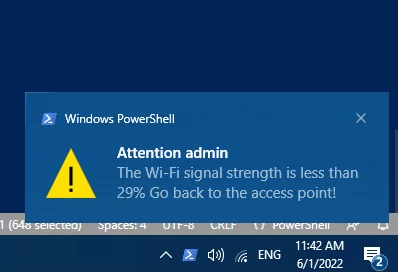
Using a simple PowerShell script, you can display a pop-up notification if the Wi-Fi signal strength is less than 30%:
$cur_strength=(netsh wlan show interfaces) -Match '^\s+Signal' -Replace '^\s+Signal\s+:\s+','' | Out-String
 If ($cur_strength.replace('%','') –le 30)
 {
 Add-Type -AssemblyName System.Windows.Forms
 $global:balmsg = New-Object System.Windows.Forms.NotifyIcon
 $path = (Get-Process -id $pid).Path
 $balmsg.Icon = [System.Drawing.Icon]::ExtractAssociatedIcon($path)
 $balmsg.BalloonTipIcon = [System.Windows.Forms.ToolTipIcon]::Warning
 $balmsg.BalloonTipText = “The Wi-Fi signal strength is less than $cur_strength Go back to the access point!”
 $balmsg.BalloonTipTitle = "Attention $Env:USERNAME"
 $balmsg.Visible = $true
 $balmsg.ShowBalloonTip(10000)
 }
You can run this PowerShell code in an infinite loop and check the status of the signal once every 10 seconds, or make it a Windows service that will notify you if the Wi-Fi connection is poor.
You can also use netsh to also display a list of all available wireless networks in your wireless adapter’s range (not only the list of saved Wi-Fi networks):
netsh wlan show network mode=bssid
The following PowerShell script scans all available Wi-Fi networks (including Windows access points), displays their names, signal strength, channels (useful if you want to find free channels), and supported standards (802.11n, 802.11ac, 802.11g, etc.).
$logs=@()
 $date=Get-Date
 $cmd=netsh wlan show networks mode=bssid
 $n=$cmd.Count
 For($i=0;$i -lt $n;$i++)
 {
 If($cmd[$i] -Match '^SSID[^:]+:.(.*)$')
 {
 $ssid=$Matches[1]
 $i++
 $bool=$cmd[$i] -Match 'Type[^:]+:.(.+)$'
 $Type=$Matches[1]
 $i++
 $bool=$cmd[$i] -Match 'Authentication[^:]+:.(.+)$'
 $authent=$Matches[1]
 $i++
 $bool=$cmd[$i] -Match 'Cipher[^:]+:.(.+)$'
 $chiffrement=$Matches[1]
 $i++
 While($cmd[$i] -Match 'BSSID[^:]+:.(.+)$')
 {
 $bssid=$Matches[1]
 $i++
 $bool=$cmd[$i] -Match 'Signal[^:]+:.(.+)$'
 $signal=$Matches[1]
 $i++
 $bool=$cmd[$i] -Match 'Type[^:]+:.(.+)$'
 $radio=$Matches[1]
 $i++
 $bool=$cmd[$i] -Match 'Channel[^:]+:.(.+)$'
 $Channel=$Matches[1]
 $i=$i+2
 $logs+=[PSCustomObject]@{date=$date;ssid=$ssid;Authentication=$authent;Cipher=$chiffrement;bssid=$bssid;signal=$signal;radio=$radio;Channel=$Channel}
 }
 }
 }
 $cmd=$null
 $logs|Out-GridView -Title 'Scan Wifi Script'
You will see a simple Out-GridView table containing information about the parameters of all available wireless networks.
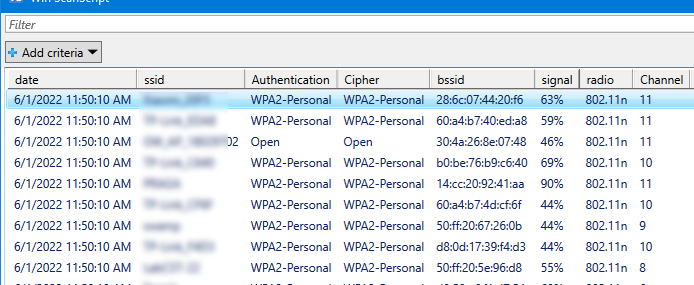
My screenshot shows that channel 11 is heavily used in my environment, so it is worth running my access point on another channel.
2 comments
hey theres smth wrong with the script it’s showing the radio band under radio and channel…i need to see the channel nbmr help
Nice, thank you for sharing. I was just Googling around how to get this info directly via Powershell instead of parsing netsh output but I like what you’ve done here.