Let’s look at how to change the primary IP address (managed address) and/or hostname of the Proxmox VE server. This may be necessary when changing IP addressing schemes in your network, adding or removing network adapters, or migrating infrastructure.
Changing the Primary Proxmox IP Address
Suppose you have a standalone Proxmox host configured with a static IP address during initial setup.
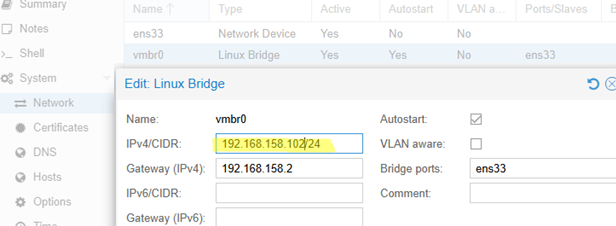
If the Proxmox node management web interface is available, you can change the IP address directly from the web UI. Go to System -> Network and find the Linux Bridge interface. Open the vmbr interface settings, set a new IP address, subnet mask, and gateway.
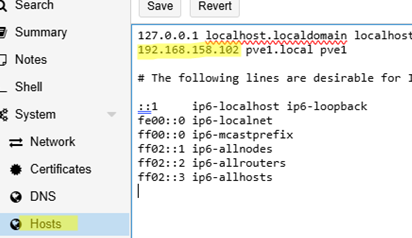
Then, go to System -> Hosts and replace the old IP address with a new one.
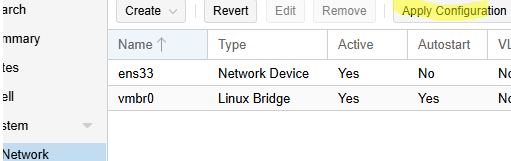
Then, go back to System -> Network and click the Apply Configuration button to apply the changes and restart the network interface (the connection to the host by the old IP address will be lost).
In a few seconds, you will be able to connect to the WEB UI using the new IP address.
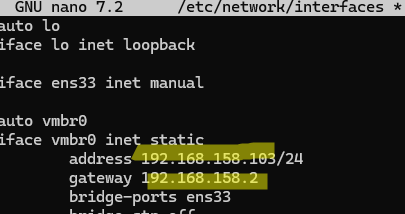
You can also change the Proxmox host’s IP address from the server console. Update the following configuration files with the new IP address and network settings:
# nano /etc/network/interfaces
and
# nano /etc/hosts

vmbr0 interface:auto vmbr0 iface vmbr0 inet dhcp
Restart the networking to apply the new network settings:
# systemctl restart networking
How to Rename a Proxmox Node
Let’s look at how to change the Proxmox hostname. Changing a Proxmox hostname is a slightly more complicated procedure than changing an IP address.
First, set the new hostname in the config files:
# nano /etc/hosts

and
# nano /etc/hostname

If virtual machines and/or LXC containers have already been created on the Proxmox host, you must relocate the contents of directories whose paths reference the previous hostname:
/var/lib/rrdcached/db/pve2-storage/[OLDHOSTNAME]/var/lib/rrdcached/db/pve2-node/[OLDHOSTNAME]/etc/pve/nodes/[OLDHOSTNAME]
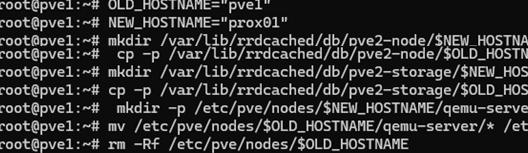
For convenience, set the old and new hostnames as variables, then copy the data using the following bash script:
OLD_HOSTNAME="pve1"
 NEW_HOSTNAME="prox01"
 mkdir /var/lib/rrdcached/db/pve2-node/$NEW_HOSTNAME
 cp -p /var/lib/rrdcached/db/pve2-node/$OLD_HOSTNAME /var/lib/rrdcached/db/pve2-node/$NEW_HOSTNAME
 mkdir /var/lib/rrdcached/db/pve2-storage/$NEW_HOSTNAME
 cp -p /var/lib/rrdcached/db/pve2-storage/$OLD_HOSTNAME/* /var/lib/rrdcached/db/pve2-storage/$NEW_HOSTNAME
 mkdir -p /etc/pve/nodes/$NEW_HOSTNAME/qemu-server
 mv /etc/pve/nodes/$OLD_HOSTNAME/qemu-server/* /etc/pve/nodes/$NEW_HOSTNAME/qemu-server
 # Remove the original directories with the old hostname:
 rm -Rf /etc/pve/nodes/$OLD_HOSTNAME
 rm -Rf /var/lib/rrdcached/db/pve2-node/$OLD_HOSTNAME
 rm -Rf /var/lib/rrdcached/db/pve2-storage/$OLD_HOSTNAME
Restart the Proxmox host:
# systemctl reboot
Log in to the host’s web UI and check the Proxmox host’s functionality.
In my case, one of the mounted storage devices in a local directory disappeared after rebooting the host. An error occurred when trying to run a VM with disks on this storage:
TASK ERROR: storage 'datastore02' is not available on node 'prox01'

The issue in this case was that the specified storage was still bound to the old hostname in the nodes option. To fix it, specify a new hostname in this file:
# nano /etc/pve/storage.cfg
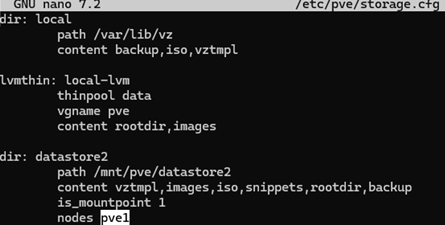
After that, the storage appeared in the Proxmox web interface, and I could start the VM.
If the Proxmox host is part of a cluster (pve-cluster), it is often simpler to first remove the host from the cluster, rename it, and then rejoin the host to the cluster rather than attempting an in-place rename. This will be easier than editing the corosync config files.