Windows OS Hub
  • Windows
    • Windows 11
    • Windows 10
    • Windows Server 2025
    • Windows Server 2022
    • Windows Server 2019
    • Windows Server 2016
  • Microsoft
    • Active Directory (AD DS)
    • Group Policies (GPOs)
    • Exchange Server
    • Azure and Microsoft 365
    • Microsoft Office
  • Virtualization
    • VMware
    • Hyper-V
    • Proxmox
  • PowerShell
  • Linux
  • Home
  • About

Windows OS Hub

  • Windows
    • Windows 11
    • Windows 10
    • Windows Server 2025
    • Windows Server 2022
    • Windows Server 2019
    • Windows Server 2016
  • Microsoft
    • Active Directory (AD DS)
    • Group Policies (GPOs)
    • Exchange Server
    • Azure and Microsoft 365
    • Microsoft Office
  • Virtualization
    • VMware
    • Hyper-V
    • Proxmox
  • PowerShell
  • Linux

 Windows OS Hub / PowerShell / Testing Internet Speed from Windows Command Prompt (PowerShell)

July 2, 2024

Testing Internet Speed from Windows Command Prompt (PowerShell)

Many online services allow you to test your Internet connection speed in real-time. If you need to regularly collect Internet connection speed metrics from your provider for monitoring, you can use the popular Speedtest console client from Ookla. Let’s look at how to measure the speed of an Internet connection using the Windows command prompt or a PowerShell script.

Download the console speedtest.exe tool for Windows from https://www.speedtest.net/apps/cli and extract it to a local directory.

To automatically test network download and upload speeds to the nearest Speedtest service location, run the command

.\speedtest.exe

speedtest.exe - Internet speed test from WIndows CLI

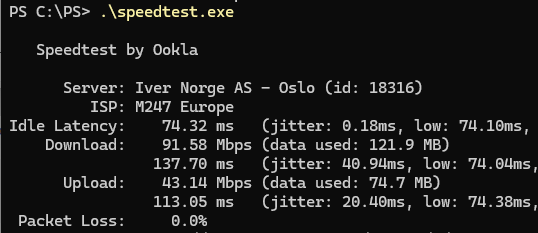
The tool returns download and upload speeds (in Mbps), network latency from your computer to the nearest Speedtest server. Since there are many SpeedTest locations worldwide, this will be the speed of your internet connection.

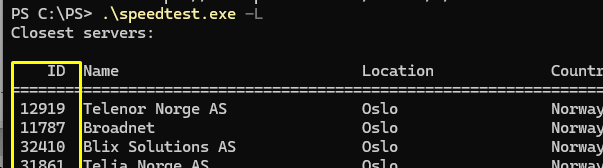
You can manually select the ISP, country, and city to test your Internet connection speed to. List the nearest test points and copy the ID:

.\speedtest.exe -L

Run the speed test against the target server:

.\speedtest.exe -s 11787

speedtest-cli server list

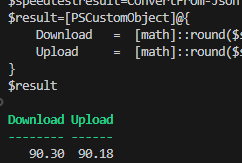
The speedtest command can return results in structured formats (CSV, JSON, TSV), which is useful if you need to extract additional data from the results or send the test result to the monitoring system.

For example, you can use a PowerShell script to get the results of an Internet speed test:

$speedtestcmd = & "C:\ps\speedtest.exe" --accept-license -s 37149 -f json
$speedtestresult=ConvertFrom-Json $speedtestcmd
$result=[PSCustomObject]@{
   Download = [math]::round($speedtestresult.download.bandwidth/1MB, 5)*8
   Upload = [math]::round($speedtestresult.upload.bandwidth/1MB, 5)*8
}
$result

Internet download and upload speed test with PowerShell

The speedtest command returns a JSON object that can be processed using PowerShell. Extract the download and upload speed values from JSON and convert the values from bits to megabits.

You can send the Internet speed test results to your monitoring system as metrics (Getting data into Zabbix from a PowerShell script).

On a local network, you can use the iperf tool to test the network bandwidth between two machines.
0 comment
3
Facebook Twitter Google + Pinterest
PowerShellWindows 10Windows 11
previous post
Configure File and Folder Access Auditing on Windows (GPO)
next post
Permanently Disable Driver Signature Enforcement on Windows 11

Related Reading

Fix: Remote Desktop Licensing Mode is not Configured

August 24, 2023

Managing Windows Firewall Rules with PowerShell

March 11, 2024

Extend an Expired User Password in Active Directory

December 23, 2024

Installing Language Pack in Windows 10/11 with PowerShell

September 20, 2023

How to Assign (Passthrough) a Physical GPU to...

June 11, 2024

How to Create UEFI Bootable USB Drive to...

March 13, 2024

Adding ESXi Host to VMware vCenter Server (vCSA)

March 12, 2024

How to View and Change BIOS (UEFI) Settings...

September 13, 2023

Leave a Comment Cancel Reply

join us telegram channel https://t.me/woshub
Join WindowsHub Telegram channel to get the latest updates!

Recent Posts

  • AppLocker: Configure Application Restriction Policies in Windows

    November 19, 2025
  • Enable/Disable Random Hardware (MAC) Address for Wi-Fi on Windows

    November 14, 2025
  • Automate Software and Settings Deployment with WinGet Configure (DSC)

    November 13, 2025
  • SMB over QUIC: Mount File Share over Internet without VPN on Windows Server 2025

    November 4, 2025
  • How to Find a Previous Computer Name in Windows

    October 28, 2025
  • Stop Windows Server from Auto-Shutdown Every Hour

    October 22, 2025
  • How to Delete a Windows Service via CMD or PowerShell

    October 16, 2025
  • Resource Fair Sharing in Windows Server Remote Desktop Services (RDS)

    October 6, 2025
  • How to Disable (Enable) Credential Guard in Windows 11

    October 6, 2025
  • Wrong Network Profile on Windows Server after Reboot

    September 30, 2025

Follow us

  • Facebook
  • Twitter
  • Telegram
Popular Posts
  • How to Delete Old User Profiles in Windows
  • Fix: Remote Desktop Licensing Mode is not Configured
  • How to Install Remote Server Administration Tools (RSAT) on Windows
  • Configuring User Profile Disks (UPD) on Windows Server RDS
  • How to Create UEFI Bootable USB Drive to Install Windows
  • Wi-Fi (Internet) Disconnects After Sleep or Hibernation on Windows 10/11
  • How to Allow Non-Admin User to Start/Stop Service in Windows
Footer Logo

@2014 - 2024 - Windows OS Hub. All about operating systems for sysadmins


Back To Top