Windows OS Hub
  • Windows
    • Windows 11
    • Windows 10
    • Windows Server 2025
    • Windows Server 2022
    • Windows Server 2019
    • Windows Server 2016
  • Microsoft
    • Active Directory (AD DS)
    • Group Policies (GPOs)
    • Exchange Server
    • Azure and Microsoft 365
    • Microsoft Office
  • Virtualization
    • VMware
    • Hyper-V
    • Proxmox
  • PowerShell
  • Linux
  • Home
  • About

Windows OS Hub

  • Windows
    • Windows 11
    • Windows 10
    • Windows Server 2025
    • Windows Server 2022
    • Windows Server 2019
    • Windows Server 2016
  • Microsoft
    • Active Directory (AD DS)
    • Group Policies (GPOs)
    • Exchange Server
    • Azure and Microsoft 365
    • Microsoft Office
  • Virtualization
    • VMware
    • Hyper-V
    • Proxmox
  • PowerShell
  • Linux

 Windows OS Hub / Windows 11 / Windows: Auto Switch to Strongest Wi-Fi Network

December 10, 2025

Windows: Auto Switch to Strongest Wi-Fi Network

Windows 10 and 11 include a built-in feature that allows automatically switch the wireless NIC to the Wi‑Fi access point broadcasting the same SSID with the strongest available signal. The AutoSwitch feature can prevent a Windows device from staying connected to a Wi-Fi AP with a weak signal when a stronger signal is available.

The AutoSwitch feature can be enabled in the WLAN adapter settings.

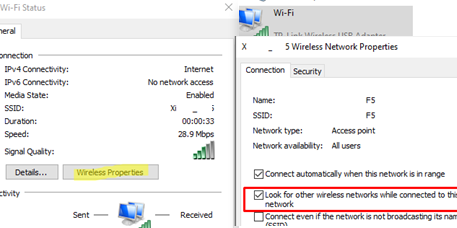
  1. Open the Network Connections management panel ( ncpa.cpl )
  2. Right-click on a Wi-Fi connection and select Status
  3. Click the Wireless Properties button and enable the option Look for other wireless networks while connected to this network Enable Wi-Fi autoswitch: Look for other wireless networks while connected to this network
This option will not be available if the “Connect automatically when this network is in range” setting is turned off.

After enabling AutoSwitch for a network adapter, Windows will automatically connect to the Wi-Fi network with the strongest available signal.

You can use PowerShell to check the signal strength (quality) of the current Wi-Fi network (in %).

(netsh wlan show interfaces) -Match '^\s+Signal' -Replace '^\s+Signal\s+:\s+',''

netsh wlan checking signal strength

You can enable or disable auto-switching for a specific WLAN profile by using the netsh wlan command.

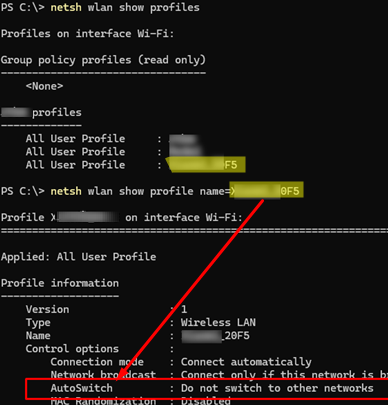
List the Wi-Fi profiles saved in Windows:

netsh wlan show profiles

Get the settings for a specific WLAN profile:

netsh wlan show profile name=WOSHUB05

Check the “Profile Information” section to see the status of the AutoSwitch option. It is disabled by default:

AutoSwitch : Do not switch to other networks

netsh wlan set - enable autoswitch

Enable the AutoSwitch option for a specific Wi-Fi profile:

netsh wlan set profileparameter name=WOSHUB05 autoswitch=Yes

This will change the option to:

AutoSwitch: Switch to more preferred network if possible

In the network adapter driver settings, you can configure how aggressively the client should perform roaming between Wi-Fi networks. This option is called Roaming Aggressiveness (or Roaming Sensitivity). Its availability depends on the specific network adapter model and the driver in use.

  1. Open the properties of the WLAN adapter and go to the Advanced tab.
  2. In the network adapter driver properties, look for the Roaming Aggressiveness option (in my case, it is a Realtek network adapter)
  3. Use the drop-down menu to select a sensitivity level between 1 and 6. This defines how aggressively the adapter switches to the network with the strongest signal. When set to the highest sensitivity level, the device will continuously monitor the quality of the connected Wi-Fi network. If signal degradation is detected, the device attempts to locate and connect to an access point with a stronger signal.Change Roaming Aggressiveness in WLAN adapter settings

You can use PowerShell to display the current sensitivity level for Wi-Fi roaming of a WLAN adapter.

Get-NetAdapterAdvancedProperty -Name "Wi-Fi" | ft DisplayName, DisplayValue, ValidDisplayValues

The command lists both the current roaming aggressiveness value and the allowed values.

Roaming Aggressiveness 1. Lowest {1. Lowest, 2. Medium-low, 3. Medium, 4. Medium-High...}

To adjust the sensitivity of the current WLAN auto-switch:

Set-NetAdapterAdvancedProperty -Name "Wi-Fi" -DisplayName "Roaming Aggressiveness" -DisplayValue "4. Medium-High"

Additionally, a Windows device can be configured to automatically disconnect from a wireless network when an Ethernet connection becomes active.

The auto-switching and roaming aggressiveness options available in Windows can enhance connection quality for users operating within seamless Wi‑Fi networks.

0 comment
0
Facebook Twitter Google + Pinterest
Questions and AnswersWindows 10Windows 11
previous post
How to Enable or Disable VBScript in Windows after Deprecation

Related Reading

Configuring RemoteApps Hosted on Windows 10/11 (without Windows...

January 25, 2025

Fix: Windows Update Tab (Button) is Missing from...

December 16, 2024

How to Prefer IPv4 over IPv6 in Windows...

April 15, 2025

Change BIOS from Legacy to UEFI without Reinstalling...

April 23, 2025

How to Detect Which User Installed or Removed...

June 25, 2025

Find a Process Causing High Disk Usage on...

July 16, 2025

Map a Network Drive over SSH (SSHFS) in...

May 13, 2025

Unable to Select Edition During Windows 10/11 Installation

February 4, 2025

Leave a Comment Cancel Reply

join us telegram channel https://t.me/woshub
Join WindowsHub Telegram channel to get the latest updates!

Recent Posts

  • Start Menu Not Working (Unresponsive) on Windows Server RDS

    November 27, 2025
  • AppLocker: Configure Application Restriction Policies in Windows

    November 19, 2025
  • Enable/Disable Random Hardware (MAC) Address for Wi-Fi on Windows

    November 14, 2025
  • Automate Software and Settings Deployment with WinGet Configure (DSC)

    November 13, 2025
  • SMB over QUIC: Mount File Share over Internet without VPN on Windows Server 2025

    November 4, 2025
  • How to Find a Previous Computer Name in Windows

    October 28, 2025
  • Stop Windows Server from Auto-Shutdown Every Hour

    October 22, 2025
  • How to Delete a Windows Service via CMD or PowerShell

    October 16, 2025
  • Resource Fair Sharing in Windows Server Remote Desktop Services (RDS)

    October 6, 2025
  • How to Disable (Enable) Credential Guard in Windows 11

    October 6, 2025

Follow us

  • Facebook
  • Twitter
  • Telegram
Popular Posts
  • Converting Windows 10 to Enterprise LTSC Without Losing Data
  • Permanently Disable Driver Signature Enforcement on Windows 11
  • Fix: Windows Update Tab (Button) is Missing from Settings
  • How to Remove ‘Some Settings are Managed by Your Organization’ on Windows 11 or 10
  • How to Add or Reinstall the Microsoft PDF Printer on Windows
  • Fix: Your IT Administrator Has Limited Access to Virus & Threat Protection
  • How to Pause (Delay) Update Installation on Windows 11 and 10
Footer Logo

@2014 - 2024 - Windows OS Hub. All about operating systems for sysadmins


Back To Top