Windows OS Hub
  • Windows
    • Windows 11
    • Windows 10
    • Windows Server 2025
    • Windows Server 2022
    • Windows Server 2019
    • Windows Server 2016
  • Microsoft
    • Active Directory (AD DS)
    • Group Policies (GPOs)
    • Exchange Server
    • Azure and Microsoft 365
    • Microsoft Office
  • Virtualization
    • VMware
    • Hyper-V
    • Proxmox
  • PowerShell
  • Linux
  • Home
  • About

Windows OS Hub

  • Windows
    • Windows 11
    • Windows 10
    • Windows Server 2025
    • Windows Server 2022
    • Windows Server 2019
    • Windows Server 2016
  • Microsoft
    • Active Directory (AD DS)
    • Group Policies (GPOs)
    • Exchange Server
    • Azure and Microsoft 365
    • Microsoft Office
  • Virtualization
    • VMware
    • Hyper-V
    • Proxmox
  • PowerShell
  • Linux

 Windows OS Hub / Windows 11 / Windows Cannot Be Installed: The Selected Disk Has an MBR Partition Table

November 5, 2025

Windows Cannot Be Installed: The Selected Disk Has an MBR Partition Table

During a clean Windows installation, you may encounter an error stating that Windows cannot be installed on the selected disk because it is partitioned using the MBR partition table:

Windows 11 can’t be installed on disk 0 partition 1
The selected disk has an MBR partition table. On EFI systems, the operating system can only be installed on GPT disks.

Windows 11 can’t be installed on disk 0 partition 1 The selected disk has an MBR partition table. On EFI systems, the operating system can only be installed on GPT disks.

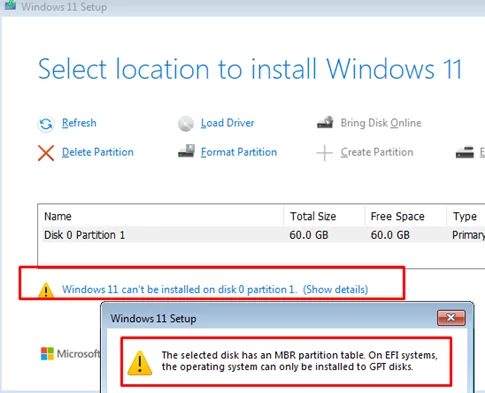
This error occurs when a computer is booted in UEFI mode but the selected disk uses an MBR partition table, which is incompatible with UEFI. Windows installation on a UEFI-based computer in native mode requires the target disk to be partitioned using the GPT partition table. In this case, there are several possible ways to continue installing Windows:

  • If the disk is empty or contains no important data, you can convert the MBR partition table to GPT (this will erase all data on the disk). This is the easiest and fastest option.
  • If your disk contains partitions with important files, you can convert the MBR partition table to GPT without deleting the existing partitions. This will take some time.
Another option is to change the boot type from EFI to Legacy BIOS (CSM) in the computer’s UEFI (BIOS) settings. In this case, Windows can be installed on an MBR disk. However, there are no advantages to using the legacy MBR partition table and BIOS boot mode on modern computers.  In most cases, it is preferable to use the native UEFI boot mode with a GPT (GUID) partition table.

Convert the disk partition style from MBR to GPT with clearing all existing partitions (will erase all data on the disk)
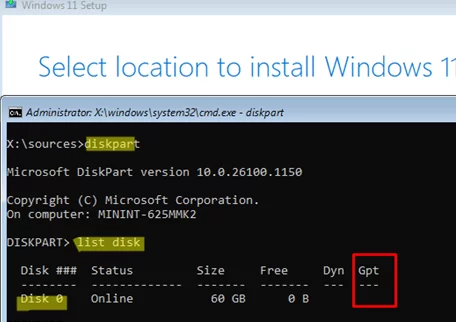
  1. Press Shift+F10 on the disk selection screen during Windows installation to open the command prompt.
  2. In the command prompt, run: diskpart
  3. List your computer’s fixed disks: list disk
  4. In this case, the * symbol is missing in the Gpt column. This indicates that the disk was formatted with an MBR partition table.
    diskpart - check partition table
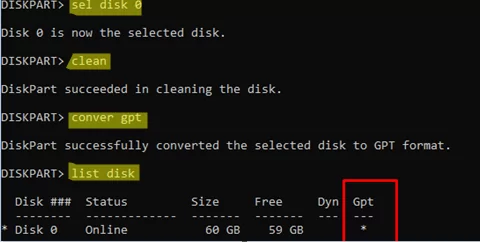
  5. Choose the disk where you want to install Windows. In our case, only Disk 0 is available: select disk 0
  6. Wipe the disk (this will delete all partitions and data on the disk!!): clean
  7. Convert the partition table to GPT: convert gpt
  8. Run the list disk command to verify that disk 0 is now formatted with the GPT partition table (an asterisk will appear in the Gpt column) diskpart - convert disk to gpt
  9. Close the command prompt window and switch to the Windows Setup wizard. Click the
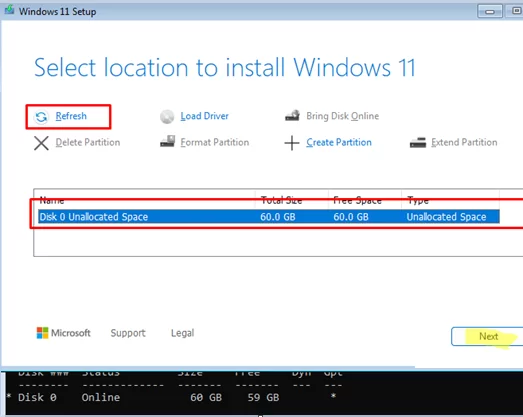
 Refresh button to update the storage information. Select unallocated space on disk 0. Once you have converted the partition table to GPT, you can install Windows on this disk (the Next button will become active).
    Install Windows 11 on unallocated space to GPT disk

If there is data on the disk, you can convert the MBR partition table to GPT without deleting existing partitions (non-destructive).

  1. At the disk selection stage, open the Command Prompt by pressing Shift+F10
  2. Both Windows 11 and 10 include the mbr2gpt.exe tool, which enables you to convert the partition table without deleting existing partitions.
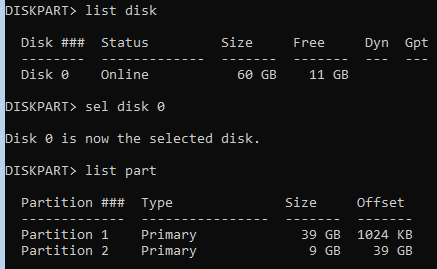
  3. Check that the disk uses the MBR partition table and has several partitions:
    diskpart
    list disk
    select disk 0
    list part
    exit

    diskpart - list disk, check that partition table is mbr
  4. First, verify that converting the partition table on Disk 0 to a GPT is possible: mbr2gpt.exe /disk:0 /validate
    mbr2gpt.exe validate
  5. Start the conversion:
    mbr2gpt.exe /convert /disk:0 /allowFullOS
  6. After this, switch to the Windows Setup dialog and continue installing Windows.

It should be noted that the mbr2gpt.exe tool only supports the conversion of system disks on which Windows is installed, and cannot be used to convert non-system disks. When used against a non-system, the mbr2gpt.exe tool returns the error Disk layout validation failed.

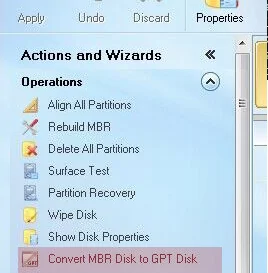
To convert a non-system disk to GPT, a third-party tool is required. For example, Minitool Partition Wizard, EaseUS Partition Master, or Acronis Disk Director.

Download a bootable ISO image with any of these free tools and write it to a USB flash drive. Boot your computer from the USB flash drive and select the appropriate menu option to convert the disk from MBR to GPT (the screenshot displays the options available in the Minitool Partition Wizard utility).

Minitool Partition Wizard - convert MBR disk to GPT

After converting the local fixed disk to GPT, you can proceed with a clean installation of Windows 11.

0 comment
0
Facebook Twitter Google + Pinterest
Questions and AnswersWindows 10Windows 11
previous post
Remote Desktop (RDP) Not Working in Windows 11
next post
SMB over QUIC: Mount File Share over Internet without VPN on Windows Server 2025

Related Reading

Configuring RemoteApps Hosted on Windows 10/11 (without Windows...

January 25, 2025

Bridging Multiple Network Interfaces on Windows

November 21, 2024

Fix: Windows Update Tab (Button) is Missing from...

December 16, 2024

How to Prefer IPv4 over IPv6 in Windows...

April 15, 2025

Change BIOS from Legacy to UEFI without Reinstalling...

April 23, 2025

How to Detect Which User Installed or Removed...

June 25, 2025

Find a Process Causing High Disk Usage on...

July 16, 2025

Map a Network Drive over SSH (SSHFS) in...

May 13, 2025

Leave a Comment Cancel Reply

join us telegram channel https://t.me/woshub
Join WindowsHub Telegram channel to get the latest updates!

Recent Posts

  • SMB over QUIC: Mount File Share over Internet without VPN on Windows Server 2025

    November 4, 2025
  • How to Find a Previous Computer Name in Windows

    October 28, 2025
  • Stop Windows Server from Auto-Shutdown Every Hour

    October 22, 2025
  • How to Delete a Windows Service via CMD or PowerShell

    October 16, 2025
  • Resource Fair Sharing in Windows Server Remote Desktop Services (RDS)

    October 6, 2025
  • How to Disable (Enable) Credential Guard in Windows 11

    October 6, 2025
  • Wrong Network Profile on Windows Server after Reboot

    September 30, 2025
  • How to Get Windows 10 Extended Security Updates After End-Of-Life

    September 24, 2025
  • Blocking NTLM Connections on Windows 11 and Windows Server 2025

    September 23, 2025
  • Windows Stucks at ‘Getting Windows Ready, Don’t Turn Off Computer’

    September 15, 2025

Follow us

  • Facebook
  • Twitter
  • Telegram
Popular Posts
  • Converting Windows 10 to Enterprise LTSC Without Losing Data
  • Permanently Disable Driver Signature Enforcement on Windows 11
  • How to Remove ‘Some Settings are Managed by Your Organization’ on Windows 11 or 10
  • Fix: Windows Update Tab (Button) is Missing from Settings
  • Fix: Your IT Administrator Has Limited Access to Virus & Threat Protection
  • How to Add or Reinstall the Microsoft PDF Printer on Windows
  • Fix: Multiple Connections to a Server or Shared Resources by the Same User
Footer Logo

@2014 - 2024 - Windows OS Hub. All about operating systems for sysadmins


Back To Top