You can use the standard SNMP protocol to monitor the health of VMWare ESXi hosts. This article shows you how to enable and configure the SNMP agent on VMWare ESXi 8.0 hosts and add them to your existing monitoring system (this guide applies to all versions of ESXi, including 6.7 and 7.0).
The built-in SNMP agent in ESXi can be configured from the esxcli command line or with the VMware PowerCLI PowerShell module, but not from the vSphere Client GUI.
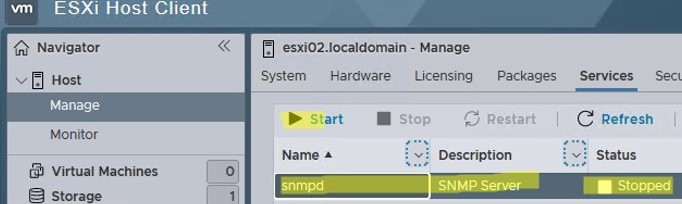
Enable and Configure SNMP Server on VMware ESXi
Open the ESXi Host client web interface and start the SNMP Serer service (snmpd): ESXi Host Client -> Manage -> Services -> SNMP Server (the service is stopped by default).
Enable SSH on the ESXi host and connect to it using any SSH client.
Lists the current setting of the SNMP agent:
esxcli system snmp get
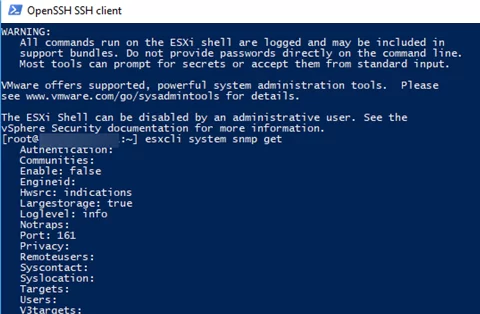
SNMP is not configured: all parameters are empty and the agent is disabled.
Authentication:
Communities:
Enable: false
Engineid:
Hwsrc: indications
Largestorage: true
Loglevel: info
Notraps:
Port: 161
Privacy:
Remoteusers:
Syscontact:
Syslocation:
Targets:
Users:
V3targets:
Set your monitoring server IP address (SNMP target), port (161 UDP by default), and SNMP community name (usually, public):
esxcli system snmp set --targets=192.168.99.99@161/public
If you want to allow access to more than one monitoring host, enter them separated by commas:
esxcli system snmp set --targets=192.168.99.99@161/public,192.168.14.14@161/public
Set the SNMP community name:
esxcli system snmp set --communities YOUR_COMMUNITY_STRING
You can also specify the device location:
esxcli system snmp set --syslocation "Allee 16, Mun, DE"
Set contact information:
esxcli system snmp set --syscontact admin@woshub.com
Then enable SNMP service on the ESXi host:
esxcli system snmp set --enable true
To test the SNMP configuration:
esxcli system snmp test

Restart the SNMP agent to apply the new settings:
/etc/init.d/snmpd restart

esxcli system snmp set –r
To disable SNMP:
esxcli system snmp set --disable true
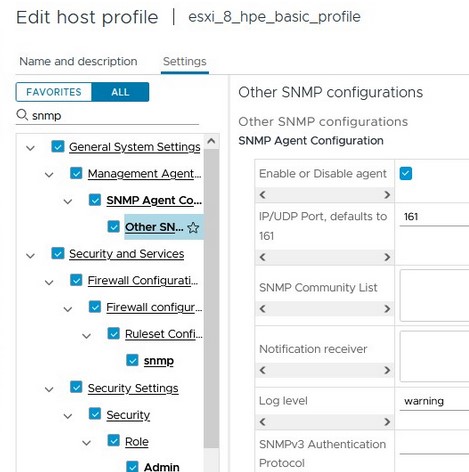
If you have a VMWare Enterprise Plus license, you can configure the SNMP option on ESXi hosts through Host Profiles (Policies and Profiles -> Host Profiles -> your_profile_name-> Other SNMP Agent Configuration).
Configure the following SNMP agent options here:
- Enable or Disable agent: check the option
- IP/UDP Port: 161
- SNMP Community String: public
- Notification Receiver: specify your monitoring host address in the format 192.168.1.100@161/public
ESXi Firewall Configuration for SNMP Traffic
There are two ways to allow SNMP traffic in the ESXi host firewall. You can allow SMNP requests to be received from any device on the network:
esxcli network firewall ruleset set --ruleset-id snmp --allowed-all true
 esxcli network firewall ruleset set --ruleset-id snmp --enabled true
Or you can allow inbound traffic from an IP address of your monitoring server or an IP subnet where your SNMP targets are located:
esxcli network firewall ruleset set --ruleset-id snmp --allowed-all false
 esxcli network firewall ruleset allowedip add --ruleset-id snmp --ip-address 192.168.100.0/24
 esxcli network firewall ruleset set --ruleset-id snmp --enabled true
You are now ready to monitor your ESXi hosts.
Set SNMP Settings on VMware ESXi Host with PowerShell
If you need to quickly enable SNMP settings on multiple ESXi hosts, you can use the PowerShell script:
$ESXi = 'mun-esxi01'
 $Community = 'Public'
 $Target = '192.168.99.99'
 $Port = '161'
 # Connect to an ESXi host
 Connect-VIServer -Server $sESXiHost
 # Clear current SNMP settings
 Get-VMHostSnmp | Set-VMHostSnmp -ReadonlyCommunity @()
 # Set SNMP parameters
 Get-VMHostSnmp | Set-VMHostSnmp -Enabled:$true -AddTarget -TargetCommunity $Community -TargetHost $Target -TargetPort $Port -ReadOnlyCommunity $Community
 # List the current SNMP parameters
 $Cmd= Get-EsxCli -VMHost $ESXiHost
 $Cmd.System.Snmp.Get()
Configure SNMPv3 on VMWare ESXi
In the previous section, we looked at how to enable and configure SNMP agents v1 and v2 on ESXi hosts. The more modern and secure version of SNMP v3 is supported starting with VMware ESXi 5.1.
Enable support for authentication and encryption protocols for SNMP:
esxcli system snmp set -a MD5 -x AES128
Generate SNMP authentication and encryption password hashes (replace authpass1 and privhash1 with the password you want):
esxcli system snmp hash --auth-hash authpass1 --priv-hash privhash1 --raw-secret
![]()
Copy the value of the resulting hashes (authhash1 and privhash1) into the following command to create an SNMP user (snmpuser):
esxcli system snmp set -e yes -C snmp@woshub.com -u snmpuser/authhash1_value/privhash1_value/priv
Then specify the SNMP target address:
esxcli system snmp set --v3targets 192.168.99.99@161/snmpuser/priv/trap
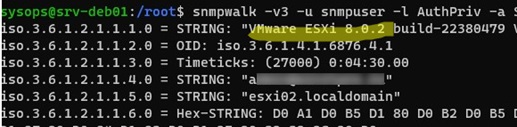
You can check the SNMP configuration remotely using the Linux snmpwalk tool:
snmpwalk -v3 -u snmpuser -l AuthPriv -a SHA -A authpass1 -x AES-X privhash1 192.168.1.120
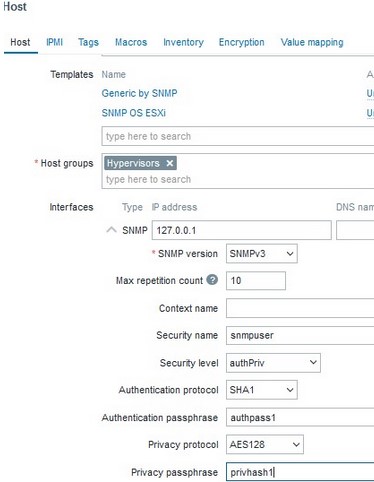
You are now ready to add an ESXi host to your monitoring app. For example, the Zabbix network monitoring solution provides out-of-the-box VMware ESXi monitoring via API (predefined template) without using SNMP.
You can download and import the Zabbix template for ESXi with SNMP support here (https://www.zabbix.com/integrations/vmware#3rd_party).
Then add a new ESXi host in Zabbix and configure the SNMPv3 connection settings.
2 comments
Thank you so much! It works perfectly at WhatsUpGold
Best regards
Muchas
gracias