An email system based on on-premises Exchange Server or Exchange Online (Microsoft 365) allows an administrator to block (reject) e-mails from specific external domains or sender addresses. There are several features in Exchange Server and Microsoft 365 that you can use to create a blacklist of unwanted domains and email addresses from which you want to block incoming e-mails. In this article, we’ll look at how to configure a blocked senders list from the Exchange Admin Center (EAC) GUI or from PowerShell.
The following is a summary table of the sender blocking methods that are available in EOL (M365) and in the on-premises Exchange Server.
| On-premises Exchange Server | Exchange Online (Microsoft 365) | |
| Sender Filter | + | |
| Blocking senders using transport rules (mail flow rules) | + | + |
| Individual block lists in user mailboxes | + | + |
| Tenant Allow/Block List in EOL | + |
Configure Sender Filter Agent on Exchange Server
You can use the Anti-Spam Agent’s built-in filter in on-premises Exchange Server to configure sender blacklists. The Transport service in Exchange Server allows you to use anti-spam agents to filter incoming e-mail messages. These agents are not installed by default. To install them, run the following script on a Mailbox server:
& $env:ExchangeInstallPath\Scripts\Install-AntiSpamAgents.ps1
Restart the Exchange Transport service:
Restart-Service MSExchangeTransport
This PowerShell script installs several Exchange antispam agents, including the Sender Filter agent. The Sender Filter agent allows you to specify a list of domains and sender addresses that you do not want to receive e-mail from.
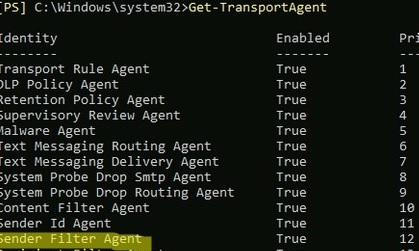
List installed agents:
Get-TransportAgent
In order to enable the Recipient Filter Agent, run:
Enable-TransportAgent "Recipient Filter Agent"
All other antispam agents can be disabled (if you don’t use them):
Disable-TransportAgent "Content Filter Agent"
 Disable-TransportAgent "Sender Id Agent"
 Disable-TransportAgent "Sender Filter Agent"
 Disable-TransportAgent "Protocol Analysis Agent"
Enable the sender filtering agent:
Set-SenderFilterConfig -Enabled $true
If you only want to filter external senders, you should run this command:
Set-SenderFilterConfig -ExternalMailEnabled $true
You can now specify a list of email addresses that you want to block.
Set-SenderFilterConfig -BlockedSenders info@emailing.com,admin@bad-domain.org
You can block all senders from specific domains and all subdomains:
Set-SenderFilterConfig -BlockedDomainsAndSubdomains spammers.com,masssend.net
To get the list of blocked email addresses, run the command:
Get-SenderFilterConfig |fl BlockedSenders,BlockedDomains,BlockedDomainsAndSubdomains
If you want to add new entries to the list of blocked domains/addresses, use:
Set-SenderFilterConfig -BlockedSenders @{Add="spam_user@contoso.com"}
Or
Set-SenderFilterConfig -BlockedDomainsAndSubdomains @{Add="block_me.net","spammers.com","fb.com"}
To remove the specific email addresses from the Exchange blacklist, run these commands:
Set-SenderFilterConfig -BlockedSenders @{Remove="spam_user@contoso.com","some@gmail.com"}
This will only remove the addresses you specify, not the whole list.
Or:
Set-SenderFilterConfig –BlockedDomainsAndSubdomains @{Remove="block_me.net","spammers.com"}
Set-ContentFilterConfig -Enabled $true
 Set-ContentFilterConfig -ExternalMailEnabled $true
 Set-ContentFilterConfig -BypassedSenderDomains microsoft.com
 Set-ContentFilterConfig -BypassedSenders jkarlin@gmail.com
 IPAllowListEntry -IPAddress 123.45.67.89
Use Exchange Mail Flow Rules to Block Email
In EOL and Exchange Server, you can use Exchange mail flow rules (transport rules) to block e-mail from specific senders or domains. You can create mail rules from the Exchange Admin Center web interface.
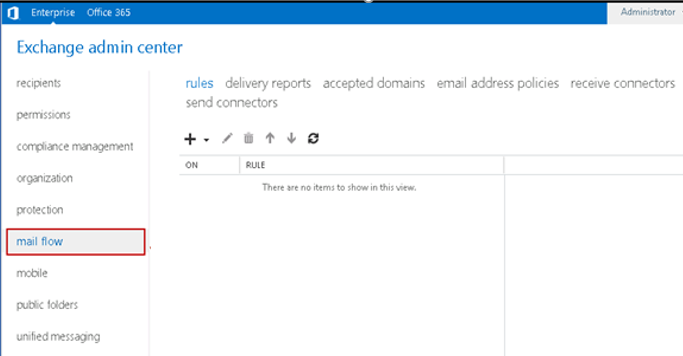
If you are using the classic EAC interface:
- Navigate to the Mail flow;

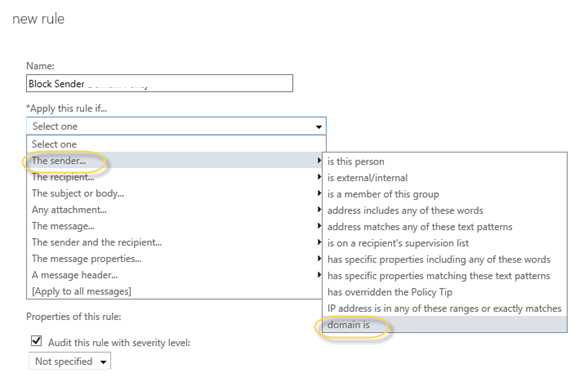
- Create a new rule. Add the condition The sender -> is the person or domain is and specify the sender email addresses or domains to block;
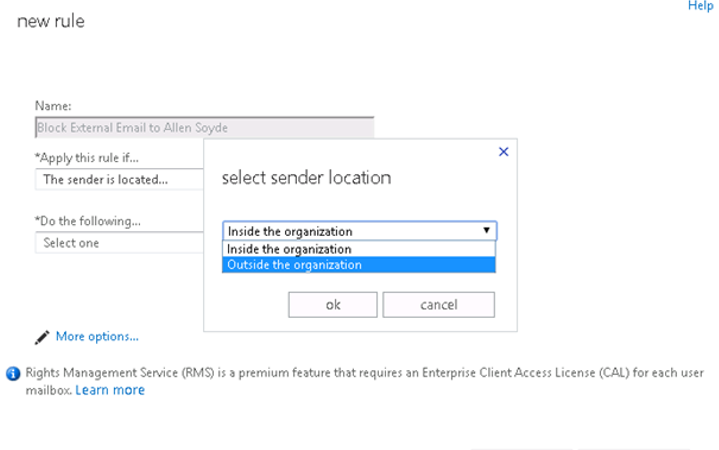
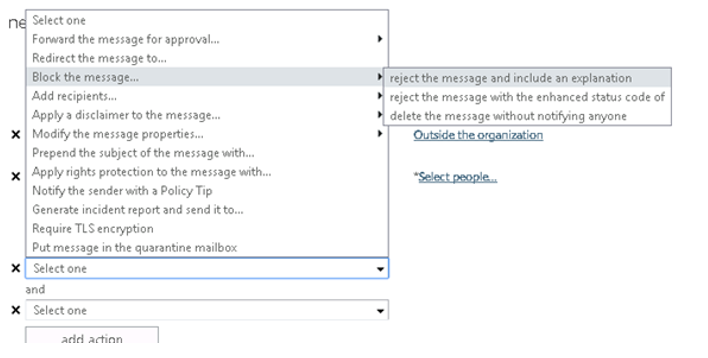
- If you want to block all external emails, select the option The sender is located… -> Outside the organization. Click More options;
- Then add the action -> Block the message. You can block an email and send an NDR to the sender (Reject the message and include an explanation), NDR with the error code, or delete the e-mail message without sending any notification;
- Specify the rule priority and save it.
In the EOL, the new Exchange Admin Centre is used to add a new transport rule:
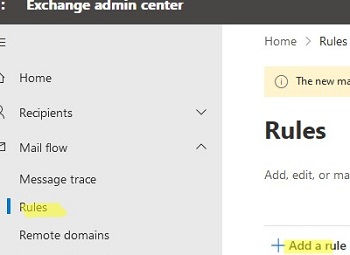
- Navigate to Mail flow -> Rules —> Add a rule;

- Select the rule Restrict messages by sender or recipient;
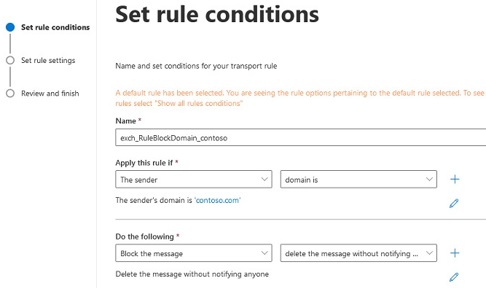
- Set the rule name;
- Apply this rule if -> domain is -> specify the names of the domains you want to block (you can add multiple domains in a transport rule);
- In the Do the following field, select Block the message and specify whether the NDR should be sent to the sender (for example, select reject the message with the enhanced status code and specify 5.7.1;

- Then select Rule mode -> Enforce;
- The new transport rule is disabled by default. Enable it in EAC.
All emails from the specified domains will now be rejected by EOL. You can see the name of the transport rule that rejected the email in the Microsoft 365 tracking logs:
Office 365 received this message but couldn't deliver it to the recipient (info@contoso.com). This happened because an email admin for your organization set up the following mail flow rule that rejected the message: Mail flow rule: exch_RuleBlockDomain_contoso
![]()
You can create a transport rule in Exchange tenant using PowerShell. Connect to your Exchange organization, and run the following command to create a new mail flow rule to block multiple domains:
New-TransportRule -Name 'Block Spammers' -Comments 'Rule to block spammers' -Priority '0' -Enabled -FromAddressContainsWords 'info@nwtraders.msft' -DeleteMessage $true
Or:
$list1 = @('contoso.com','nwtraders.msft',)
 New-TransportRule -Name "block_sender_domain" -RecipientAddressMatchesPatterns $list1 RejectMessageEnhancedStatusCode '5.7.1' -RejectMessageReasonText "Blocked recipients"
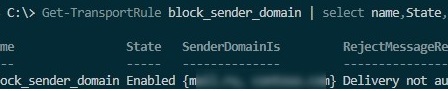
View information about the transport rule:
Get-TransportRule block_sender_domain | select name,State,SenderDomainIs,RejectMessageReasonText
Block Senders Using the Tenant Allow/Block List
You can block the sender list using the Tenant Allow/Block List feature in Exchange Online.
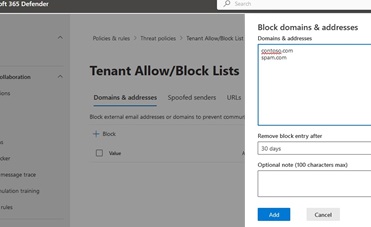
- Sign in to the Microsoft 365 Defender https://security.microsoft.com.
- Navigate to Policies & rules -> Threat policies -> Tenant Allow/Block List;
- Click the Block button and add a list of email addresses and domains to be blacklisted;

- A separate rule is created for each entry
You can also add addresses to the Tenant Allow/Block list using PowerShell:
New-TenantAllowBlockListItems -ListType Sender -Block -Entries 'spam@contoso.com','info@contoso.com' -NoExpiration
Display blocked addresses:
Get-TenantAllowBlockListItems -ListType Sender -Block|select value,ExpirationDate

Users in the organization will no longer be able to send e-mails to these addresses and the senders will receive an NDR:
5.7.1 Your message can't be delivered because one or more recipients are blocked by your organization's tenant allow/block list policy.
How to Blacklist Senders in Outlook?
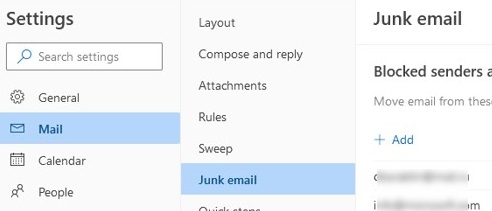
You can block senders in a specific user’s mailbox, rather than at the level of the entire Exchange organization/tenant. The list of trusted and blocked users can be set in OWA (Settings -> Mail-> Junk email). To block an email address, simply add the address or domain to the Blocked Senders list and save the changes.
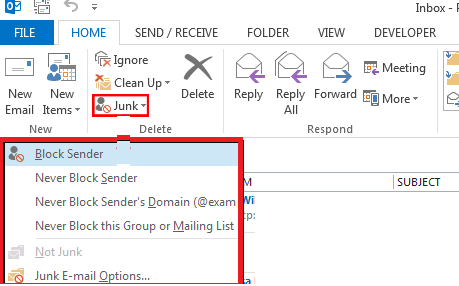
The same can be done in Outlook. Go to the Home tab in Outlook 365/2019/2016, click the Junk drop-down list, and select Junk E-mail Options.
Add the e-mail addresses or domains from which you do not want to receive e-mail in the Blocked Senders tab.
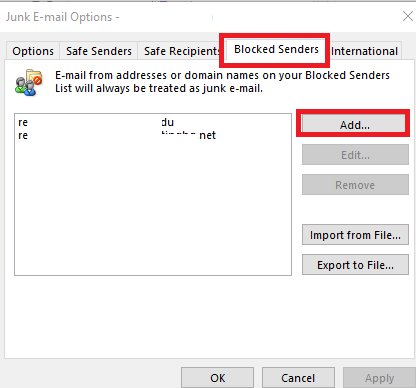
E-mails from this sender are automatically moved to the Junk Email folder of the user mailbox.
And the following message will appear in the tracking logs:
The message was delivered to the Junk Email folder: FilteredAsSpam
![]()
An Exchange administrator can manage the list of blocked domains and SMTP addresses for a specific mailbox using PowerShell. You can add a new sender address to the Junk list:
Set-MailboxJunkEmailConfiguration -Identity jrobinson –BlockedSendersandDomains @{Add="spam_user@contoso.com"}
Or you can remove the specific email address from the blocked sender’s list:
Set-MailboxJunkEmailConfiguration -Identity jrobinson –BlockedSendersandDomains @{Remove="spam_user@contoso.com"}
Display a list of blocked addresses:
Get-MailboxJunkEmailConfiguration –Identity jrobinson | FL BlockedSendersandDomains

Clear the list of blocked senders:
Set-MailboxJunkEmailConfiguration -Identity jrobinson -BlockedSendersAndDomains $null
1 comment
Hi, thanks. However can you block IP adresses from the sending server (found in header data of the mail) if they spoof the email adress?