Microsoft has decided to add a built-in Microsoft Teams Chat client to Windows 11, and its icon is shown in the taskbar by default. If you don’t use Microsoft Teams, you can uninstall the app and remove the Chat icon from the taskbar.
![]()
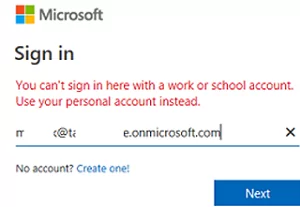
You can’t sign in with a work or school account. Use your personal account instead.
How to Remove Microsoft Teams Chat Icon from Taskbar in Windows 11?
If you don’t want to uninstall the Teams Chat client, you can just disable its automatic startup and hide its icon from the taskbar.
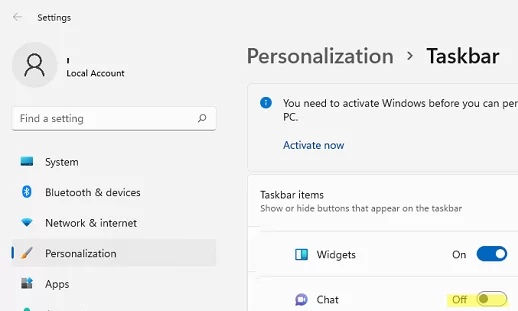
To hide the Teams Chat icon from the taskbar, go to Settings -> Personalization -> Taskbar (you can run the quick access URI command: ms-settings:taskbar) and disable Chat.
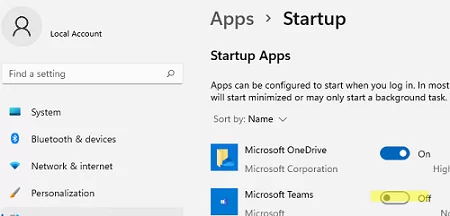
In order to disable Microsoft Teams autostart, go to Settings -> Apps -> Startup (ms-settings:startupapps).
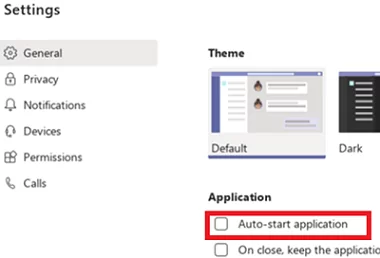
Note that it is not enough just to disable Teams autostart in the Settings or Task Manager -> Startup. If you run the Teams client, it will automatically be added to startup.
When you upgrade to the next Windows 11 build, the Teams Chat may return to the taskbar and autostart. So, you can use other ways to hide the Teams icon from the taskbar.
- New GPO administrative templates (ADMX) for Windows 11 have got the Configure the Chat icon on the taskbar option (under Computer Configuration -> Administrative Templates -> Windows Component -> Chat). If you set this policy option to Disabled, the Teams icon won’t appear in the taskbar;

- You can also hide the Teams Chat icon using the registry:
reg add "HKEY_LOCAL_MACHINE\SOFTWARE\Policies\Microsoft\Windows\Windows Chat" /f /v ChatIcon /t REG_DWORD /d 3
How to Completely Uninstall Teams in Windows 11?
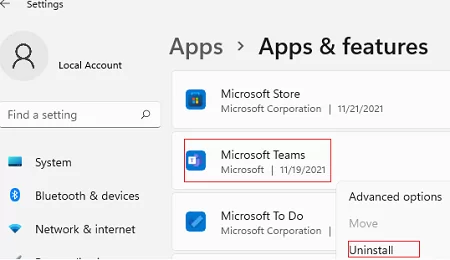
To uninstall the APPX client of Teams Chat for the current user, go to Settings -> Apps -> Apps and features (ms-settings:appsfeatures). Find Microsoft Teams in the list of installed apps and remove it (by clicking Uninstall in the menu).
But this will remove the Teams app for the current user only. If you want to uninstall Teams for all users and remove it from your Windows 11 image (as a Staged app), use PowerShell:
Get-AppxPackage MicrosoftTeams*|Remove-AppxPackage -AllUsers
 Get-AppxProvisionedPackage -online | where-object {$_.PackageName -like "*MicrosoftTeams*"} | Remove-AppxProvisionedPackage -online –Verbose

Dir “C:\Program Files\WindowsApps”| where-object {$_.Name -like "*MicrosoftTeams*"}
Learn more about how to uninstall built-in UWP/APPX apps in Windows.
After uninstalling Teams, you can disable its automatic installation:
reg add HKLM\SOFTWARE\Microsoft\Windows\CurrentVersion\Communications /v ConfigureChatAutoInstall /t REG_DWORD /d 0 /f
It is noteworthy that Teams Chat is not built-in into the Windows 11 install image. This APPX is downloaded and installed automatically after the Windows setup is complete. Therefore, you will not be able to remove it from the Windows installation image (install.wim) using this method.
Currently, the only way to prevent automatic Teams Chat installation is to enable the ConfigureChatAutoInstall registry parameter during Windows setup.
You can create the AutoUnattend.xml file and copy it to the root of the Windows 11 installation image/flash drive (like it is described in the article How to Install Windows 11 Without TPM and Secure Boot Checks). Here is a part of the AutoUnattend file to prevent Teams Chat installation:
<RunSynchronousCommand wcm:action="add">
<Order>1</Order>
<Path>reg add HKLM\Software\Microsoft\Windows\CurrentVersion\Communications /v ConfigureChatAutoInstall /t REG_DWORD /d 0 /f</Path>
</RunSynchronousCommand>
5 comments
Hi,
When running the following registry edit, getting access denies, even I am logged in as local administrator and running it as Administrator. I tried to create it manually and still gets the same access denied error
reg add HKLM\SOFTWARE\Microsoft\Windows\CurrentVersion\Communications /v ConfigureChatAutoInstall /t REG_DWORD /d 0 /f
We faced the same problem, only TrustedInstaller can make changes in “Communications” directory in W11. Microsoft support couldn’t help.
Try to take ownership of registry key from TrustedInstaller
^^^ Yes, this. I would open registry editor of your choice and replace ownership to local administrators.
Apparently this key is protected by WRP now. Really convenient, Microsoft…. Haven’t been able to change ownership on it either from pwsh or regedit. Seems like you have to inject them during image build now if you want to avoid this delightful behavior from ever growing pile of doodoo that is Windows 11