In Windows, services are used to run app binaries in the background, typically without requiring user interaction. Services can automatically start during Windows boot and run continuously in the background until system shutdown. This post explains how to create a new system service from an executable binary file.
There are several built-in Windows tools that allow administrators to create new services via the command prompt. These include the sc.exe console command and the New-Service PowerShell cmdlet.
The following command will create a new service from the specified executable file with additional arguments:
sc create CorpCollectorService binPath= "C:\Program Files (x86)\CORP\collector.exe -i C:\tools\config.xml" start= auto DisplayName= "CORP Log Collector Service"
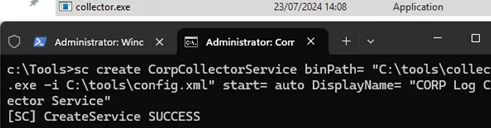
If the command is executed successfully, a message will appear:
[SC] CreateService SUCCESS
The following arguments are used:
-
CorpCollectorService– new service name -
binPath– contains the full path to the executable file, along with any required launch arguments (in quotation marks if there are any spaces) -
start= auto– start the service automatically at Windows boot (boot|system|auto|demand|disabled). -
DisplayName— service display name
Additional parameters can be used:
type— type of service. By default, own is used, meaning that the service runs in its own process. You can also specify here:own|share|kernel|filesys|adapt|rec|interact- By default, the service runs on behalf of Local System. If you need to run the service on behalf of a specific user account, specify the username and password using the options:
obj= "woshub\user1" password= "myUserPassw0r1"
Now, open the Services graphical service management snap-in (services.msc). The new service will appear in the list of services (press F5 to refresh the Service Manager database). Here you can start or stop the service, or change the startup type. 
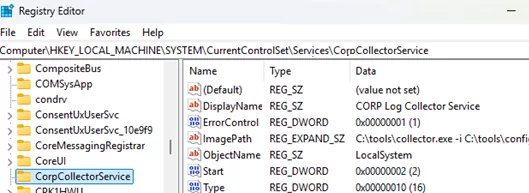
All service settings are stored under the HKEY_LOCAL_MACHINE\SYSTEM\CurrentControlSet\Services\ registry key. The CorpCollectorService subkey was created automatically for the new service.
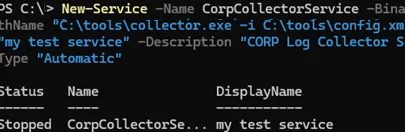
Here is a similar PowerShell command for creating a new service:
New-Service -Name CorpCollectorService -BinaryPathName "C:\Program Files (x86)\CORP\collector.exe -i C:\tools\config.xml" -DisplayName "my test service" -Description "CORP Log Collector Service" -StartupType "Automatic"
If you need to configure a username and password to start the service, use the following syntax:
$username = "user123"
 $password = "PaSSw0rd1"
 $securepassword = ConvertTo-SecureString $password -AsPlainText -Force
 $cred = New-Object System.Management.Automation.PSCredential ($username, $securepassword)
 New-Service … -Credential $cred
sc delete service_name1
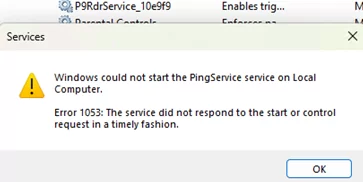
Note that not all executable binaries can operate successfully as Windows services. The application must be specifically designed to operate as a service that responds to commands from the Service Control Manager (SCM). Error 1053 will appear when attempting to start a service that is unable to handle SCM control signals:
Windows could not start the MyService1 service on Local Computer.
Error 1053: The service did not respond to the start or control request in a timely fashion.
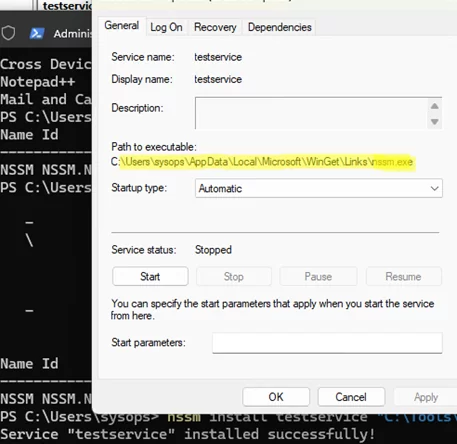
Several third-party tools can be used to create a service from a program that is not designed to run in Windows service mode (including those with graphical interfaces). The Windows Server Resource Kit 2003 included srvany.exe and instsrv.exe commands, which could be used to create a service from any binary. However, it is now preferable to use the modern NSSM (Non-Sucking Service Manager) tool. Unlike legacy Microsoft tools, it monitors running app processes and offers advanced process management capabilities. NSSM can run any app, script, or executable as a reliable background Windows Service, and automatically restart it if it crashes.
NSSM can be installed using the WinGet package manager:
winget install --id NSSM.NSSM -e
Now, to create a service from any executable, run:
nssm install testservice "C:\Tools\collector.exe"
Note that in the new service’s properties, nssm.exe serves as the executable launcher for your application binary.
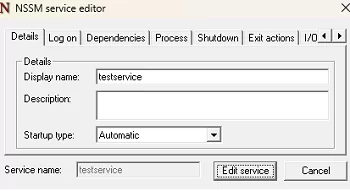
NSSM provides a simple GUI that enables convenient configuration of service parameters.
For example, to edit a previously created service, run:
nssm edit testservice