For security reasons, the clipboard is disabled by default in the VMware vSphere Client. This means that you cannot use copy/paste operations between the OS and your computer when you are connected to the VMware virtual machine console. This article explains how to enable clipboard copy and paste for a VMware VM.
Copy, Paste, Drag-and-Drop Features Not Working in VMware Workstation
By default, VMware Workstation allows you to use the clipboard for copy/paste operations through the Virtual Machine Management Console.
Check the following if the clipboard does not work for any reason:
- Make sure that VMware Tools are installed in the virtual machine and update them if necessary;
- Check that the clipboard and drag-and-drop settings are enabled in the VM settings.
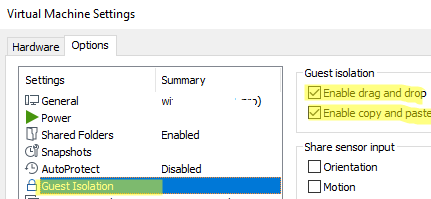
- Open VMware Workstation -> VM -> Settings -> Options tab;
- Select Guest Isolation;
- There are two checkboxes here:
Enable drag and drop
Enable copy and paste
Enable them both and save VM settings.

- Start your VM.
You can now use the clipboard to copy/paste files and text between your host and guest OS in a VMware Workstation virtual machine.
Alternatively, you can enable these options manually in the virtual machine’s VMX file.
isolation.tools.copy.disable = "FALSE"
isolation.tools.dnd.disable = "FALSE"
isolation.tools.paste.disable = "FALSE"
isolation.tools.hgfs.disable= "FALSE"
Enabling Clipboard Copy and Paste in VMware ESXi
Now let’s look at enabling the clipboard in the VMware vSphere Web Client or VMware ESXi Host Client (HTML5-based).
- For the clipboard to work in an ESXi virtual machine, VMTools must be installed in the guest OS;Linux VMs require open-vm-toolbox or open-vm-tools to be installed. Check they are installed (for Ubuntu):
$ sudo service vmware-tools status - Power off your virtual machine;
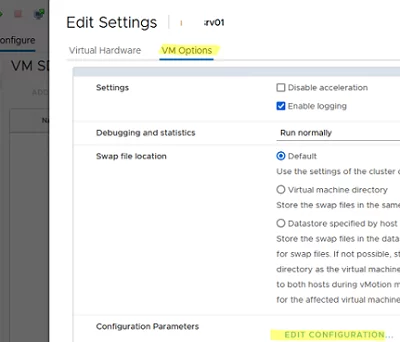
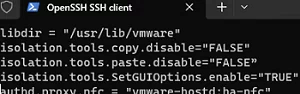
- Open the VM settings. Go to the VM Options -> Advanced -> Edit Configuration;

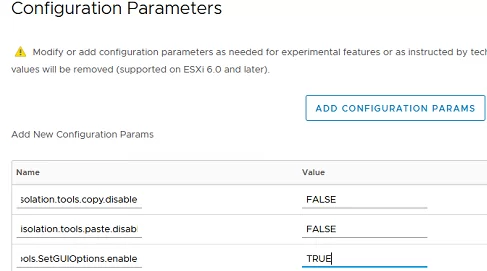
- Click Add Configuration Params and add three options:
isolation.tools.copy.disable = FALSE
isolation.tools.paste.disable = FALSE
isolation.tools.setGUIOptions.enable  = TRUE
- Save the changes and power on the VM;
- Ensure that the clipboard now works for this VM so that you can copy and paste content via VMRC.
The VMX configuration file of the virtual machine on the datastore can also be used to enable these parameters.
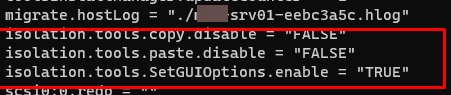
- Connect to the ESXi host using SSH;
- Edit the virtual machine VMX file using vi:
# vi /vmfs/volumes/volume_id/mun-srv01/mun-srv01.vmx - Add the lines:
isolation.tools.copy.disable="FALSE"
isolation.tools.paste.disable="FALSE"
isolation.tools.SetGUIOptions.enable="TRUE"
- Save the changes and run the VM.
You can enable the clipboard for all VMs on an ESXi host at once.
- First, backup the /etc/vmware/config file:
# cp /etc/vmware/config /etc/vmware/config_bak - Edit the file:
# vi /etc/vmware/config - Add the lines:
vmx.fullpath = "/bin/vmx"isolation.tools.copy.disable="FALSE"
isolation.tools.paste.disable="FALSE"
isolation.tools.SetGUIOptions.enable="TRUE"
- Reboot the ESXi host.
You can also enable clipboard options using PowerShell.
- Install the VMware PowerCLI module on your computer:
Install-Module -Name VMware.PowerCLI - Connect to vCenter or ESXi:
Connect-VIServer <FQDN_of_vCenter_or_ESXi_host> - Enable the following options for your VM:
$VM = Get-VM -Name mun-srv01
 New-AdvancedSetting -Entity $VM.name -Name isolation.tools.copy.disable -Value False -Confirm:$false -Force:$true
 New-AdvancedSetting -Entity $VM.name -Name isolation.tools.paste.disable -Value False -Confirm:$false -Force:$true
 New-AdvancedSetting -Entity $VM.name -Name isolation.tools.setGUIOptions.enable -Value True -Confirm:$false -Force:$true
If the clipboard doesn’t work in the HTML version of your VMware client, try to install VMRC on your computer and use it to connect to the VM.

1 comment
This worked for ESXi 8. Add the following lines to the config file:
isolation.tools.copy.disable=”FALSE”
isolation.tools.paste.disable=”FALSE”
isolation.tools.SetGUIOptions.enable=”TRUE”
The first line wasn’t necessary:
vmx.fullpath = “/bin/vmx”