Some native print drivers, especially those for legacy printer models, can often be challenging to find and download from the Internet. Many vendors often remove support pages with driver download links from their websites when deprecating support for older printer models. If you have a healthy Windows system with the required print drivers installed, you can extract drivers and import them to other machines. This post explains how to extract installed printer drivers from a Windows machine.
How to Export (Backup) Printer Drivers Using the Print Management Console
Windows provides a built-in Print Management MMC snap-in (printmanagement.msc) for advanced administration of the printing subsystem.
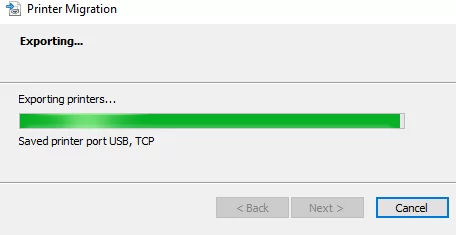
The Migration Wizard built into the console allows you to export the printers installed on your computer, along with their drivers and print queues. This wizard is typically used to migrate a configured print server to a different machine.
To start the printer export wizard:
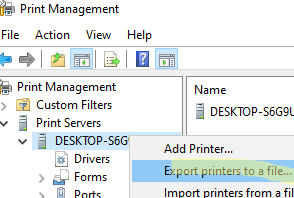
- Open the Print Management console by running the command
printmanagement.msc - Expand the Print Servers section
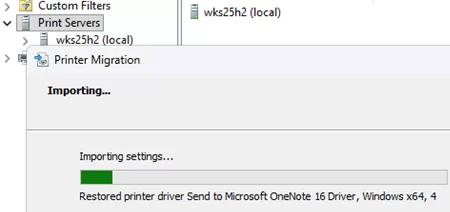
- Right-click on the computer name and select Export printers to a file

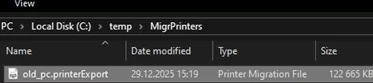
- Specify the destination folder and file name for your exported print server settings (the Printer Migration file’s extension is
.printerExport) - Once the export is complete, copy the compressed *.printerExport file to another computer
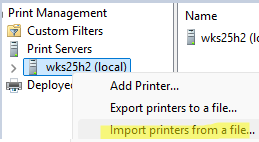
- Then, open the Print Management console on the target computer and select Import printers from a file from the menu.
- The wizard automatically imports and restores all printer configurations, including drivers and print queues, from the source computer to the target system.
The same export and import operations for print server configurations can be performed from the command line using the built-in Printbrm.exe tool.
Export the print server configuration to a file.
cd C:\Windows\System32\Spool\Tools\
 Printbrm.exe -b -f C:\TMP\backup.printerExport
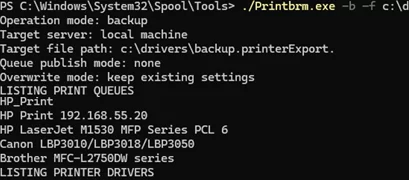
To import (restore) print server settings from a file on another computer, run:
Printbrm -r -f C:\TMP\backup.printerExport
Thus, the Print Management console can be used to export and import all the printers installed on a computer, including their drivers and settings. This is helpful when migrating a lot of printers to a new print server. However, this method doesn’t support exporting only print drivers, as it always restores the complete set of drivers and printers from the source print server to the target machine
Extract Installed Printer Drivers Using PowerShell
With PowerShell, you can only extract the print drivers installed on a machine. This approach is more convenient if you only want to extract the device drivers without restoring the original printers and their configurations on the target system.
The built-in Windows PowerShell cmdlet Export-WindowsDriver enables exporting all installed third-party drivers from a system to a specified folder. To back up all the drivers installed in the Driver Store, open a PowerShell console as an administrator, and specify the target folder to which you want to export them:
Export-WindowsDriver –Online -Destination C:\BackUp\Drivers
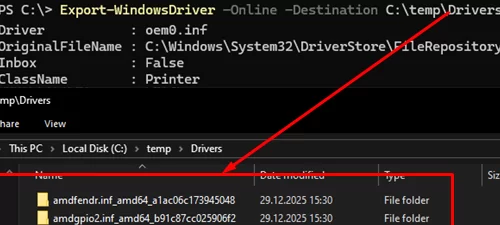
This cmdlet creates a separate folder for each third-party driver installed on a computer and exports all associated driver files into it. The target directory will contain subfolders for all the installed third-party drivers, including print, network, video, and other device drivers. To install an exported print driver on a target system from such a backup, you must first locate it among the driver list, which can be difficult due to non-descriptive INF file names.
It would be more practical to export only print drivers. In the next section, we’ll explain how to use PowerShell to extract drivers for one specific printer or all printers at once.
How to Export Only a Specific Printer Driver
The pnputil /export-driver command allows you to export only a specific driver (with all associated files) from the Driver Store by its INF file name (for example, oemN.inf). However, this command is not always suitable for exporting a printer driver installed in Windows. This is because, in most cases, printer drivers are not registered in the Windows driver store as OEM driver packages (oemN.inf). These printer drivers can be copied manually from the C:\Windows\System32\DriverStore\FileRepository\ folder.
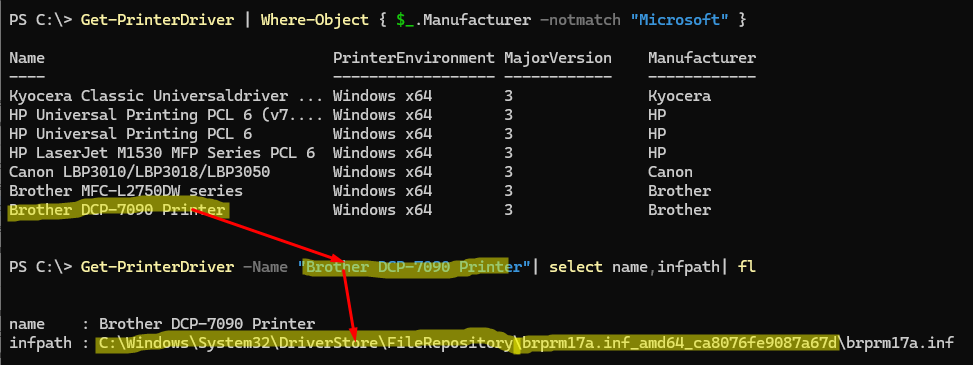
To list the installed printer drivers (excluding built-in Microsoft drivers such as Microsoft Print to PDF, Remote Desktop Easy Print, etc.), run this PowerShell command:
Get-PrinterDriver | Where-Object { $_.Manufacturer -notmatch "Microsoft" }
Copy the name of the required printer, then determine the full path to its INF file to identify the directory where its driver is stored:
Get-PrinterDriver -Name "Brother DCP-7990 Printer "| select name,infpath| fl
Navigate to the specified directory. This directory contains the driver files for the specified printer. Manually copy the driver directory to another computer.
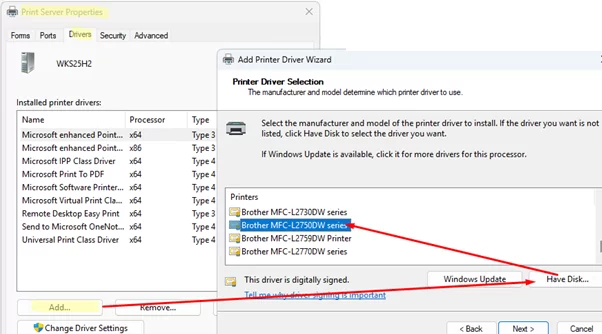
To install this driver on another computer, use the Print Management snap-in printmanagement.msc or the Print Server Properties dialog (run the printui /s command, go to the Drivers -> Add -> specify the path to the INF file -> select the printer model).
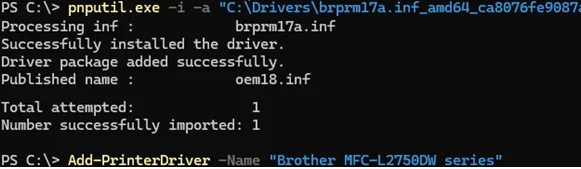
Or add the printer driver using PowerShell:
pnputil.exe -i -a "C:\Drivers\BrDCp7090\brprm17a.inf_amd64_ca8076fe9087a67d\brprm17a.inf"
 Add-PrinterDriver -Name "Brother DCP-7090 Printer"
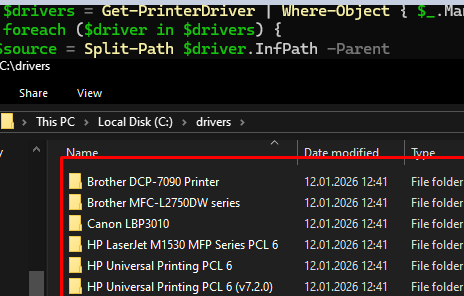
To automatically extract all print drivers installed on your system into separate folders named after each printer, use the following PowerShell script:
$targetdir="C:\BackUp\PrintDrivers"
 New-Item -Path $targetdir -ItemType Directory -Force
 $drivers = Get-PrinterDriver | Where-Object { $_.Manufacturer -notmatch "Microsoft" }
 foreach ($driver in $drivers) {
 $source = Split-Path $driver.InfPath -Parent
 $dest = "$targetdir\$($driver.Name)"
 New-Item $dest -ItemType Directory -Force
 Copy-Item "$source\*" $dest -Recurse -Force
 }
A folder named C:\BackUp\PrintDrivers will be created as a result, containing all the installed print drivers.
In summary, this guide covered both the complete migration of a configured print server to another computer and the selective export/import of specific printer drivers from a Windows host.