With PowerShell, you can automate common printer and printer driver management tasks in Windows. This guide explains how to create, delete, or share a printer from the PowerShell console; set a default printer; map a network printer; install or remove printer drivers; and manage local ports and print queues.
The built-in PrintManagement PowerShell module includes 22 cmdlets for managing printers, drivers, print ports, and queues:
Get-Command –Module PrintManagement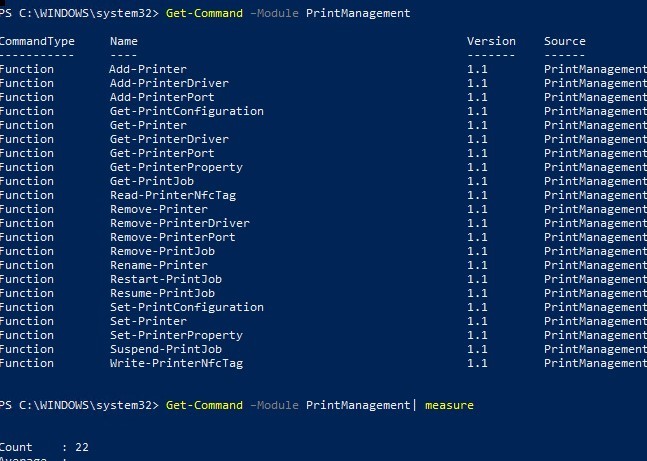
- Add-Printer – add (install) a new printer;
- Add-PrinterDriver – install a new printer driver;
- Add-PrinterPort – create a local print port;
- Get-PrintConfiguration – display the printer configuration;
- Get-Printer – list the printers installed on a computer;
- Get-PrinterDriver – list the available printer drivers;
- Get-PrinterPort – show the printer ports;
- Get-PrinterProperty – show the printer properties;
- Get-PrintJob – list the print tasks in the queue;
- Read-PrinterNfcTag – get printer information from the NFC tag;
- Remove-Printer – remove the printer;
- Remove-PrinterDriver — remove the printer driver;
- Remove-PrinterPort – remove the printer port;
- Remove-PrintJob – delete a print job on the printer;
- Rename-Printer – rename the printer;
- Restart-PrintJob – restart the print job;
- Resume-PrintJob – resume the paused print job;
- Set-PrintConfiguration – set the printer configuration;
- Set-Printer – update the printer configuration;
- Set-PrinterProperty – change printer properties;
- Suspend-PrintJob – suspend (pause) the print job;
- Write-PrinterNfcTag – write information into the NFC tag.
Adding Printer Drivers to the DriverStore
The PrintManagement module has the Add-PrinterDriver cmdlet, which allows install a printer driver from an INF file. In fact, this cmdlet only allows adding drivers to an offline Windows image (just like the Add-WindowsDriver command, which lets you integrate drivers into offline Windows images).
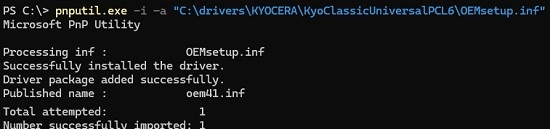
To install a printer driver from an INF file, use the pnputil console command. Download the drivers for your printer model from the vendor’s website and extract them to a local folder. Then install the driver:
pnputil.exe -i -a "C:\drivers\KYOCERA\KyoClassicUniversalPCL6\OEMsetup.inf"
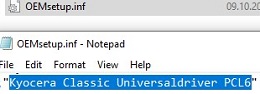
Once the driver has been installed in the Windows Driver Store, it must be added to the list of available drivers for the print server:
Add-PrinterDriver -Name "Kyocera Classic Universaldriver PCL6"
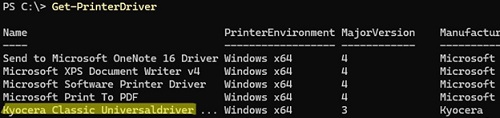
List available print drivers:
Get-PrinterDriver
How to Install Printer with PowerShell
Before creating a new printer, you must add a printer port. This can be a local port or it can be a network port (to send print jobs to a remote printer over the network). For example:
Add-PrinterPort -Name "LocalPort:" -ErrorAction -Verbose
Or specify the remote printer IP or print server name as the PrinterHostAddress.
Add-PrinterPort -Name "IP_192.168.10.26" -PrinterHostAddress "192.168.10.26"
To create a new printer in Windows, specify the printer name, driver, and port:
Add-Printer -Name "Ricoh IM 2702" -DriverName "Kyocera Classic Universaldriver PCL6" -PortName USB001 -Verbose
![]()
Check that the new printer appears in the Control Panel and Settings app.

To rename the printer:
Rename-Printer -Name "Ricoh IM 2702" -NewName "Ricoh_2702"
To share a new printer over the network:
Set-Printer -Name "Ricoh IM 2702" -Shared $True -ShareName "Ricoh_2702"
Disable printer sharing:
Set-Printer -Name "Ricoh IM 2702" -Shared $False
List Printers on a Print Server Using PowerShell
List the printers installed on a computer:
Get-Printer
The command returns the printer names, types (local or network), driver, print port, whether the printer is shared, and whether it is published in Active Directory.

Most of the cmdlets in the PrintManagement module can be used to manage printers on remote computers (by using the -ComputerName parameter).
View a list of printers installed on a remote computer (print server):
Get-Printer -ComputerName rome-prnt1 | Format-List Name,DriverName
List shared printers on a computer:
Get-Printer -ComputerName rome-prnt1 | where Shared -eq $true | fl Name
Get printers that have duplex printing support:
Get-Printer | ForEach-Object { Get-PrintConfiguration -PrinterName $_.Name } | Where-Object { $_.DuplexingMode -ne "OneSided" }

List all the color printers on a computer:
Get-Printer | ForEach-Object { Get-PrintConfiguration -PrinterName $_.Name } | where {$_.Color -eq $True}
Enable color printing mode for a printer:
Get-Printer 'HP Color LaserJet 150nw' | Set-PrintConfiguration -Color $true
Connect a Network Shared Printer with PowerShell
To connect a shared printer from a print server to a computer:
Add-Printer -ConnectionName \\rome-prnt1\HP3027
List the network printers connected to a computer:
Get-Printer | ?{$_.type -eq 'Connection'}
Remove a specific network printer connection:
Get-Printer -name \\rome-prnt1\HP3027| Remove-Printer -force
Remove all mapped network printers from your computer:
Get-Printer | ?{$_.type -eq 'Connection'} | Remove-Printer
Set a Default Printer on Windows
Windows automatically sets the default printer to the last printer that the user successfully printed to. To prevent Windows from reassigning the default printer, create the LegacyDefaultPrinterMode registry parameter:
Set-ItemProperty -Path "HKCU:\SOFTWARE\Microsoft\Windows NT\CurrentVersion\Windows" -Name "LegacyDefaultPrinterMode" -Value 1 –Force
Then use the following commands to set the fixed default printer:
$Printer = Get-CimInstance -Class Win32_Printer -Filter "Name='Ricoh IM 2702'"
 Invoke-CimMethod -InputObject $Printer -MethodName SetDefaultPrinter

How to Remove Printer with PowerShell
To remove a printer, use the command:
Remove-Printer -Name "HP LaserJet M1530"
You can then remove the printer driver from the print server:
Remove-PrinterDriver -Name "HP Universal Printing PCL 6"
Here are some other useful commands for sysadmin to manage typical printing tasks.
Send a test page for printing:
Invoke-CimMethod -MethodName printtestpage -InputObject (Get-CimInstance win32_printer | Where-Object Name -eq "HP LaserJet M1530")
Clear the printer queue:
Get-Printer -Name "HP LaserJet M1530" | Get-PrintJob | Remove-PrintJob
21 comments
This post was very helpful since you explained that the driver has to be in the driver store to install the driver and how to put it there. I have been able to duplicate this process but we also install the 32 bit driver on our servers so I am trying to figure out the command for the install of that driver. I run the pnputil.exe command to add the 32 bit driver and I do not get any errors and when I run the Get-PrintDriver I see the PrinterEnviroment listed so I am using the command below to try to add the printer but it fails. Am I missing something?
Add-PrinterDriver -Name “HP Universal Printing PCL 6 (v5.8.0)” -ComputerName “Servername” -PrinterEnvironment “Windows NT x86”
You didn’t specify an error that this command returns
Command looks correct, try to run it locally on the server, not remotely
Also perhaps there is a mismatch in the bitness of driver
Using the same pattern at Donald above, I get a ‘driver not in driver store’ error when I try to add the HP Universal Printing (v5.7.0) x86 driver onto a win2012 server. I added all the drivers (x86 and x64) with:
pnputil.exe -i -a “\\path\to\x64\HPUniversalDriver\*.inf”
pnputil.exe -i -a “\\path\to\x86\HPUniversalDriver\*.inf”
then:
Add-PrinterDriver –Name “HP Universal Printing PS (v5.7.0)”
Add-PrinterDriver –Name “HP Universal Printing PS (v5.7.0)” -PrinterEnvironment “Windows NT x86”
The x64 driver is added but the x86 fails. I am doing this locally on the server.
This post helped me figure out the x64 drivers, thank you much for this post.
hello, i have same issue, i add driver to drivestore with pnputil, all is ok. and when i do a Add-PrinterDriver with PrinterEnvironment “Windows NT x86″ it say the driver is not in the Driverstore …
no luck i spent hours to search how put x86 driver in my print server with command line (prefered powershell) .. but no luck ..found nothing .. only gui way ..
hope some have an answer.
best rehards
I use this VBS to install Printer Drivers on our servers:
Function InstallPrinterDriver(strPrintServer,strDriverName,strPlatform,strDriverPath,strDriverINF)
Set objWMIService = GetObject(“winmgmts:” _
& “{impersonationLevel=impersonate}!\” & strPrintServer & “rootcimv2”)
objWMIService.Security_.Privileges.AddAsString “SeLoadDriverPrivilege”, True
Set objDriver = objWMIService.Get(“Win32_PrinterDriver”)
objDriver.Name = strDriverName
objDriver.SupportedPlatform = strPlatform
objDriver.Version = 3
objDriver.DriverPath = strDriverPath
objDriver.Infname = strDriverPath & “” & strDriverINF
intResult = objDriver.AddPrinterDriver(objDriver)
if intResult<>0 then
wscript.echo “ERROR: Driver not installed correctly !! ” & intResult & ” Run as admin?”
else
wscript.echo “SUCCESS: Driver is installed ” & intResult
end if
InstallPrinterDriver = intResult
End Function
strDriverPath = “\serversharefolderdriverpath”
strDriverINF = “driver.inf”
wscript.echo strDriverName & ” (x86) ==> ” & InstallPrinterDriver(strPrintServer,strDriverName,”Windows NT x86″,strDriverPath,strDriverINF)
wscript.echo strDriverName & ” (x64) ==> ” & InstallPrinterDriver(strPrintServer,strDriverName,”Windows x64″,strDriverPath,strDriverINF)
Thank you for your helpful advice, but Powershell-way looks more simple 🙂
First thank you thank you and thank you
Perhaps you have figured out a problem i have spent all day on. What if you dont know the name of the driver? sure i know where the INF file is and i can open it in notpad ++ and find the name but what if it is cryptic or you are automating the process so clicking the INF you want to install will require a driver name.
Add-PrinterDriver -ComputerName $server -Name ????
I can pint to the INF file but that does no good. Perhaps there is a way to do it. I hope. Powershell or batch.
Thanks
I want to know this also. Is there a ways to add all printer drivers from the chosen *.inf file.
If not how does the Windows “have disk.. choose driver” dialog window work?
You can install driver using pnputil
pnputil /i /a hpprintdriver.infThey will not work against windows 2003 servers?
I get the below error
add-printer : The specified print processor is invalid.
At line:1 char:1
+ add-printer -ComputerName servername -Name Testing4 -DriverName “Generic / Text On …
+ ~~~~~~~~~~~~~~~~~~~~~~~~~~~~~~~~~~~~~~~~~~~~~~~~~~~~~~~~~~~~~~~~~~~~~~~~~~~~~~~~
+ CategoryInfo : NotSpecified: (MSFT_Printer:ROOT/StandardCimv2/MSFT_Printer) [Add-Printer], CimExceptio
+ FullyQualifiedErrorId : HRESULT 0x80070706,Add-Printer
This helped tremendously. Thanks for sharing.
[…] L’objectif de cet article sera d’installer un centralisateur de journaux d’événements Windows (logs) sur une machine virtuelle. Je vous invite dès à présent à rentrer dans un nouvel univers à l’image de « MATRIX » ! Dans cet article, j’ai décidé d’utiliser « VMWARE WORKSTATION 12 PRO » pour virtualiser le Trio « GRAYLOG2/Elasticsearch/MongoDB ». Objectifs de cet article. Managing Printers and Drivers with PowerShell in Windows 10 / Server 2016 | Windows OS Hub. […]
Is there any way to create a port with the script for a output device that’s not reachable? You can do it manually, but the powershell script prompts an error.
You can create a TCP / IP print port even if the remote device is not reachable:
Add-printerport -Name “TCPPort:192.168.1.222” -PrinterHostAddress “192.168.1.222”
Thanks, we managed to make it work
Add-PrinterPort : One or more specified parameters for this operation has an invalid value.
At C:\Users\sanchpab\Desktop\NewPSscript\Create_Config_PQ.ps1:273 char:5
+ Add-PrinterPort -Name $hostname -ComputerName $server -PrinterHos …
+ ~~~~~~~~~~~~~~~~~~~~~~~~~~~~~~~~~~~~~~~~~~~~~~~~~~~~~~~~~~~~~~~~~
+ CategoryInfo : InvalidArgument: (MSFT_PrinterPortTasks:ROOT/StandardCimv2/MSFT_PrinterPortTasks) [Add-PrinterPor
t], CimException
+ FullyQualifiedErrorId : HRESULT 0x80070057,Add-PrinterPort
Is there a way to add printer certificates using powershell
What printer certificates are you talking about? Do you mean package-aware print drivers?
Set-Printer -Name “hp LaserJet 1015” -Shared $False -CimSession in4411864
Set-Printer: Cannot update an instance of the MSFT_3D Printer class using an instance view for the MSFT_Printer class. Specify the instance representation for the MSFT_3DPrinter class.
Why?
Get a list of all printers
$printers = Get-Printer *
Get the list of all printers without One Sided printing mode
ForEach ($printer in $printers){Get-PrintConfiguration -ComputerName PRINTERSERVER -PrinterName $printer.Name | where {$_.DuplexingMode -ne “OneSided”}| ft -AutoSize}
Get a list of all printers with Color Mode on
ForEach ($printer in $printers){Get-PrintConfiguration -ComputerName PRINTERSERVER -PrinterName $printer.Name | where {$_.Color -eq $True}| ft -AutoSize}
Set Printer Color Mode to OFF
ForEach ($printer in $printers){
Set-PrintConfiguration -PrinterName $printer.Name -Color $False}
Set Printer Collate feature to ON
ForEach ($printer in $printers){ Set-PrintConfiguration -PrinterName $printer.Name -Collate $true}
[…] you need to get a new copier on the network? In that situation I'd probably be using powershell: Managing Printers and Drivers with PowerShell in Windows 10 / Server 2016 | Windows OS Hub (ignore URL, it is for 10/11) I imagine there's probably a script somewhere that's ready-made to […]