By default, PowerShell modules are installed online from the official PowerShell Gallery (PSGallery) repository using the Install-Module command. However, you won’t be able to install a PowerShell module if your computer is on an isolated network or if direct access to the PSRepository is restricted. The same limitation applies when installing PowerShell modules on Windows Server hosts, which typically have direct Internet access restricted or blocked. blocked. In this article, we’ll show how to install PowerShell modules on offline machines and how to import an installed module from a remote computer.
Installing PowerShell Module from an Online PowerShell Gallery
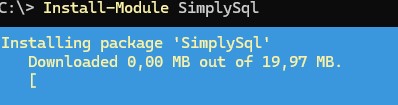
Installing a PowerShell module is straightforward if your computer has Internet access: simply run the Install-Module command and specify the required module name. For example, to install the PowerShell module for interacting with MsSQL/MariaDB databases, run the following command:
Install-Module SimplySql
This command searches the connected PS repositories for the specified module. By default, Windows only has one enabled online repository: PSGallery (https://www.powershellgallery.com/)
Get-PSRepository

If the specified PowerShell module is found, the corresponding NuGet package will be downloaded from the repository via the NuGet provider and installed on the computer.
If the computer is connected to an isolated network without Internet access, an error will appear when trying to install the module:
WARNING: Network connectivity may not be available, unable to reach remote sources.
WARNING: Unable to bootstrap the required package provider due to problems with network connectivity. Please fix your network connection.
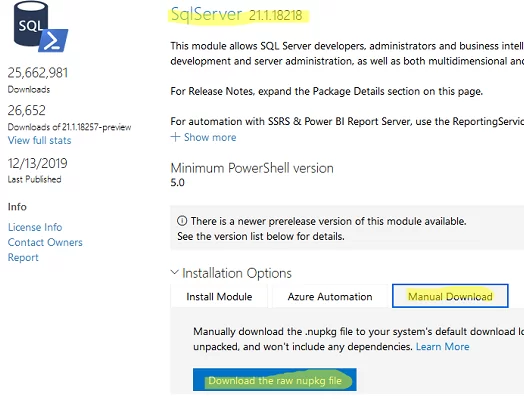
PowerShell modules in the PSGallery repository are stored in the NuGet format with a .nupkg file extension. The module can only be downloaded manually in this packaged .nupkg format (from the Manual Download tab). By default, Windows cannot install PowerShell modules from nupkg files. Although you can manually extract the .nupkg file and copy its contents to the modules directory, this approach will not produce a fully functional module installation. The primary issue is that dependencies will not be resolved and installed automatically.
Install PowerShell Module (Nupkg) from a Local Folder
Now, let’s look at how to correctly manually install a PowerShell module from a *.nupkg file (NuGet package format). This method involves creating a local PowerShell (NuGet) repository on a computer, copying the required .nupkg packages containing PowerShell modules into it, and installing the modules from the repository using the standard Install-Module command.
Create a local directory to be used as a local PowerShell repository.
New-Item -Type Directory c:\LocalNugetRepo
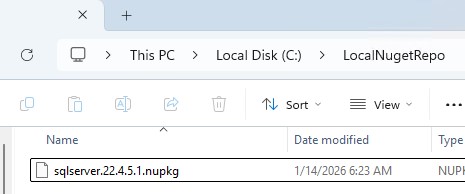
The required nupkg package should be downloaded and copied to this directory (in my example, this is sqlserver.22.4.5.1.nupkg).
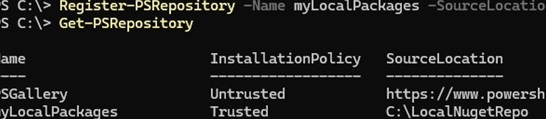
Register a new PowerShell repository in Windows with a local folder as a source:
Register-PSRepository -Name myLocalPackages -SourceLocation C:\LocalNugetRepo -InstallationPolicy Trusted
-SourceLocation \\dub-man01\PS_REPOList the available PowerShell repositories:
Get-PSRepository
Install the PowerShell module from the specified local repo:
Install-Module sqlserver -Repository myLocalPackages
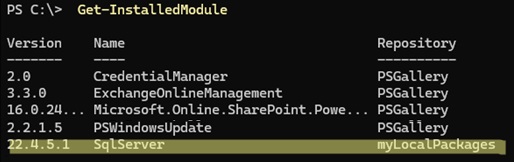
Check that the module has been installed successfully:
Get-InstalledModule
How to Install PowerShell Modules without Internet
Another method of installing a PowerShell module on an offline computer (that is not connected to the internet) is to first install it on a computer that has access to the PowerShell Gallery repository, and then copy it to the target system.
Check whether the module is available in the PSGallery repository:
Find-Module –Name *SqlServer*| Select Name, Version, Repository

Save the module to the specified local folder on this computer.
Save-Module –Name SqlServer –Path C:\PS\

The next step is to copy the folder containing the module to the offline machine on which you want to install it. Which directory should you copy the module to?
PowerShell modules can be stored in a number of different directories. To list the available module paths, run:
$env:PSModulePath -split ";"

Windows PowerShell modules can be found in one of the following locations:
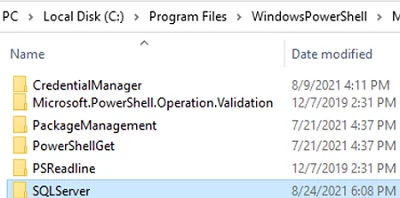
C:\Users\username\Documents\WindowsPowerShell\Modules($Home\Documents\PowerShell\Modules) – the PowerShell modules in the user profile folder are only available to the CurrentUserC:\Program Files\WindowsPowerShell\Modules($Env:ProgramFiles\WindowsPowerShell\Modules) — this is the default directory used when installing a module for all computer users (-Scope AllUsers)C:\Windows\system32\WindowsPowerShell\v1.0\Modules– this directory contains the built-in Windows modules and is not recommended for installing third-party modules.
Copy the module folder to the ‘C:\Program Files\WindowsPowerShell\Modules’ directory.
Set-ExecutionPolicy RemoteSigned
If the Restricted policy is enabled, attempting to run any cmdlet from the module will result in the ‘PowerShell module could not be loaded‘ error.
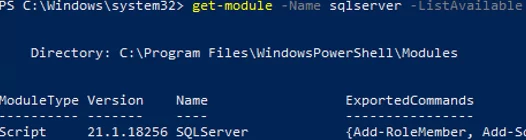
Make sure that the SQLServer module is now available:
Get-Module -Name SQLServer -ListAvailable
The directory in which the PowerShell module is installed can be shown in the following way:
(Get-Module -ListAvailable SQLServer).path

List the cmdlets available in the module:
Get-Command -Module SQLServer
Importing PowerShell Modules from a Remote Computer
If you don’t want to install a PowerShell module on all computers, you can import any module from a remote computer using PSRemoting.
$session = New-PSSession -ComputerName dub-sql1
List the PS modules installed on a remote computer:
Get-Module -PSSession $session –ListAvailable
To import the specified PowerShell module to your computer:
Import-Module -PSsession $session -Name SqlServer
Don’t forget to close the session when you finish using the module:
Remove-PSSession $session
An even more interesting way to use a PowerShell module installed on a remote computer is through Implicit remoting.
Connect to a remote computer using the Invoke-Command and import the PowerShell module you need:
$session = New-PSSession -ComputerName dub-sql1
 Invoke-Command {Import-Module SqlServer} -Session $session
Export the cmdlets from the remote session to the local module.
Export-PSSession -Session $s -CommandName *-Sql* -OutputModule RemoteSQLServer -AllowClobber
This command creates a new RemoteSQLServer PowerShell module on your computer (in C:\Program Files\WindowsPowerShell\Modules). The cmdlet files themselves are not copied.
Close the session:
Remove-PSSession $session
To use the PowerShell cmdlets from this module, simply import the module into the session.
Import-Module RemoteSQLServer
All SQL module cmdlets will be available without establishing an explicit connection to the remote computer. All MSSQL commands remain available until you close the PowerShell console or remove the module.
Uninstall-Module cmdlet to remove a PowerShell module from a computer.
1 comment
Bravo. Excellent blog. Clear, concise and thorough instructions that leave me the viewer in no doubt that you know your stuff. I’ve read a number of guides on the topic of offline (or isolated) computers and installing PowerShell Modules, but I know this one is the best. I’m copying this link like no one’s business. Thanks very much for taking the time to document this!