Microsoft Entra ID (ex Azure AD) supports Certificate Based Authentication (CBA). This means that you can use certificate authentication to automatically run your PowerShell scripts with no password entry and without using Azure MFA. With certificate-based auth, you no longer need to worry about securely storing passwords in PowerShell scripts or using third-party vault storage through the SecretManagement module.
Here is how to use certificates for authentication from your PowerShell scripts against Microsoft Entra ID (Azure AD) and Exchange Online.
You must first create a certificate and install it on your computer. You can obtain a certificate from your CA or issue a self-signed certificate. In this example, we will create a self-signed certificate by using the New-SelfSignedCertificate cmdlet.
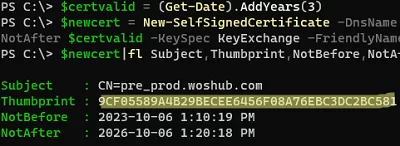
Generate a self-signed certificate with a 3-year validity period:
$certvalid = (Get-Date).AddYears(3)
 $newcert = New-SelfSignedCertificate -DnsName "pre_prod.woshub.com" -CertStoreLocation "cert:\LocalMachine\My" -NotAfter $certvalid -KeySpec KeyExchange -FriendlyName "Azure Microsoft Entra ID PowerShell Auth cert"
 $newcert|fl Subject,Thumbprint,NotBefore,NotAfter
Copy the value of the certificate thumbprint.
Then export the certificate to the CER and PFX files:
$newcert | Export-Certificate -FilePath "C:\PS\azure-auth.cer"
 $newcert | Export-PfxCertificate -FilePath "C:\PS\azure-auth.pfx" -Password $(ConvertTo-SecureString -String "S3dPswrd@123" -AsPlainText -Force)
Now you need to create an application in Azure Microsoft Entra:
- Sign in to Azure Portal and go to Microsoft Entra ID -> App registrations -> New registration;
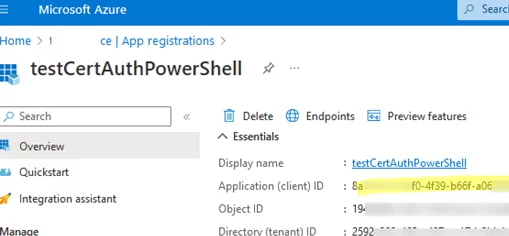
- Specify the app name (
testCertAuthPowerShell), select Accounts in this organizational directory only (Single tenant), and click Register; - Copy the Application (client ID) value;

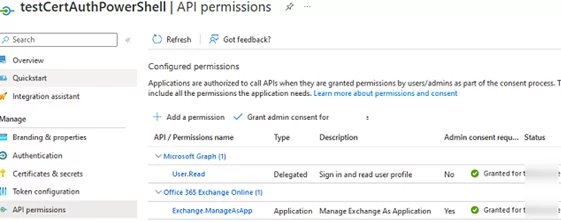
- Then assign permissions for your app. Go to API permissions -> Add a permission. In this example, we will grant permissions to manage the Exchange Online configuration (APIs my organization uses -> Office 365 Exchange Online) Azure -> Application permissions -> Exchange.ManageAsApp -> Add permissions -> Grant admin consent);
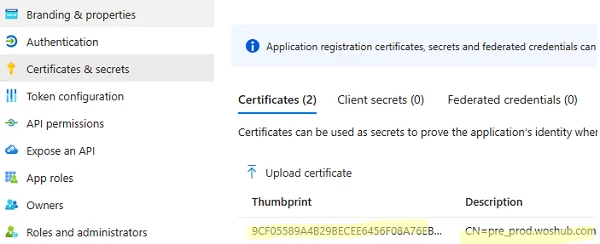
- Then go to Certificates and secrets and upload a self-signed certificate file from your computer;
- Next, assign the Exchange Administrator role to your app. Go to Azure Active Directory -> Roles and administrators -> select the Exchange Administrator role -> Add Assignments -> Select your app from the list (testCertAuthPowerShell).

Once that’s done, you can try to connect to Exchange Online from a PowerShell script on your computer by using the certificate. Note that in this example, the Exchange Online PowerShell module (EXO) is already installed on the computer.
You will need the values of the following variables (the ones you copied earlier):
$certThumbprint = "9CF05589A4B29BECEE6456F08A76EBC3DC2BC581"
 $AzureAppID = "111111-2222-3333-4444-123456789"
 $tenant="woshub.onmicrosoft.com"
Now you can connect to the Exchange Online tenant using the certificate:
Connect-ExchangeOnline -AppId $AzureAppID -CertificateThumbprint $certThumbprint -Organization $tenant

There will be no password prompt and no Modern Authentication form when you connect to the Microsoft Entra ID.
List mailboxes in your Exchange tenant:
Get-EXOMailbox
Disconnect-ExchangeOnline -Confirm:$false
Similarly, you can configure certificate-based auth for other Microsoft 365 services as well. The important thing here is to properly assign permissions for your Azure app.
For example, if you are using the Teams PowerShell module, you would run the following command to authenticate with a certificate:
Connect-MicrosoftTeams -CertificateThumbprint $certThumbprint -ApplicationId $AzureAppID -TenantId $tenant

To use the Azure AD PowerShell module with a certificate to connect to Microsoft Entra ID:
Connect-AzureAD -TenantId $tenant -ApplicationId $AzureAppID -CertificateThumbprint $certThumbprint
Besides, you can import a certificate to another Windows host using a PFX file containing a password-protected private key. Use the Certificates MMC snap-in or PowerShell to import the certificate:
$password = ConvertTo-SecureString -String "S3dPswrd@123" -Force -AsPlainText
 Import-PfxCertificate -Password $password -FilePath "C:\PS\azure-auth.pfx" -CertStoreLocation Cert:\CurrentUser\My
You can then use Azure certificate-based authentication in PowerShell scripts on that computer.
1 comment
you did not mention what redirection URIs you indicated (I set localhost), in addition, I keep getting the error message: Get-MgUserCalendarView : Access is denied. Check credentials and try again.
executes the command as global admin