In Exchange Server or Microsoft 365-based email organizations, you can recall (or replace) a sent email from a recipient’s inbox in Outlook if it has not been read. For example, you forgot to attach a file to a message, specified the wrong recipient, or the information in the email is no longer up-to-date. In all these cases, Outlook allows you to recall a sent e-mail from users’ mailboxes and send a new one with valid details.
You can recall an e-mail from Outlook if:
- You are using the desktop version of Outlook. The recall feature is not available in Outlook Web client (OWA, Outlook on the Web);
- Both your mailbox and the recipient’s mailboxes are in the same Exchange organization;
- The recipient has not read the email. Note: an email is considered read when it has been viewed in the Outlook Preview Panel (Getting email read status in Exchange mailbox with PowerShell);
- The email item is in the Inbox folder and has not been moved to another folder by Exchange/Outlook inbox rules or manually by the user;
- Your mailbox isn’t connected via POP or IMAP;
- If you use Exchange Online, make sure the email recall option is enabled at a tenant-wide level;
- The user doesn’t have cached or offline mode enabled.
How to Recall a Sent Email in Outlook
Here’s a step-by-step guide for recalling a sent email in the Outlook desktop client (we used Outlook 2019 in this example but the recall option works the same way in other versions):
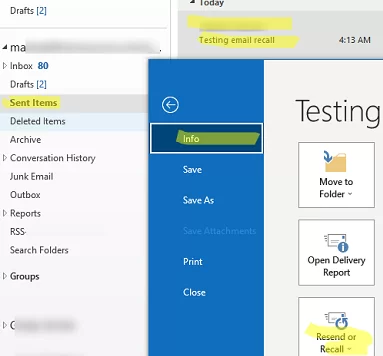
- Locate your email in the Sent folder and open it;
- Go to File -> Info -> Resend or Recall -> Recall this message;
 The recall option is also available from the Outlook top menu (Actions -> Recall This Message).
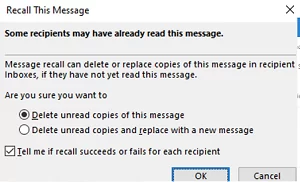
 - You will be asked to select the action you wish to perform. You can either
Delete unread copies of these messagesorDelete unread copies and replicas with a new message. The second allows you to edit the original email and replace it in the recipient’s mailbox. To get notified about the email recall status for each mailbox, enable the optionTell me if recall succeeds or fails for each recipient. - Now click OK to queue a recall request.
 The recall option is also available from the Outlook top menu (Actions -> Recall This Message).
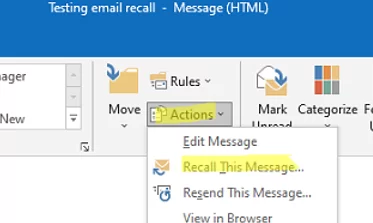

After some time, you should get a report on the recall status for each recipient. The report can either indicate
Message successfully recalled.
Or
The message was successfully recalled but was read by the recipient.
In Exchange Online, you can view the recall request status by clicking on the Message Recall Report for message link that is supposed to be sent to your mailbox.

If the email is recalled successfully, it will disappear from the recipient’s Inbox.
Enable or Disable the Email Message Recall in Exchange Online
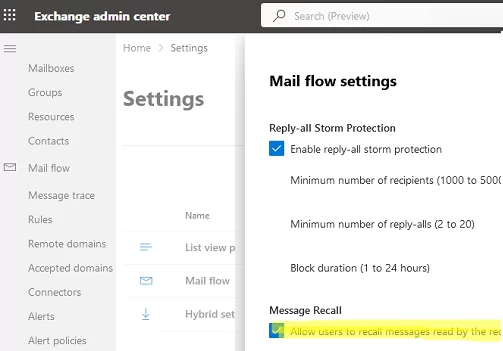
In Exchange Online (Microsoft 365), you can enable or disable the email recall feature at the tenant level:
- Sign in to the Exchange admin center;
- Go to Settings -> Mail flow;
- Find the Allow users to recall messages read by the recipient option;
- This option is enabled by default.
You can disable the email recall option for your EOL organization using PowerShell. Connect to your tenant using the
Connect-ExchangeOnline
To disable the email recall in your organization, run the command:
Set-OrganizationConfig -MessageRecallEnabled $False
Exchange Online users can even recall emails that have been read since February 2023. This feature is enabled by default (the default value is null, which means that email recall is allowed).
Get-OrganizationConfig | fl RecallReadMessagesEnabled

You can change this behavior by using the
Set-OrganizationConfig -RecallReadMessagesEnabled $false
If you’re looking for an administrative way to bulk recall emails from users’ mailboxes using PowerShell, you can use Compliance Search to find and remove email items from Exchange mailboxes.
Start by creating a search query:
New-ComplianceSearch -Name "2024-30-01: Delete jan 2024 report" -ExchangeLocation All -ContentMatchQuery '(Subject:"Jan 2024 report (1)")' | Start-ComplianceSearch
Wait for the search request to complete:
Get-ComplianceSearch -Identity "2024-30-01: Delete jan 2024 report" | FL name,items,size,jobprogress,status
You can now delete found emails from users’ mailboxes:
New-ComplianceSearchAction -SearchName "2024-30-01: Delete jan 2024 report" -Purge -PurgeType HardDelete