The Azure Active Directory password policy defines the password requirements for tenant users, including password complexity, length, password expiration, account lockout settings, and some other parameters. In this article, we’ll take a look into how to manage a password policy in Azure AD.
Azure AD has a default password policy applied to all accounts that are created in the cloud (not synchronized from on-premises Active Directory via Azure AD Connect).
It defines the following settings that cannot be changed by the Azure/Microsoft 365 tenant administrator:
- Allowed characters:
A-Z,a-z,0-9,spaceand special symbols@ # $ % ^ & * – _ ! + = [ ] { } | \ : ‘ , . ? / ` ~ ” ( ) - Password complexity: at least 3 out of 4 character groups (uppercase, lowercase, numbers, and symbols)
- Password length: minimum 8, maximum 256 characters
- The user cannot use the previous password
How to Change Password Expiration Policy in Azure AD
By default, a user’s password never expires in Azure AD (Microsoft 365). But you can enable the password expiration through the Microsoft 365 Admin Center:
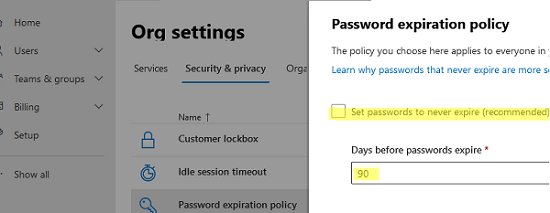
- Go to Microsoft 365 Admin Center -> Settings -> Security & Privacy -> Password expiration policy;
- Disable the option Set password to never expire (recommended);

- In this case:
Password expiration set to 90 days
The notification to change your password will start to be displayed 14 days before the expiry date.
You can use the MSOnline PowerShell module to change user password expiration settings. Just install the module (if needed) and connect to your tenant:
Install-Module MSOnline
 Connect-MsolService
Check the current password expiration policy settings in Azure AD:
Get-MsolPasswordPolicy -DomainName woshub.com
ExtensionData NotificationDays ValidityPeriod
System.Runtime.Serialization.ExtensionDataObject 14 2147483647

You can change the password expiration policy and notification settings in Azure AD with PowerShell:
Set-MsolPasswordPolicy -DomainName woshub.com -ValidityPeriod 180 -NotificationDays 21
You can manage password expiration settings for a specific user using the Azure AD module:
Connect-AzureAD
Enable the Password never expires option for a specific user:
Set-AzureADUser -ObjectId "maxadm@woshub.com" -PasswordPolicies DisablePasswordExpiration
View the user’s password expiration date:
Get-AzureADUser -ObjectId "maxadm@woshub.com"|Select-Object @{N="PasswordNeverExpires";E={$_.PasswordPolicies -contains "DisablePasswordExpiration"}}
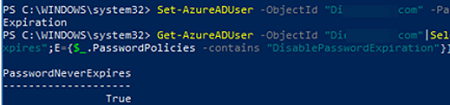
PasswordNeverExpires
--------------------
True
Enable password expiration for the user:
Set-AzureADUser -ObjectId "maxadm@woshub.com" -PasswordPolicies None
Account Lockout Settings in Azure AD
One more parameter of the Azure password policy available for the administrator to configure is the user lockout rules in case of entering an incorrect password. By default, an account is locked for 1 minute after 10 failed attempts to authenticate using an incorrect password. Note that the lockout time is extended following each next unsuccessful sign-in attempt.
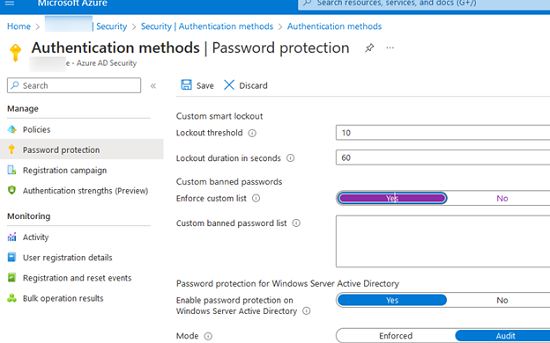
You can configure the lockout settings in the following section of the Azure Portal -> Azure Active Directory -> Security -> Authentication methods —> Password protection.
The options available for you to change are:
- Lockout threshold – the number of unsuccessful sign-in attempts before the account is locked out (10 by default);
- Lockout duration in seconds – 60 seconds by default.
If their account is locked out, an Azure user will see the following notification:
Your account is temporarily locked to prevent unauthorized use. Try again later, and if you still have trouble, contact your admin.

Prevent Using Weak and Popular Passwords in Azure AD
There is a separate Azure AD Password Protection feature that allows you to block the use of weak and popular passwords (such as P@ssw0rd, Pa$$word, etc.).
You can define your own list of weak passwords in Azure Active Directory -> Security -> Authentication methods —> Password protection. Enable the option Enforce custom list and add a list of passwords you want to ban (up to 1000 passwords).
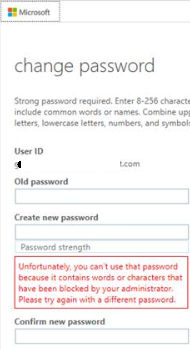
When an Azure AD user attempts to change their password to one of the banned list, a notification is displayed:
Unfortunately, you can’t use that password because it contains words or characters that have been blocked by your administrator. Please try again with a different password.
These settings are applied by default only to cloud users in Azure.
If you want to apply a banned password list to the local Active Directory DS users, here’s what you need to do:
- Make sure you have Azure AD Premium P1 or P2 subscription;
- Enable the option Enable password protection on Windows Server Active Directory;
- The default configuration enables only the audit of the prohibited password use. So, after the testing, switch the Mode option to Enforced;
- Deploy the Azure AD Password Protection Proxy Service (
AzureADPasswordProtectionProxySetup.msi) on one of the on-premises hosts; - Install Azure AD Password Protection (
AzureADPasswordProtectionDCAgentSetup.msi) on all the ADDS domain controllers.
If you want the Azure password policy to be applied to users synchronized from AD DS via Azure AD Connect, you must enable the option EnforceCloudPasswordPolicyForPasswordSyncedUsers:
Set-MsolDirSyncFeature -Feature EnforceCloudPasswordPolicyForPasswordSyncedUsers -Enable $true
In this case, when a user’s password is changed or reset in on-premises Active Directory, the user is checked against the list of banned passwords in Azure.
If you have Azure AD Connect sync enabled, you can use your own password policies from on-premises Active Directory to apply to cloud users. To do this, you need to create a Fine Grained Security password policy in the on-premises AD and link it to a group containing the users synchronized with the cloud. In this case, Azure Active Directory will follow the password policy of your local domain.
6 comments
Why MS has not caught up to allowing to the requirements by most security firms on the Minimum password length or allowing admins to set this to something more then 8 is beyond me
You can completely disable the Entra ID password policy if you have enabled MFA for all Microsoft 365 accounts.
Get MFA status for all tenant users:
Install-Module MSOnlineConnect-MsolService
$Report = @()
$AzUsers = Get-MsolUser -All
ForEach ($AzUser in $AzUsers) {
$DefaultMFAMethod = ($AzUser.StrongAuthenticationMethods | ? { $_.IsDefault -eq "True" }).MethodType
$MFAState = $AzUser.StrongAuthenticationRequirements.State
if ($MFAState -eq $null) {$MFAState = "Disabled"}
$objReport = [PSCustomObject]@{
User = $AzUser.UserPrincipalName
MFAState = $MFAState
MFAPhone = $AzUser.StrongAuthenticationUserDetails.PhoneNumber
MFAMethod = $DefaultMFAMethod
}
$Report += $objReport
}
$Report
Enable MFA for a Microsoft Entra ID user:
$st = New-Object -TypeName Microsoft.Online.Administration.StrongAuthenticationRequirement$st.RelyingParty = "*"
$st.State = "Enabled"
$sta = @($st)
Set-MsolUser -UserPrincipalName user1@contoso.com -StrongAuthenticationRequirements $sta
Force a user to change current Microsoft Modern authentication MFA method (OneWaySMS / TwoWayVoiceMobile / PhoneAppOTP / PhoneAppNotification ):
Set-MsolUser -UserPrincipalName user1@contoso.com -StrongAuthenticationMethods @()Always try to use only the Modern Authentication (ADAL+OATH 2.0)method for the Microsoft 365 tenant.
Basic Auth is disabled in all tenants, regardless of usage, with the exception of SMTP Auth.
1) Check for enabled auth policies that allow basic auth to be used:
Get-AuthenticationPolicy
2) Check that the Security defaults option is enabled.
To use a custom banned password list from Azure this requires all users within active directory to have the p1 or p2 license?
Yes, the custom banned password list feature is only available with Entra ID Premium P1 or P2 license.
You can also use free, open-source password filters for AD domain controllers to block common weak passwords.
https://woshub.com/deny-common-weak-passwords-active-directory/
Time to remove MSOL references and include MS Graph