The Distributed File System (DFS) feature in Microsoft networks is used to simplify access to shared network folders and, optionally, to replicate data between file servers. DFS allows shared folders from different file servers to be organized into a centralized structure and presented to users as a single virtual directory tree, which is accessible via a common UNC path. Users will still be able to access the target folder added to DFS even if its physical location changes.
The DFS implementation in Windows Server is based on two services.
- DFS namespace service can join file shares from multiple file servers into a single, logical DFS namespace. To users, each DFS namespace appears as a virtual share containing subfolders. A DFS namespace can aggregate shares from different servers, while hiding their real structure and locations from users.
- DFS Replication is a service that enables file synchronization (replication) between shared folders on servers within a DFS namespace, ensuring high availability and data consistency. When a file is modified on one of the servers, the DFS Replication service only transfers the modified parts of the file to the other partners.
This guide will show you how to configure the DFS namespace and replication on Windows Server 2025 (previous versions of Windows Server are configured in the same way).
Installing DFS and Creating a DFS Namespace on Windows Server
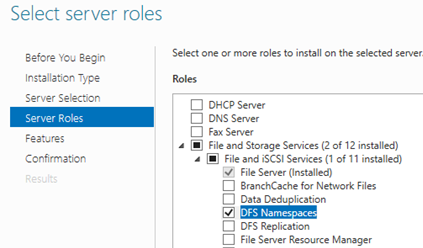
The DFS namespace service is available in all Windows Server editions. It can be installed either via the Server Manager console (File and Storage Services -> File and iSCSI Services -> DFS Namespace), or using PowerShell:
Install-WindowsFeature FS-DFS-Namespace, RSAT-DFS-Mgmt-Con
Once the role has been installed, a new DFS namespace can be created:
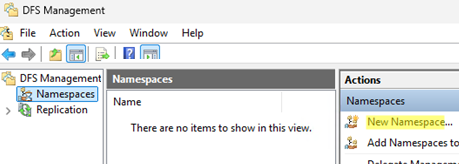
- Open the DFS Management snap-in (
dfsmgmt.msc). - Click New Namespace in the right Actions pane.

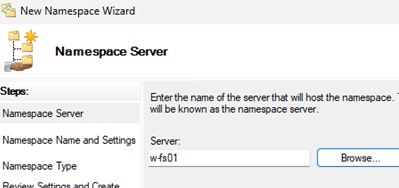
- Specify the name of the server that will host the DFS namespace. This can be either a domain controller or a member server.
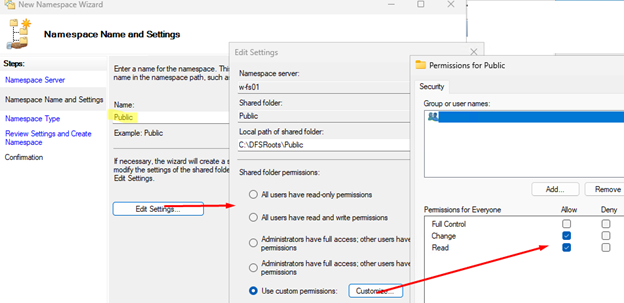
- Set the namespace name. It will be used for client access. For example, Public.
- Click the Edit Settings button to configure access permissions for the root directory of the namespace. In most cases, configure share permissions to allow access for the Everyone group, which means that the actual access permissions are enforced at the NTFS file system level. Also, specify a local path to the DFS directory here (by default,
C:\DFSRoots\Public). - Next, choose the type of namespace. This can be either a Domain-based namespace or a Stand-alone namespace. Although a domain-based namespace has a number of advantages, it requires a deployed Active Directory domain and domain admin permissions (or delegated rights to create DFS domain namespaces).
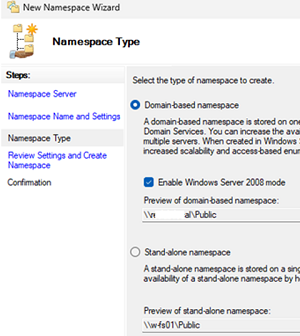
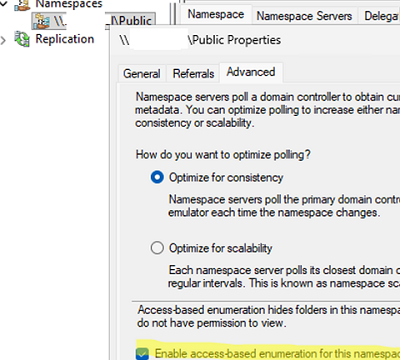
\\ServerName\Public , and to access the domain DFS, specify the domain name in the UNC path ( \\DomainName\Public ).To ensure users browsing the DFS namespace see only folders to which they have access permissions, open the namespace properties and enable the Enable access-based enumeration for this namespace option (read more about using Access-Based Enumeration in Windows).
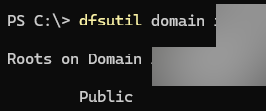
List all root DFS namespaces in a domain:
dfsutil domain woshub.com
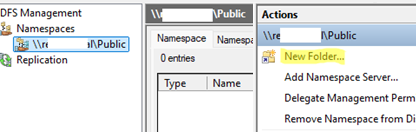
Now let’s add a new shared network folder to the DFS namespace hierarchy that we created earlier:
- Select the namespace in the DFS console and click New Folder
- Provide the name of the new directory and its exact location (in UNC format).
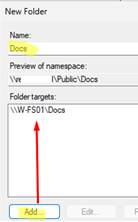
Ensure that users can browse the newly added network directory via the DFS namespace using File Explorer: \\woshub.com\public\Docs

Users can open files from a shared folder added to DFS without knowing which file server the files are actually stored on. Users can map a share as a network drive by using its DFS path.
DFS namespace fault tolerance and availability can be enhanced by adding additional namespace servers to it (Add Namespace Server).
Configure DFS Replication on Windows Server
You can use DFS-R replication to organize synchronization of network folder contents across file servers within the DFS namespace, thereby ensuring high data availability. Clients are automatically redirected to the replica server if one of the servers in a replication group is unavailable. In branch office scenarios, this enables users to access the latest synchronized file versions from the head office, thereby reducing the load on the WAN channel.
The FS-DFS-Replication role must be installed on all servers participating in the DFS replication group.
Install-WindowsFeature FS-DFS-Replication, RSAT-DFS-Mgmt-Con
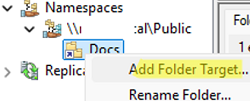
In the DFS Management snap-in, select the DFS Namespace, right-click on the directory for which you want to create a replica, and select Add Folder Target.
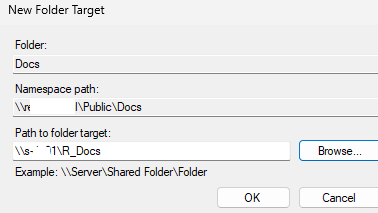
Specify the full (UNC) path to the shared folder on another server where the replica will be stored.
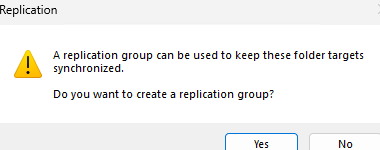
When asked if you want to create a replication group, answer Yes.
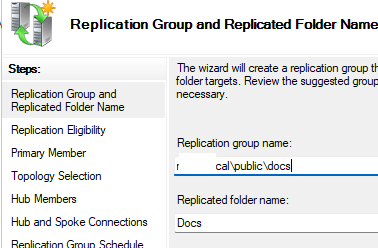
The replication setup wizard will start. Check the name of the replication group and the replicated folder.
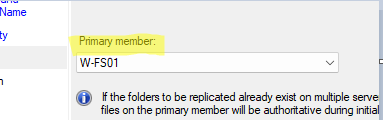
Select the primary server. This will be the data source for the initial replication.
Choose the type of topology (connection) between members of the replication group. In this example, I used Full Mesh (i.e. all with all).

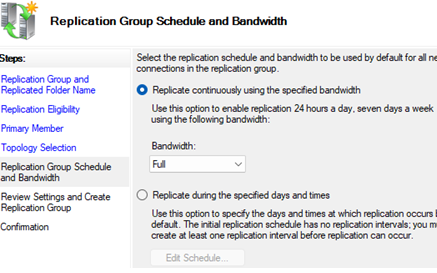
Then you can configure the replication schedule and whether to enable bandwidth throttling for DFS Replication traffic. In modern intranet networks, even those connected via WAN channels, it is usually possible to run continuous replication, utilizing the full available bandwidth.
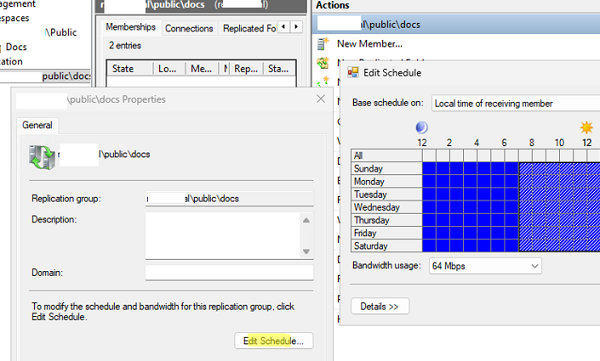
If needed, the replication schedule and maximum bandwidth can be configured in the replication group settings, which can be found under the Replication node.
Allow the initial replication to the other servers in the DFS replication group to complete, which may take some time depending on the data size and the network conditions. Or run the following command to force replication:
Sync-DfsReplicationGroup -GroupName "woshub.com\public\docs" -SourceComputerName "w-fs01" -DestinationComputerName "d-fs02" -DurationInMinutes 15
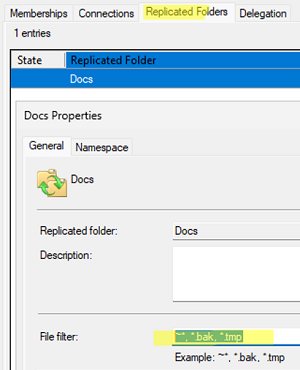
The DFS Replication service may ignore certain files. There is usually no need to replicate the temporary files created by programs. Open the DFS folder properties on the Replicated Folder tab. Note that the filter for files with the extensions ~*, *.bak, and *.tmp is enabled by default. You can edit this list and add your own file types to be excluded from DFS Replication.
It should be noted that the hidden directory DFSRPrivate is created at the root of each DFS folder on the disk. This system directory stores the internal data and metadata for DFS Replication.
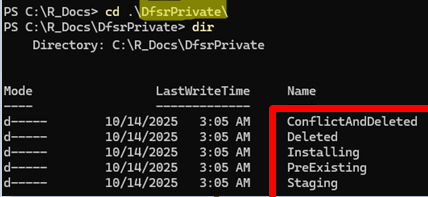
The DFS administrator should be aware of these service subfolders:
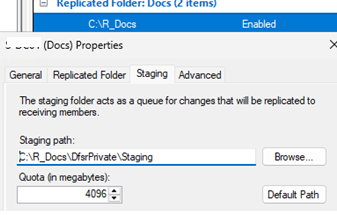
- Staging – this is temporary storage for files that are being replicated. The default size of this folder is 4GB. The quota is set in the Staging tab of the DFS folder settings. If a file exceeds the staging quota, DFS Replication will transfer it in several stages.
- PreExisting – contains files that existed in the folder before replication began and were saved by the system.
- ConflictAndDeleted – it contains deleted and conflicting replication files. This folder is used to store files that have been modified by multiple users simultaneously. When a DFS file is updated, it reflects the latest saved version, while the previous version is moved to the ConflictAndDeleted folder, from where it can be restored by the administrator.
- Delete – contains deleted objects
In addition to the Event Viewer (Applications and Services Logs -> DFS Replication), DFS service logs can be found in the %windir%\debug\DFSR*.log folder.
Let’s take a look at some useful commands that can be used to monitor and obtain replication status.
List the files that are currently being processed by the DFS replication process:
Get-DfsrState -ComputerName M-FS01 | FT FileName,UpdateState,Inbound, SourceComputerName

DFS replication queue statistics:
dfsrdiag replicationstate /all
The number of files being replicated between servers:
Get-DfsrBacklog -SourceComputerName SRV01 -DestinationComputerName M-DS01| select FileName,FullPathName
dfsrdiag backlog /SMem:M-FS01 /RGName:Rep_Folder /RFName:share /RMem:D-FS01
DFS replication is well-suited for files that are rarely modified or for scenarios where only one server is active while others are read-only, minimizing the risk of conflicts and synchronization issues. Frequent concurrent modifications to the same file on multiple file servers can result in conflicts that are difficult to resolve automatically using DFS tools.