In this article, we will show how to create a Wi-Fi access point (Software AP) on any computer or laptop running Linux and equipped with a wireless adapter. You can use this access point (hotspot) to create a wireless local network in a small office or at home, or to share mobile Internet with other devices. In this example, we are using a laptop running the latest version of Ubuntu.
First, make sure that your wireless Wi-Fi module supports an Access Point (AP) mode. To do it, install iw package:
$ sudo apt install iw
iw tool is used to configure wireless interfaces (nl80211 driver) from the command prompt. It supports all new drivers recently added to the Linux kernel. The old iwconfig tool, which uses the Wireless Extensions interface, is deprecated, so it is strongly recommended that you use iw and nl80211 instead.Run the command below:
$ iw list
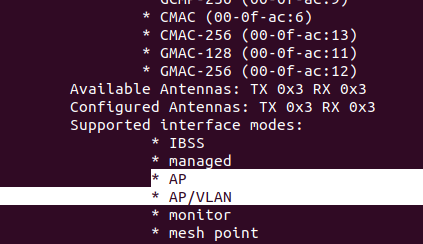
In the Supported interface modes section, look for
- AP
- AP/VLAN
It means that your Wi-Fi adapter supports operation in the access point mode.
How to Create Wi-Fi Hotspot from Ubuntu GUI?
On Ubuntu 20.04 LTS and newer with GNOME (3.28+), you can run a wireless access point from the graphic interface. This is the easiest method for the average user.
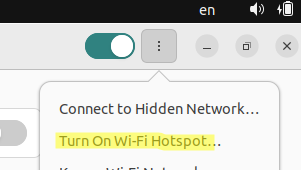
Click the network connection icon and select Turn On Wi-Fi Hotspot in the Wi-Fi settings.

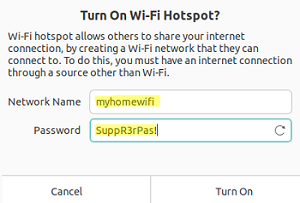
Enter the access point name and connection key (password)
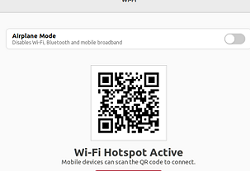
You should see a message that your access point is active. The same window contains a QR code to connect to your Wi-Fi access point.
Configure Wireless Access Point with Network Manager (nmcli) on Linux
Network Manager can be used to manage network connections in most modern Linux distros (Ubuntu, Debian, Mint, Fedora, CentOS, etc.). In this example, we will show how to create a software access point on Linux using the Network Manager and nmcli command line tool.
First, you need to find out the name of your wireless adapter in the system.
$ nmcli d
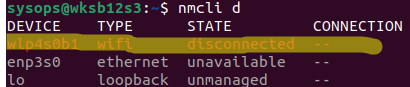
In our example, the name of the Wi-Fi adapter is wlp4s0b1.
To create an access point on the wlp4s0b1 interface with the network name (SSID) WOSHubWiFi and a network key (password) MaxPass21, run the commands below:
# nmcli con add type wifi ifname wlp4s0b1 mode ap con-name MyHomeWiFI ssid WOSHubWiFi
 # nmcli con modify MyHomeWiFI 802-11-wireless.band bg
 # nmcli con modify MyHomeWiFI 802-11-wireless.channel 1
 # nmcli con modify MyHomeWiFI 802-11-wireless-security.key-mgmt wpa-psk
 # nmcli con modify MyHomeWiFI 802-11-wireless-security.proto rsn
 # nmcli con modify MyHomeWiFI 802-11-wireless-security.group ccmp
 # nmcli con modify MyHomeWiFI 802-11-wireless-security.pairwise ccmp
 # nmcli con modify MyHomeWiFI 802-11-wireless-security.psk MaxPass21
 # nmcli con modify MyHomeWiFI ipv4.method shared
Start your hotspot:
# nmcli con up WOSHubWiFi

# nmcli con modify MyHomeWiFI 802-11-wireless.band a
 # nmcli con modify MyHomeWiFI 802-11-wireless.channel 35
By default, the built-in DHCP server in the NetworkManager assigns IP addresses to clients from the 10.42.0.x/24 range (and the 10.24.0.1 is the address of your hotspot interface). You can change the DCHP range:
# nmcli con modify MyHomeWiFI ipv4.addr 192.168.31.1/24
To disable the access point, run this command:
# nmcli con down MyHomeWiFI
For complete removal of software hotspot on Linux:
# nmcli con delete MyHomeWiFI
Using Hostapd to Set Up a Virtual WiFi Access Point on Linux
A popular tool for creating a Wi-Fi access point on Linux computers is the hostapd package. Install it:
$ sudo apt install hostapd
Copy the original configuration file (/etc/hostapd/hostapd.conf). Add the following configuration to hostapd.conf:
$ sudo nano /etc/hostapd/hostapd.conf
interface= wlp4s0b1
# The nl80211 driver is suitable for most Wi-Fi adapters
driver=nl80211
# Your access point name
ssid=MyHomeAP
# The number of your Wi-Fi channel (1 to 13)
channel=11
#Select a mode for your access point (a = IEEE 802.11a, b = IEEE 802.11b, g = IEEE 802.11g)
hw_mode=g
# 1=wpa, 2=wep, 3=both
auth_algs=1
# Allow connections from all MAC addresses except those in the blacklist
macaddr_acl=0
wpa=2
wpa_key_mgmt=WPA-PSK
wpa_pairwise=TKIP CCMP
#Set a password for your access point
wpa_passphrase=MyPass321
ieee80211n=1
ht_capab=[HT40-][SHORT-GI-40]
Unmask the hostpad service:
$ sudo systemctl unmask hostapd
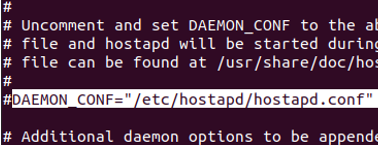
Then specify the path to your configuration file in the DAEMON_CONF parameter of /etc/default/hostapd file:
$ sudo nano /etc/default/hostapd
DAEMON_CONF="/etc/hostapd/hostapd.conf"
Then configure your wireless network interface. Set a static IP address, DNS, mode, and other options. Edit the /etc/network/interfaces file and add the following:
# nano /etc/network/interfaces
auto wlp3s0
iface wlp3s0 inet static
address 10.10.0.1
netmask 255.255.255.0
You will also need it to prevent NetworkManager from interfering with the Wi-Fi interface. After saving the settings, restart your computer.
Then you just have to configure a DHCP server that will assign IP addresses to the devices connecting to your Linux access point. In our example, we will use a light-weight dnsmasq:
$ sudo apt install dnsmasq
Edit dnsmasq.conf. Specify that dnsmasq will run on the wlp4s0b1 interface and assign IP addresses from the 10.10.0.x range. In the simplest case, you may have the following configuration:
$ sudo nano /etc/dnsmasq/dnsmasq.conf
interface=wlp4s0b1
dhcp-range=10.10.0.2,10.10.0.100,12h
#Set DNS servers
server=/www.google.com/8.8.8.8
In order for your Linux host can route packets between the Wi-Fi clients and an external Internet connection, you need to enable the routing and add the corresponding rule to iptables:
sysctl net.ipv4.ip_forward=1
iptables -t nat -A POSTROUTING -o enp3s0 -j MASQUERADE
Start these services:
# systemctl start dnsmasq.service
 # systemctl start hosapd
Now you can connect to your access point from any client, check that it has received an IP address from the specified DHCP range and that it can access the Internet.
2 comments
Thanks a lot for this post.
Do you know what are the pros/cons using hostapd vs networkManager ?
or do you have any documentation highlighting this diffrences ?
Should not still be using TKIP in 2024. it’s been condemned for over a decade. Use only CCMP.