This article describes how to update Windows PowerShell to the latest version 5.1 and how to install (upgrade) PowerShell Core 7.3. There are currently two branches of PowerShell:
- The classic Windows PowerShell (the maximum version is 5.1, which is no longer being developed.);
- The new PowerShell Core platform (version 7.3 is available now).
Although the PowerShell version numbering continues from 5.1 (6.0, 6.1, 7.0, 7.1, and so on), they are two different platforms. Therefore, updating Windows PowerShell and PowerShell Core will be covered separately.
Upgrading to Windows PowerShell 5.1
Windows PowerShell 5.1 is already installed by default in all versions, starting with Windows 10 and Windows Server 2016.
You must manually upgrade to PowerShell 5.1 for earlier versions (Windows 7/8.1 and Windows 2008 R2/2012). For example, Windows Server 2012 R2 (Windows 8.1) has PowerShell 4.0 installed.
Let’s try upgrading the Windows PowerShell version to 5.1 in Windows Server 2012 R2.
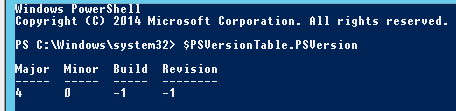
First, check the current PowerShell version (the screenshot shows that it’s PowerShell 4.0):
$PSVersionTable.PSVersion
To upgrade your PowerShell version to 5.1, install the Windows Management Framework 5.1, which requires the .NET Framework 4.5.2 (or later). Make sure that .NET 4.5.2 or higher is installed using this command:
(Get-ItemProperty ‘HKLM:\SOFTWARE\Microsoft\NET Framework Setup\NDP\v4\Full’ -Name Release).Release

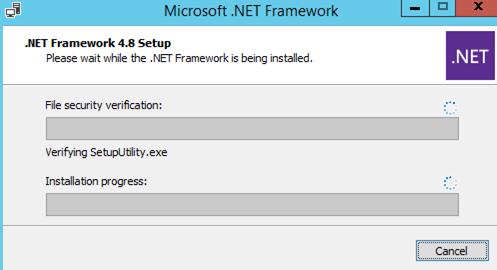
In my case, the release version 378675 means that the .NET Framework version 4.5.1 is installed. So, I have to download and install the latest .NET Framework 4.8 (here is the link to the offline installer: https://go.microsoft.com/fwlink/?linkid=2088631 — ndp48-x86-x64-allos-enu.exe).
Install the .NET 4.8 package (you will need to restart your computer):
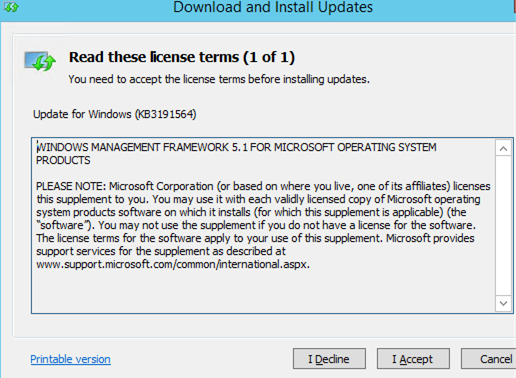
Download WMF 5.1 for Windows Server 2012 R2 — Win8.1AndW2K12R2-KB3191564-x64.msu (https://go.microsoft.com/fwlink/?linkid=839516).
Install the Windows Management Framework 5.1 from the MSU file.
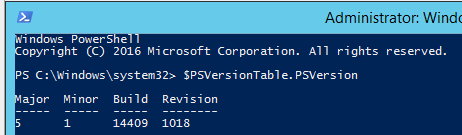
After you restart the server, open the powershell.exe console and make sure that the PowerShell version has been updated to 5.1.
How to Install or Update PowerShell Core 7?
PowerShell Core is cross-platform and under active development (unlike Windows PowerShell 5.1). Actually, PowerShell Core is a new platform installed on the operating system alongside the classic Windows PowerShell. This means that you cannot upgrade from PowerShell 5.1 to PowerShell Core 7.3. PowerShell 7.x is installed on your computer separately from Windows PowerShell 5.1 (side-by-side).
There are several ways to upgrade (install) the PowerShell Core version on Windows 10 and 11:
- Use the PowerShell Core MSI installer, which is available to download from GitHub;
- Using the built-in Windows 10/11 package manager WinGet;
- Using the Microsoft Store.
Next, using the example of updating PowerShell Core to 7.3 on Windows 10 22H2, we will look at all of these methods.
Upgrading the PowerShell Core Using MSI installation
If you want to install PowerShell Core using the MSI package, go to the project page https://github.com/PowerShell/PowerShell and download the installation package for your OS version. At the time of writing, the most recent release of PowerShell is v7.3.3, dated 24 February 2023 (for example, PowerShell-7.3.3-win-x64.msi or PowerShell-7.3.3-win-x86.msi). Use only stable or LTS releases for a production environment.
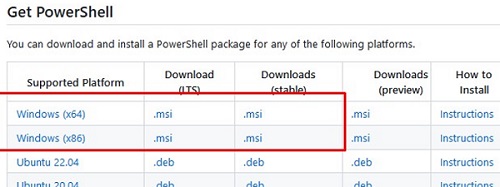
Download the MSI file and install it.
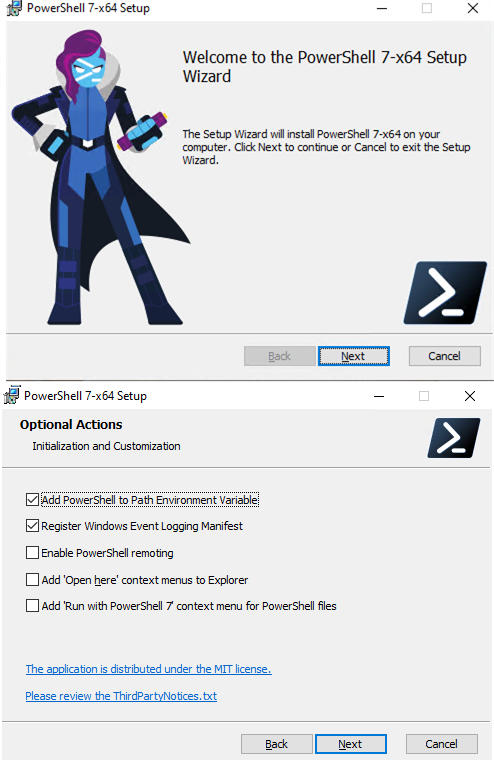
The following installation options are available:
- Add PowerShell to Path Environment Variable
- Register Windows Event Logging Manifest (a separate Event Viewer log is created for PowerShell events.
%SystemRoot%\System32\Winevt\Logs\PowerShellCore%4Operational.evtx) - Enable PowerShell Remoting (enables and configures WinRM for PowerShell Remoting)
- Add ‘Open here’ context menu to Explorer
- Add ‘Run with PowerShell 7’ context menu for PowerShell files
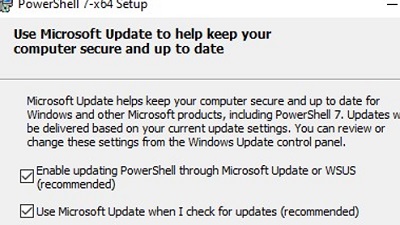
Next, you can enable automatic updates of the PowerShell Core through Windows Update/WSUS (see below).
- ADD_EXPLORER_CONTEXT_MENU_OPENPOWERSHELL
- ADD_FILE_CONTEXT_MENU_RUNPOWERSHELL
- ENABLE_PSREMOTING
- REGISTER_MANIFEST
- ADD_PATH
- DISABLE_TELEMETRY
- USE_MU – use the Microsoft Update to get PSCore updates
- ENABLE_MU – allow the PowerShell Core to be updated through Windows Update
For example, the command for a silent installation might look something like this:
msiexec.exe /package PowerShell-7.3.3-win-x64.msi /quiet ADD_EXPLORER_CONTEXT_MENU_OPENPOWERSHELL=1 ENABLE_PSREMOTING=1 REGISTER_MANIFEST=1 ADD_PATH=1 ENABLE_MU=1 ADD_PATH=1
You can upgrade PowerShell directly from the console. To install or upgrade to the latest version of PowerShell Core, run the following command:
iex "& { $(irm https://aka.ms/install-powershell.ps1) } -UseMSI"
This command downloads the PowerShell 7.3 MSI file from GitHub and then starts the installation via the MSI installer.

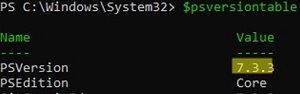
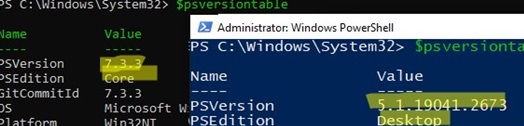
When the installation is complete, the PowerShell Core (pwsh.exe) window appears. Check the PowerShell version to ensure that it is updated to PoSh 7.3.3.
Using WinGet Package Manager to Install or Update PowerShell Core
If you have the WinGet package manager installed, you can install or update your PowerShell version to the latest command:
winget install --id Microsoft.Powershell --source winget
Or, you can install a specific version of PowerShell Core:
winget install --id=Microsoft.PowerShell -v "7.1.2" -e
If you have the Chocolatey package manager installed, use the commands (for 5.1):
choco install powershell -y
 choco upgrade powershell -y
or for PowerShell 7.x:
choco install pwsh -y
 choco install pwsh -y
- Windows PowerShell 5.1:
$env:WINDIR\System32\WindowsPowerShell\v1.0 - PowerShell Core 6.x:
$env:ProgramFiles\PowerShell\6 - PowerShell Core 7.x:
$env:ProgramFiles\PowerShell\7
If PowerShell 6.x was installed on your computer, the $env:ProgramFiles\PowerShell\6directory is automatically removed when you install PowerShell 7.3.
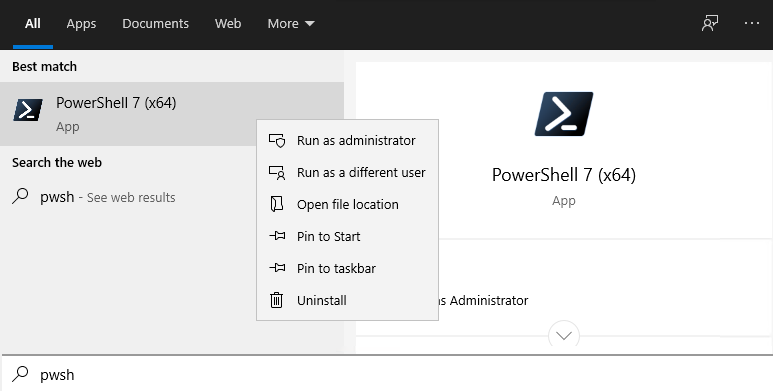
Note that the name of the PowerShell executable file has changed. In PowerShell Core, it is c:\Program Files\PowerShell\7\pwsh.exe. It has its icon in the Start menu.
- To run .NET Framework-based Windows PowerShell, the
powershell.execommand is used - To run .NET Core-based PowerShell Core, use the
pwsh.exe
This means that you have both Windows PowerShell 5.1 and PowerShell Core 7.3 installed on your computer.
(Get-Command 'C:\Program Files\PowerShell\7\pwsh.exe').Version

This is how you can check the version of a file on a remote computer:
Invoke-Command -Computername computer1 -Scriptblock {(Get-Command 'C:\Program Files\PowerShell\7\pwsh.exe').Version}
Windows PowerShell provides a special backward compatibility mode that allows you to run an older version of PowerShell even if you have newer versions installed. You can use the following command to run a specific version of PowerShell example, 4.0):
C:\Windows\System32\WindowsPowerShell\v1.0\powershell.exe -Version 4
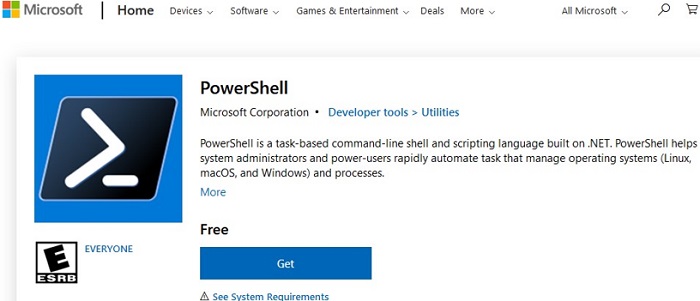
Install PowerShell Core on Windows 10 and 11 via Microsoft Store
On Windows 10 and 11, you can install or update PowerShell through the Microsoft Store. You can manually find the PowerShell app in the Store or use this link.
You can also use WinGet to install the Store version of PowerShell:
winget search powershell --source msstore
 winget install --id 9MZ1SNWT0N5D
The advantage of installing PowerShell Core from the Microsoft Store is that the App Store automatically checks your installed version of PowerShell and automatically installs updates as they become available.
To verify that you have installed the Store version of PowerShell Core, use the command:
Get-AppPackage Microsoft.PowerShell
The Microsoft.PowerShell_7.3.3.0_x64__8wekyb3d8bbwe package is installed in this example.

However, there are also drawbacks to the fact that such an instance of PowerShell will be running in a sandbox environment.
Add-AppxPackage PowerShell cmdlet .Installing/Updating PowerShell Core on Remote Computers
Consider two scenarios for installing or updating the PowerShell Core on multiple remote computers.
Deploying PowerShell Core with Group Policy
You can use Group Policy to centrally deploy and update PowerShell Core in an Active Directory domain. Use the features of the GPO to deploy MSI packages to domain computers.
- Download the PowerShell MSI installation file and copy it to the SYSVOL directory on the domain controller;
- Open the Domain Group Policy Management Console (
gpmc.msc), create a new GPO and link it to the OU with computers and servers; - Go to the GPO section Computer Configuration -> Software Settings, create a new package, and specify the path to the PowerShell MSI installation file in the SYSVOL folder in the domain (use the UNC path);
 To more accurately target your policy to domain devices, you can use the GPO WMI filters.
 - To update the Group Policy settings for the software installation, you must restart the computers. The new version of PowerShell will be installed on all computers at startup.

How to Update PowerShell on a Remote Computer from the Command Prompt?
You can use the command line prompt to update PowerShell on a remote computer.
- The first method uses an MSI installer in a shared network folder to remotely update PowerShell on a computer:
Invoke-Command -ComputerName mun-srv01 -ScriptBlock {Start-Process msiexec.exe -ArgumentList '/package "\\mun-fs01\install\PowerShell-7.3.3-win-x64.msi" /quiet ADD_EXPLORER_CONTEXT_MENU_OPENPOWERSHELL=1 ENABLE_PSREMOTING=1 REGISTER_MANIFEST=1' -Wait}
- The following script selects all enabled computers running Windows 10 from the Active Directory domain and starts downloading and installing PowerShell Core on each of them:
$ADComputers = Get-ADComputer -Filter 'operatingsystem -like "*Windows 10*" -and enabled -eq "true"'
 ForEach ($computer in $ADcomputers) {
 Invoke-Command -ComputerName $computer {iex "& { $(irm https://aka.ms/install-powershell.ps1) } -UseMSI -Quiet"}
 }
You must have the Active Directory PowerShell module installed on the computer to use the GetADComputer cmdlet.
Enter-PSSession and Invoke-Command cmdlets). If you need to connect to a PowerShell 7 endpoint, you must use the command:Enter-PSSession -ComputerName dc01 -ConfigurationName "powershell.7"
Otherwise, you will connect to the PowerShell Remoting 5.1 endpoint.
Updating PowerShell via Windows Update or WSUS
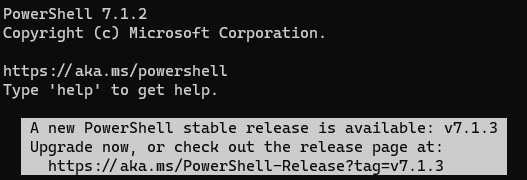
Before PowerShell Core version 7.2, pwsh.exe was not automatically updated. There was only a notification in the console after the release of a new version:
A new PowerShell stable release is available. Upgrade now, or check out the release page at: https://aka.ms/PowerShell-Release?tag=v7.1.3
Starting with version 7.2, PowerShell Core supports automatic updates through Windows Update (Microsoft Update, Windows Update for Business, internal WSUS server, or SCCM). To do this, you must enable the appropriate options during the installation of the MSI package.
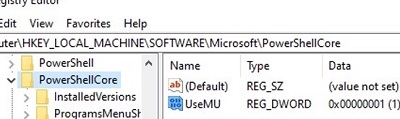
- The first allows PowerShell to update automatically using any available channel (enables the registry parameter UseMU =1 in the
HKEY_LOCAL_MACHINE\SOFTWARE\Microsoft\PowerShellCorekey)
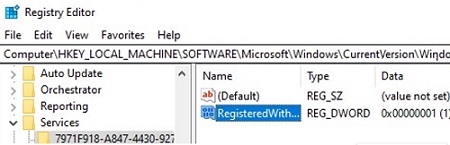
- The second checkbox will allow you to receive updates for all of Microsoft’s software, not just Windows. If this option is disabled, you will not receive PowerShell updates from Microsoft Update, but you can receive them from your WSUS/SCCM (the registry parameter registeredwithAU=1 under
HKLM\SOFTWARE\Microsoft\Windows\CurrentVersion\WindowsUpdate\Services\7971F918-A847-4430-9279-4A52D1EFE18D)
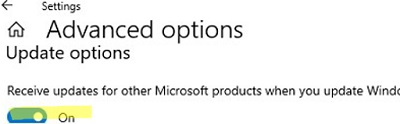
Check that the Receive updates for other Microsoft products when you update Windows option is now enabled under Settings -> Update and Security -> Windows Update -> Advanced options.
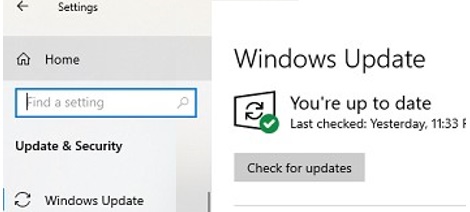
Now, when you click the Check for Updates button or run an update scan through the PSWindowsUpdate module, you will also receive updates for PowerShell Core.
14 comments
On Windows 7
iex “& { $(irm https://aka.ms/install-powershell.ps1) } -UseMSI”
irm : The request was aborted: Could not create SSL/TLS secure channel.
At line:1 char:12
+ iex “& { $(irm https://aka.ms/install-powershell.ps1) } -UseMSI”
+ ~~~~~~~~~~~~~~~~~~~~~~~~~~~~~~~~~~~~~~~~~
+ CategoryInfo : InvalidOperation: (System.Net.HttpWebRequest:HttpWebRequest) [Invoke-RestMethod], WebException
+ FullyQualifiedErrorId : WebCmdletWebResponseException,Microsoft.PowerShell.Commands.InvokeRestMethodCommand
“You can update PowerShell right from the PS cli.” Not on Win 10. When the msi installation starts, it needs all Powershell to be closed, and closing the shell automatically closes msi!
@MARC: had the same issue. Possible solution:
If available in your case, select the option “reboot later”. Maybe it will pop up 2-3 times. You’ll get to the end of the wizard. Immediately after installing, the new powershell is available. Good luck 🍀
☠️ On July 1, 2021, Microsoft announced a critical vulnerability in .NET Core (CVE-2021-26701, score 8.1) related to remote code execution. You urgently need to upgrade your PowerShell Core 7.0 to 7.0.6 and 7.1 to 7.1.3, respectively. This applies not only to Windows, but also to other platforms with PowerShell Core.
Forget the noise and the drama:
iex “& { $(irm https://aka.ms/install-powershell.ps1) } -UseMSI -Quiet”
Put that into PowerShell as an admin. Done. 🖖
The choco command is actually wrong.
If you run “choco upgrade powershell -y”, it will update the PowerShell version 5.1 or below.
If you want to upgrade the version 7.x, you need to run
choco upgrade pwsh -y
Thank you for clarifying!
The post has been updated.
Thank you 😀
(just two very little tiny things: it seems, you unfortunately forgot to replace “install” with “upgrade” in the second command … 😉
… and just for nice looking: sometimes it seems you have a leading space in front of the commands and sometimes not)
Microsoft has released PowerShell 7.2 with automatic updates through the Microsoft Update service (Windows Update for Business, WSUS, SCCM) on Windows 10 and Windows Server
Thanks, nice article.
To get a human readable output for installed .Net versions, I rather prefer
Get-ChildItem ‘HKLM:\SOFTWARE\Microsoft\NET Framework Setup\NDP\v4\Client\’
Thx for the nice and detailed article
Remotely check PowerShell version on domain computers:
$adcomputer=(Get-ADComputer -Filter ‘operatingsystem -like “*Windows server*” -and enabled -eq “true”‘ -SearchBase ‘OU=servers,OU=Munich,dc=woshub,dc=com’ ).Name
Invoke-Command-ComputerName $adcomputer -Scriptblock{$PSVersionTable.psversion} -ErrorAction SilentlyContinue
On the computers from a txt file:
Invoke-Command -ComputerName (Get-Content C:\PS\host_list.txt) –
ScriptBlock{$PSVersionTable.PSVersion} | Select PSComputerName, @{N=”PS Version”;E={$_.Major}}
Install and update PowerShell Core on Ubuntu:
$ sudo apt-get update -y
Download GPG keys of Microsoft repository:
$ wget -q https://packages.microsoft.com/config/ubuntu/$(lsb_release -rs)/packages-microsoft-prod.deb -O packages-microsoft-prod.deb
Install Microsoft GPG keys:
$ sudo dpkg -i packages-microsoft-prod.deb
Update the package list with packages from packages.microsoft.com:
$ sudo apt-get update
Install PowerShell:
$ sudo apt-get install powershell -y
The PowerShell package will be automatically updated by the apt package manager:
$ sudo apt update
If you are on Windows 11, to upgrade to the latest version of PowerShell, run:
winget install microsoft.powershell