In some cases, you may receive the error ‘Windows cannot access sharename. The network path was not found. Error code: 0x80070035‘ when you try to open a shared network folder on a Windows computer, Samba share, or NAS device. In this article, we’ll look at how to fix this shared folder error on Windows 10 and 11.
- Disable Legacy SMB Versions of File Shares
- Check the Windows SMB Client Settings
- Allow SMBv2 Insecure Guest Logons on Windows
- Enable Legacy SMB v1 Client on Windows
- Disable SMB 1.0 and SMB 2.0 Protocols on Windows Clients
- Check the Network Discovery Settings on Windows
- Add Windows Credentials to access NAS or Samba Shares
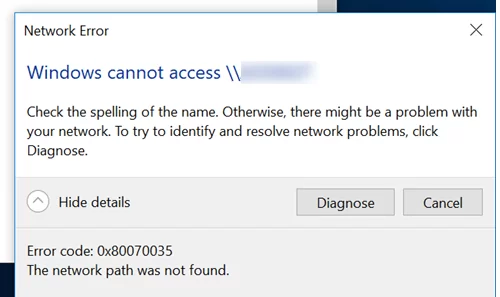
Network Error
Windows cannot access \\sharedNAS
Check the spelling of the name. Otherwise, there might be a problem with your network. To try identify and resolve network problems, click Diagnose.
Error code: 0x80070035.
The network path was not found.
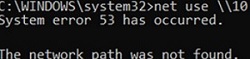
Another error occurs if you try to map such a shared folder as a network drive using Group Policy or the net use command:
System error 54 has occurred.
The network path was not found.
At the same time, you can easily open this shared folder from other computers (running older versions of Windows 10, 8.1 or 7), smartphones, and other devices.
Disable Legacy SMB Versions of File Shares
In most cases, the ‘0x80070035: The network path not found‘ error indicates that the target shared folder on the remote computer only supports SMBv1 connections or SMBv2 guest access. These are legacy and insecure versions of the Server Message Block (SMB, CIFS) file-sharing protocol. Enabling these protocols on your client will probably solve the problem, but it will reduce the security of your Windows device. So reconfiguring the remote file server device to support at least SMBv2 with authentication, or ideally SMBv3, is the first thing to try. This is the most correct and secure method.
Change your file server’s SMB configuration:
- NAS device – disable SMBv1, enable authenticated SMBv2 access (depending on NAS vendor);
- Samba server on Linux – disable guest access in smb.config file under [global] section:
map to guest = never
restrict anonymous = 2
Specify the minimum SMB version supported:
server min protocol = SMB2_10
client max protocol = SMB3
client min protocol = SMB2_10
encrypt passwords = true
Disable anonymous access in the configuration of each shared folder:
guest ok = no
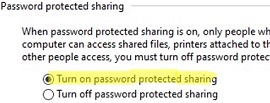
- On the Windows file server, disable the SMBv1 and SMBv2 protocols (described in a separate section of the article). Enable the Turn on password protected sharing option (navigate to Control Panel -> All Control Panel Items -> Network and Sharing Center -> Advanced sharing settings -> All networks, or run the command
control.exe /name Microsoft.NetworkAndSharingCenter /page Advanced).
Check the Windows SMB Client Settings
Perform the following simple checks on your Windows client. These steps can help you resolve the “Network Path Not Found” error without compromising the security of your computer:
- Check that you have entered the correct file server name. Try opening the network folder not by name (
\\FS01\Public), but by IP address (\\192.168.3.111\Public); - In the properties of the shared network folder (both at the NTFS file system permissions and the shared folder level), check that your user has permission to read the contents of the folder;
- Reset the DNS cache on both computers:
ipconfig /flushdns - If you simultaneously have two active network interfaces on your device (Wi-Fi and Ethernet), try temporarily disabling one of them and check access to your local network resources;
- Check that the following services are running on your computer (open the
services.mscconsole). Start these services and change the startup type to Automatic Delayed Start:Function Discovery Provider Host – fdPHost Function Discovery Resource Publication – FDResPub SSDP Discovery – SSDPSRV UPnP Device Host – upnphost DNS Client (dnscache)
- Try temporarily disabling your anti-virus and/or firewall application and see if the problem persists when you access network resources;
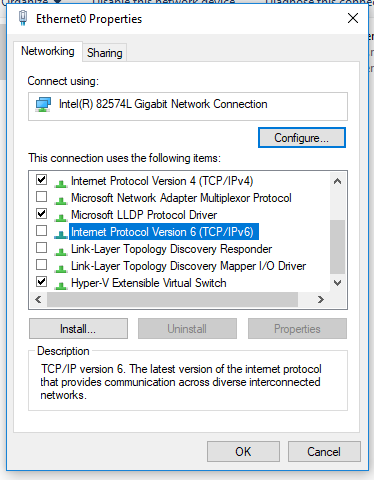
- Try to disable the IPv6 protocol in the properties of your network adapter in the Control Panel. Check that the following protocols are enabled for your network adapter: Client for Microsoft Network and File and Printer Sharing for Microsoft Networks;

- Try to reset the Windows network settings on the computer with the commands:
netsh winsock reset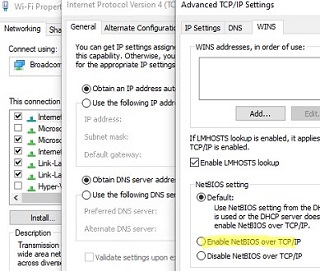
netsh int ip reset - If you are using a Windows workgroup network, make sure that NetBIOS protocol support is not disabled in the TCP/IPv4 properties of your network adapter.
 Next, open the Local Security Policy Settings (
secpol.msc), go to Local Policies -> Security Options -> Network security: LAN Manager authentication level and select Send LM & NTLM — use NTLMv2 session security if negotiated (this is an unsafe option!!).

Allow SMBv2 Insecure Guest Logons on Windows
If you are using anonymous shared folder access to NAS storage or other computers (without entering a username and password), you will need to enable the insecure guest logon policy on the client computer. By default, modern versions of Windows don’t allow anonymous (guest) access to shared network folders using the SMB 2.0 protocol.
If you try to connect to the shared folder as an anonymous (guest) user, an event with Event ID 31017 will appear in the Event Viewer log.
Source: Microsoft-Windows-SMBClient
Date: Date/Time
Event ID: 31017
Task Category: None
Level: Error
Keywords: (128)
User: NETWORK SERVICE
Computer: fs01.woshub.com
Description: Rejected an insecure guest logon.
User name: Ned
Server name: ServerName
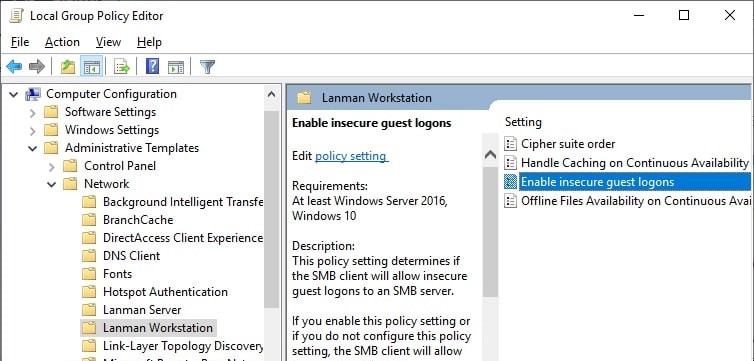
To allow SMBv2 guest logons (this is an unsafe option and should only be used when it is absolutely necessary!), open the Local Group Policy editor (gpedit.msc), and turn on the Enable insecure guest logons policy (Computer Configuration -> Administrative templates -> Network -> Lanman Workstation).
Or you can enable insecure SMB shared folder access under guest account via the registry using the command:
reg add HKLM\SYSTEM\CurrentControlSet\Services\LanmanWorkstation\Parameters /v AllowInsecureGuestAuth /t reg_dword /d 00000001 /f
Enable Legacy SMB v1 Client on Windows
You must enable the SMB1Protocol-Client component on the client computer if your network device (file storage) only supports the SMB 1.0 file-sharing protocol (although this is not recommended for security reasons).
The SMB v1.0 protocol is disabled by default in modern versions of Windows 10/11 and Windows Server 2019/2022. This is because SMB 1.0 is a legacy and vulnerable protocol for file and folder sharing on Windows. When you try to connect from Windows 10/11 to an SMBv1-only file share (for example, an old version of NAS storage, a computer running Windows XP/Windows Server 2003) and list the remote device’s shared network folders (by the UMC path, such as \\FileStorageNetworkName), you will receive an error ‘Network path not found‘.
You can use the DISM command to check if the SMBv1 protocol is enabled in Windows:
Dism /online /Get-Features /format:table | find "SMB1Protocol"

As you can see, in this case the SMB1Protocol-Client feature is disabled.
SMB1Protocol                                 | Disabled
SMB1Protocol-Client                          | Disabled
SMB1Protocol-Server                          | Disabled
SMB1Protocol-Deprecation                     | Disabled
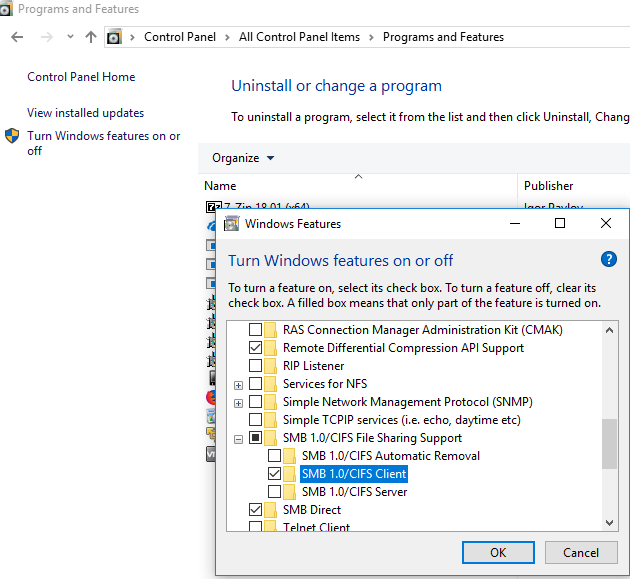
You can enable the SMB v1 client protocol to access legacy shared folders from the Turn Windows features on or off panel ( optionalfeatures.exe -> SMB 1.0 / CIFS File Sharing Support -> SMB 1.0 / CIFS Client).
Or you can enable the SMB 1.0 client with the DISM command:
Dism /online /Enable-Feature /FeatureName:"SMB1Protocol-Client"
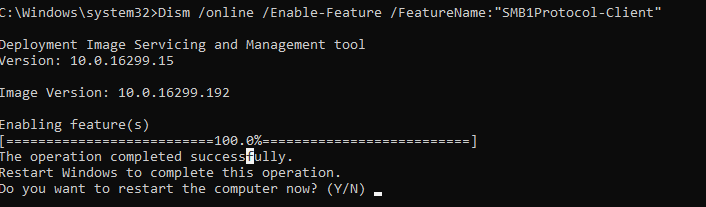
After installing the SMBv1 client, restart your computer and check that the shared network folder can now be opened.
On Windows Server 2019/2022, you can enable SMBv1 with the command
Install-WindowsFeature FS-SMB1
In Windows 10/11, the SMBv1 client is automatically disabled if it has not been used for more than 15 days.
Disable SMB 1.0 and SMB 2.0 Protocols on Windows Clients
If only modern devices that support SMB v3 are used on your network (Windows 8.1/Windows Server 2012 R2 and later, see the table of SMB versions in Windows), you can fix the 0x80070035 error by completely disabling SMB1 and SMB2 on all clients. The fact is that your computer may try to use the SMB 2.0 protocol to access shared folders that only accept SMB 3.0 connections
First, disable the SMB 1.0 protocol using the Turn Windows features on or off panel (optionalfeatures.exe) or with commands:
sc.exe config lanmanworkstation depend= bowser/mrxsmb10/nsi
 sc.exe config mrxsmb10 start= disabled
 Dism /online /Disable-Feature /FeatureName:"SMB1Protocol"
Then disable the SMB 2.0 protocol:
reg.exe add "HKLM\SYSTEM\CurrentControlSet\services\LanmanServer\Parameters" /v "SMB2" /t REG_DWORD /d "0" /f
 sc.exe config lanmanworkstation depend= bowser/mrxsmb10/nsi
 sc.exe config mrxsmb20 start= disabled
 PowerShell -ExecutionPolicy Unrestricted
 Set-SmbServerConfiguration –EnableSMB2Protocol $false
You can check that the SMB 1 and SMB 2 protocols are disabled by running the following PowerShell command:
Get-SmbServerConfiguration | select "*enablesmb*"|fl
EnableSMB1Protocol              : False
EnableSMB2Protocol              : False

Check the Network Discovery Settings on Windows
If your computers are joined to a workgroup, I strongly recommend that you follow the recommendations from the article Network computers are not showing up in Windows.
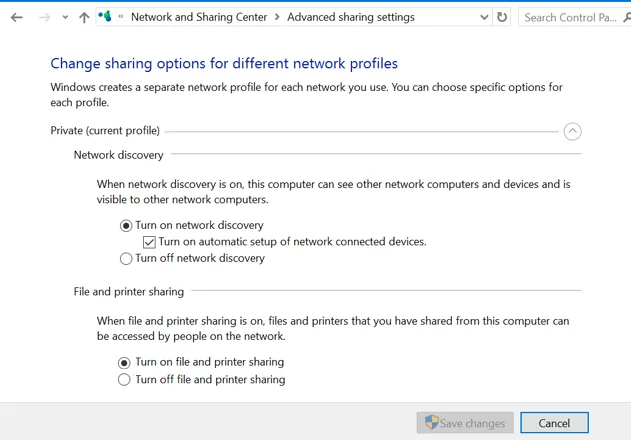
In the Network and Sharing Center section of the Control Panel on both computers, check that the Private network profile is set as the current profile (Private: Current profile). Make sure that the following options are enabled:
- Turn on network discovery + Turn on automatic setup of network connected devices;
- Turn on file and printer sharing.
In the All Networks section, enable the following options:
- Turn off password Protect Sharing;
- Turn on sharing.
Add Windows Credentials to access NAS or Samba Shares
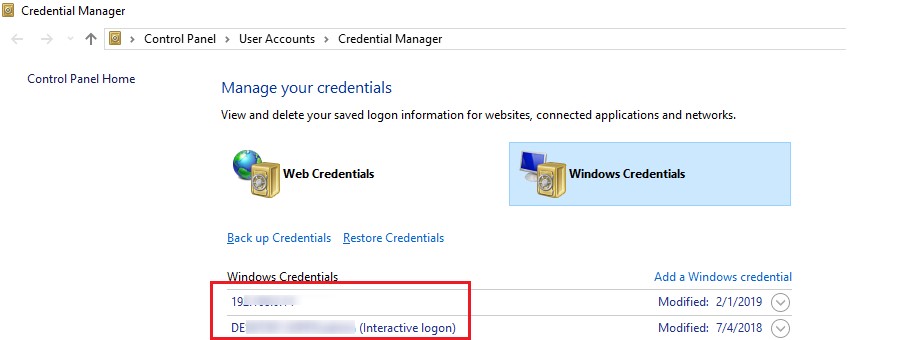
If the problem only occurs when accessing the NAS share or Samba server on Linux, you can try saving the connection credentials (username and password used to connect to the SMB share) to the Windows Credential Manager (Control Panel\All Control Panel Items\Credential Manager\Windows Credential or run the command control.exe keymgr.dll).
Click Add a Windows credential and specify the SMB file server hostname (or IP) and the connection credentials.
Then go to Network and Sharing Center and enable the option Use user accounts and passwords to connect to other computers in the Advanced sharing settings.
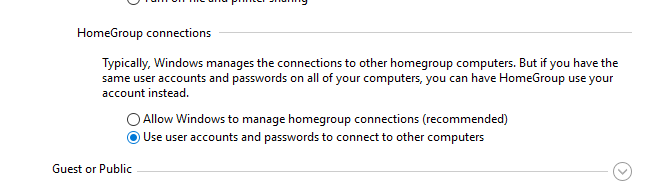
Windows automatically uses the saved credentials to access the specified file server resources.
I hope that my article will be useful to you and that you will be able to restore access to your shared folders on LAN.
47 comments
I got the error “0x80070035 The handle is invalid” when accessing shared network folders on Windows 7 SP1 and Windows Server 2008 R2 after installing the January security update KB4480970 (January 8, 2019).
The problem was resolved after removing this update. We are waiting for the fix from Microsoft.
DK — You Nailed It.
2 days of chasing this.
Layout:
Pc1 – maps Y:\qbfiles
Pc2 – maps Y:\qbfiles
Pc3 – QuickBooks File Server with loop back Y:\qbfiles
Pc1 & Pc2 fails with 0x80070035 or 0x80004005, handle is invalid, path was not found
Put old laptop in used, not updated since 11/2018, all ready has map drive and it fails.
Deduction…….Pc2 the “QB file server” is the problem.
Uninstalled KB44809070 from Pc3 and Pc2 then connected
Uninstalled KB from Pc1 only to find out it is the “server” not the connecting “clients”, reinstall KB on Pc1 an it is working.
Crickets to M$ for this crap.
Got the same issue here. Uninstalled the windows update KB44809070 (which was installed 10th January 2019) from the server. Didn’t work. What I did I uninstalled all the updates that happened on 10th January and 17th January.
All the other laptops and machines are Windows 7. All work fine connecting to the server (which runs windows server 2008).
The 2 machines that we have that run Windows 10 OS encountered the issue.
The new update KB4480955 for Windows 7 fixes the problem.
Windows 10 Enterprise, Version 1803, OS Build 17134.556
Windows 10 Error code: 0x80070035 “The network path was not found”
After few hours checking all internet suggestions and nothing worked, I found the solution myself:
On your computer\NAS open the “Control Panel” -> “Credentials Manager” -> “Windows Credentials” and create new Windows credential for the computer where your share is. Use the credentials of a user on that computer who has the admins permissions on the share…
VOILA, it works!
Hey, Nash. Adding the login id and password in Credential Manager worked for me, many thanks!. I’ve tried all the other suggestions, but none worked. It must be something to do with how Windows is authenticating to to the share. It’d be nice to have a proper fix at some stage.
You are very welcome Mark. Yeah, sometimes there are relay weird ways of resolving MS/Windows issues, but happy we all share our findings to help each other…
You are a geinus! I year later and still the same annoyance. Thanks a lot
Glad it helped you. Thanks.
Nash
Wow Nash, you are a genius! Thanks so much! I spent like 2 hours trying to figure this out and followed various tips in a few websites about configuring the network options and NOTHING worked! Doesn’t look like it has anything to do with the Windows 10 version since I’m using the latest 2004 released this month, September 2020. I had problems with an older Win 10 from a few months ago and it that case it was solved with one of those tips. But this time, I just kept getting that ridiculous Error Code: 0x80070035 “The Network Path was not found” when trying to connect to some of the computers on the network. The funny thing was that some would connect fine but others would not!
So apparently the problem is that Windows 10 has no idea what is wrong and doesn’t ask for a username and password to connect to these computers which are password protected! When you add credentials, they are already in there so it connects. It’s pretty mind blowing that this far along, with Windows 10 being around so long, such a simple issue has not been solved yet! What a headache!
But so glad it’s working now, you saved my night and probably days of tearing my hair out lol!
You are very welcome.
Glad my solution helped another person.
Happy Windows 10 to everyone 😉
You the best.
Windows Credential Manager update is working for my MYBOOKLIVE. Thanks a lot.
You are very welcome Vladimir. I learned a long time ago, some very simple “fixes” work sometimes much better that the complicated registry/OS tweaks, many experts are prone recommending…
Your solution was the only real and easy solution….the others had too many steps and no one worked…
I’ve been having this issue for months, following this guide fixed it within minutes. Thank you a bunch.
I had also this error 0x80070035, my solution was this using the registry , check the keys in :
[HKEY_LOCAL_MACHINE\SYSTEM\CurrentControlSet\Control\Lsa\MSV1_0]
“Auth132″=”IISSUBA”
“NtlmMinClientSec”=dword:00000000
“NtlmMinServerSec”=dword:00000000
“RestrictReceivingNTLMTraffic”=dword:00000002
“RestrictSendingNTLMTraffic”=dword:00000002
Delete the last 2 entries :
“RestrictReceivingNTLMTraffic”=dword:00000002
“RestrictSendingNTLMTraffic”=dword:00000002
this fixed my problem ans now i can see the shares of my both PC’s
Error Code: 0x80070035
Really many thanks for this solution which has been solved my problem, thanks again very much
your welcome 🙂
*You’re (You’re is you are, your is possessive)
Bingo – that is a common grammarical error!
thanks. you resolved my problem. thanks again.
your welcome, this is caused by using privacy tweak software for Windows 10 like O&O.ShutUp10
thanks, thanks, 1000 thanks
Shoudn’t this be $false? Only after I changed thie to $false did SMB2 change to disabled.
Under ” Then disable the SMB 2.0 protocol:” is the below line.
Set-SmbServerConfiguration –EnableSMB2Protocol $true
With Test-NetConnection I got “TcpTestSuceeded: False”.
On the same computer, using a different internet connection (wifi from my 4g phone), I get “TcpTestSuceeded: True” and the shared drive works.
So it must be something with my home internet connection: I disabled all the Windows firewall, as well as the firewall on my internet box, and yet the TCP connection on port 445 still doesn’t work. Any idea what could be blocking here? It’s really weird since it works on my 4g wifi connection…
I just figured all this out. At least with the Synology NAS devices, you have to go into File Services settings and insure that you have minimum settings for SMB protocol set to SMB1 and maximum SMB protocol settings set to SMB3.
Viola! It’s fixed. I pulled my hair out for weeks trying to figure this out!
An to be clear, the settings on the NAS were set to default as minimum and maximum at SMB1. It would not negotiate with network traffic using anything but SMB1 which Microsoft no longer likes. Go figure.
SMB1 is not used on newer OS’s and is typically disabled on older ones due to its vulnerabilities that let Ransomware propagate between machines. If yours is a home office and you have good antivirus on the PC and email, web browser, it’s probably not such a huge concern.
We run a small business workgroup with the Synology NAS used at a file server, DHCP and a few other things. That being said, since the original post references a NAS share and that is exactly what my issue was regarding that specific error, I wanted to reply here with what worked for me for this specific original post. I am sure the error mentioned in the OP can manifest for a whole host of reasons (no pun intended) so if this revelation assists anyone else with this specific problem, then I was more than happy to share.
Before attempting esoteric “fixes” for your NAS not showing in File Explorer (FE) in Win 10 check to see if your anti-malware program is blocking the visibility of the NAS. I discovered by painstaking trial-and-error that on my old VAIO (after installing a clean from scratch build (2004 latest as at 17/10/2020) of WIN10Pro x64) my Synology NAS was picked up immediately by the OS in its base standard configuration and a list of its Shared folders cascaded nicely down the left column under “Network”. Then I installed the current version of “Malwarebytes” (4.2.1.89) which I have endorsed/used for many years and found that it immediately made my NAS disappear from FE Network along with its folders. Oddly, having pinned the Synology to my “Quick Access” list the folders could still be accessed through QA but not under Network. Go figure. I discovered that only by disabling Malwarebytes (right-click System Tray icon and select “Quit/Exit”) and rebooting/logging out of my account did this allow the NAS to re-appear as before with its list of Folders. This was repeatable ad nauseam.
I filed a Support Ticket with Malwarebytes, got a Ticket number on 17/10, and still await their response as of 22/10.
For clarity, the following conditions are true:-
1. The WIN10Prox64 install was downloaded from MS servers and updated to latest 2004 build by WU OOBE with no “tweaking”.
2. The deprecated SMB1 was not re-engaged in “Programs & Features/Turn Windows Features On and Off” for the security reasons explained in this article.
3. The Synology NAS was connected on a standard 192.xxx.xxx.xxx APIPA internal network and DSM v6 was set to disallow SMB1 and instead force SMB2 as a minimum and SMB3 as a Max. Local Master Browser was un-checked (as enabling opens the Guest Account by default). Disallowing SMB1 prevented my 6-year old Samsung/HP CLX-6260 MFD from scanning docs to NAS but was overcome by setting up Scan-to-FTP instead and imposing stricter firewall rules on this.
4. On the PC, Network Discovery File and Printer Sharing was allowed and set to Private with Public turned off by default.
Very detailed, very good explanations.. i have figured out problems on my NAS server unsolved already 2 months.
thx
Obrigado:
Excelente postagem, estou completamente satisfeito.
Parabéns
The “SMB enable” saved me, totally!!!
Thanks!!!
SMB1 is not used on newer OS’s and is typically disabled on older ones due to its vulnerabilities that let Ransomware propagate between machines, so dont enable SMB1 !!
What else worth checking out. Thank you, point #4 was the case: checking the required services it sorted out that DNS Client was not started and altogether grayed out. I had to start it from command line.
On the other hand, looks not so uncommon, so I would place this point as another point to check for , but earlier in the article.
Anyway thank you for the hint!
This is a great article! However, one of the security updates (not sure which) that came out in February 2021 broke my Samba shares. I’m on Windows version 20H2 and my shares are SMB 3.0. This is across all 4 of my Windows 10 computers! Everything was fine until the security update! I didn’t change a thing on my Linux side! I’ve also tried limiting Samba to SMB 2, but behavior is exactly the same.
I get 2 different behaviors, seems to be pretty random. Either I can’t access the share (mapped drive) and get an error, “X:\ is not accessible. The request is not supported.” or the share shows up and I can see all the files. But, I can’t open anything. And when I try to revisit the share, I get the error “X:\ is not accessible. The directory name is invalid.” If I disconnect the drive, I can then remap it, but the behavior is the same.
Please HELP!!
change in HKLM\SYSTEM\CurrentControlSet\Control\Lsa
put LmCompatibilityLevel from 1 to 5 ( zie https://docs.microsoft.com/en-us/windows/security/threat-protection/security-policy-settings/network-security-lan-manager-authentication-level )
try this : change in registry HKLM\System\CurrentControlSet\Control\Lsa\LmCompatibilityLevel the LmCompatibilityLevel from 1 to 5 ( see https://docs.microsoft.com/en-us/windows/security/threat-protection/security-policy-settings/network-security-lan-manager-authentication-level )
Hi. You provide commands for disabling SMB2.
This is the last command: Set-SmbServerConfiguration –EnableSMB2Protocol $true
Should that be $true ?
You give a test command: Get-SmbServerConfiguration | select “*enablesmb*”|fl
Results: SMB1=False but SMB2=True.
If I change your Set-SmbServerConfiguration –EnableSMB2Protocol $true to $false, then the test result is false for both.
I’m on Win 10 pc, not server.
You thoughts?
Thanks.
Answering my own question: SMB2 & SMB3 protocols share the same stack. If SMB2 is completely disabled, SMB3 will also be disabled, according to MS.
Thanks for this – it was the enabling insecure guest logons in gpe that solved this for me. I’ve been all over the place disabling adaptors and re-enabling and editing all sorts of policies before finding this. I just hope I’ve not done too much damage!
Much appreciated
Thanks. Your Comment show me the way.
This fixed it for me too, thank god. Just randomly stopped working, stop releasing buggy windows updates.
Enabling insecure guest logons saved my day. Thanks a lot for the article. I had tried every suggested fix sited online until i ready the comments section. PAUL COYNE, thanks. You brought the break through.
For me this issued was FIXED INSTANTLY by turning off my VPN which I didn’t think about.