Windows OS Hub
  • Windows
    • Windows 11
    • Windows 10
    • Windows Server 2025
    • Windows Server 2022
    • Windows Server 2019
    • Windows Server 2016
  • Microsoft
    • Active Directory (AD DS)
    • Group Policies (GPOs)
    • Exchange Server
    • Azure and Microsoft 365
    • Microsoft Office
  • Virtualization
    • VMware
    • Hyper-V
    • Proxmox
  • PowerShell
  • Linux
  • Home
  • About

Windows OS Hub

  • Windows
    • Windows 11
    • Windows 10
    • Windows Server 2025
    • Windows Server 2022
    • Windows Server 2019
    • Windows Server 2016
  • Microsoft
    • Active Directory (AD DS)
    • Group Policies (GPOs)
    • Exchange Server
    • Azure and Microsoft 365
    • Microsoft Office
  • Virtualization
    • VMware
    • Hyper-V
    • Proxmox
  • PowerShell
  • Linux

 Windows OS Hub / Windows 11 / Disable Auto Disk Check (CHKDSK) at Windows Startup

March 10, 2026

Disable Auto Disk Check (CHKDSK) at Windows Startup

When powered on, Windows automatically performs a full disk check using the chkdsk.exe utility on any volumes marked with a dirty bit flag. If a volume has a dirty bit set, this indicates potential file system errors, incomplete transactions, volume inconsistencies, or other disk issues that require validation and repair. The dirty bit flag can also be set for disks in the case of a sudden system shutdown (due to a power failure or forced reboot), or if hard disk damage is detected.

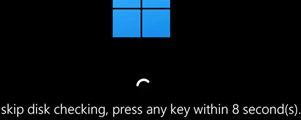
If Windows detects a dirty bit flag on one of the disks during startup, the To skip disk checking, press any key will appear on the screen. If the user doesn’t press any key within the 10-second countdown, chkdsk will automatically start scanning the disk for errors and repairing them.

Windows boot message: To skip disk checking, press any key

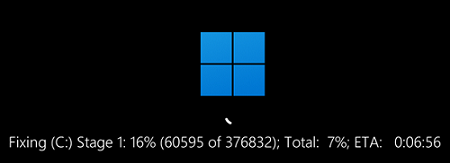
Once the automatic disk check procedure using the chkdsk tools has started (triggered by chkntfs settings or dirty bit flags), it cannot be canceled and may take a considerable amount of time (up to several hours, depending on disk size and file count), during which the user will not be able to use their computer.

Windows: auto disk checking on startup

If the disk check has been run once, you should just wait for it to finish. However, sometimes the disk check is run every time the computer is booted up, which irritates users. Disabling this disk check is an option, but it is not recommended as it can result in losing control over the integrity of your file system.

Use the following command to find out whether the specified drive requires a disk check (whether it is marked by the dirty bit flag):

fsutil dirty query c:

If the drive is marked as dirty and will be automatically checked when the computer boots, the command will return:

Volume - c: is Dirty

An administrator can use the chkntfs command to disable automatic checking for specific or all drives at Windows boot. The following command, for example, excludes drives C: and D: from the automatic checking procedure:

chkntfs /x d: c:

chkntfs /x - disable disk check

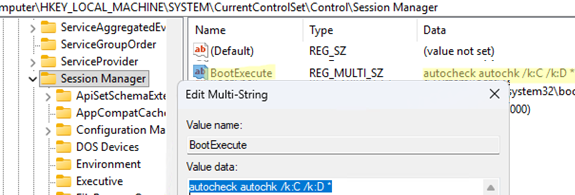
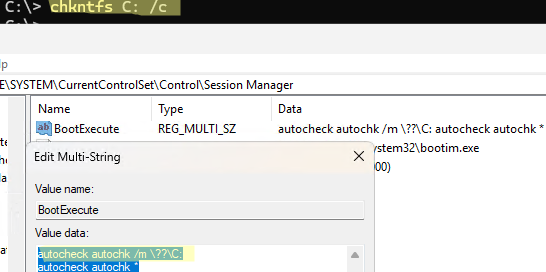
The current configuration for automatic disk checking at boot is stored in the BootExecute registry parameter under the HKLM\SYSTEM\CurrentControlSet\Control\Session Manager key.

After disabling the check for drives C: and D:, the value of this parameter changed to:

autocheck autochk /k:C /k:D *

Autodisk check settings in BootExecute registry key

To stop a specific drive from being checked, add its letter with the /K parameter (used to exclude drives from being checked). For example, to disable the automatic disk check for the C: drive only, change the registry value to:

autocheck autochk /k:C *

 The default value of the BootExecute parameter, when all disks are checked if a dirty bit is detected on them, is:

autocheck autochk *

To restore the default configuration, change the registry value as follows:

reg add "HKLM\SYSTEM\CurrentControlSet\Control\Session Manager" /v BootExecute /t REG_MULTI_SZ /d "autocheck autochk *" /f

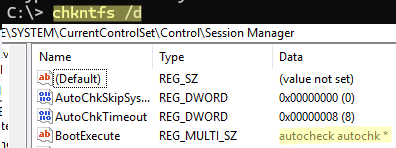
Or you can revert to the default settings (all system disks are checked for dirty bits at boot, and chkdsk is run only for disks with errors) by running:

chkntfs /d

Restore the default "autocheck" value in the registry

To schedule a one-time check of a specific drive the next time you reboot Windows, specify its drive letter in the following command:

chkntfs C: /c

This will add the autocheck autochk /m \??\C: entry to the BootExecute registry setting, which will be automatically deleted after performing a disk check the next time the computer boots.

chkntfs: schedule a one-time check of a specific drive on Windows

Cancel a scheduled disk check:

chkntfs /x c:

Important. Excluding a disk from automatic checking at boot doesn’t reset the dirty bit on that disk. We strongly recommend running a full disk check on this disk as soon as possible using the following command:

chkdsk C: /f /r ( /r – full check, /f – automatically fix errors)

This will prevent the accumulation of file system errors and minimize the risk of data loss from logical errors (lost clusters, cross-references). It will also prevent data loss on bad blocks by marking them as unwritable.

Check the disk health using:

chkntfs f:

chkntfs - F: is not dirty

The message F: is not dirty means that no errors have been found on the disk, so it doesn’t need to be checked.

0 comment
1
Facebook Twitter Google + Pinterest
Questions and AnswersWindows 10Windows 11
previous post
Configure Distributed File System (DFS) Namespace and Replication on Windows Server
next post
Pin and Unpin Apps to Taskbar in Windows 11 via PowerShell

Related Reading

How to Prefer IPv4 over IPv6 in Windows...

April 15, 2025

Change BIOS from Legacy to UEFI without Reinstalling...

April 23, 2025

Uninstalling Windows Updates via CMD/PowerShell

March 10, 2026

How to Detect Which User Installed or Removed...

June 25, 2025

Find a Process Causing High Disk Usage on...

July 16, 2025

Map a Network Drive over SSH (SSHFS) in...

May 13, 2025

Fix: The referenced assembly could not be found...

March 25, 2025

How to Move (Migrate) Windows Shares to a...

February 26, 2026

Leave a Comment Cancel Reply

join us telegram channel https://t.me/woshub
Join WindowsHub Telegram channel to get the latest updates!

Recent Posts

  • Load and Initialize Network Drivers in Windows PE or Recovery Environment

    February 25, 2026
  • How to Set a Custom Drive Icon in Windows

    February 17, 2026
  • Managing Per-User Services in Windows

    February 11, 2026
  • Change Default OU for New Computers and Users in AD

    February 2, 2026
  • Where Windows Stores Certificates and Private Keys

    January 22, 2026
  • How to Remove Old (Unused) PowerShell Modules

    January 12, 2026
  • How to Move (Migrate) Windows Shares to a New File Server

    December 24, 2025
  • Using KDC (Kerberos) Proxy in AD for Remote Access

    December 23, 2025
  • Windows: Create (Install) a Service Manually

    December 16, 2025
  • Windows: Auto Switch to Strongest Wi-Fi Network

    December 10, 2025

Follow us

  • Facebook
  • Twitter
  • Youtube
  • Telegram
Popular Posts
  • Converting Windows 10 to Enterprise LTSC Without Losing Data
  • How to Remove ‘Some Settings are Managed by Your Organization’ on Windows 11 or 10
  • Remove the Max Path Length Limit (260-Characters) on Windows
  • How to Pause (Delay) Update Installation on Windows 11 and 10
  • Pin and Unpin Apps to Taskbar in Windows 11 via PowerShell
  • Restoring a Missing Windows Update Service in Windows 11 (10)
  • Windows Cannot Be Installed: The Selected Disk Has an MBR Partition Table
Footer Logo

@2014 - 2026 - Windows OS Hub. All about operating systems for sysadmins


Back To Top