All modern versions of Windows come with a built-in firewall called Windows Defender Firewall. This built-in software firewall monitors and filters incoming and outgoing network traffic to protect Windows from unauthorized external access and controls the network activity of installed programs. Windows Defender Firewall is enabled by default and protects all network interfaces on a computer. The default behavior of Windows Defender Firewall is to block all incoming connections unless they are explicitly allowed by rules, while allowing all outgoing connections.
In most cases, Windows Firewall should be enabled to protect a computer from network threats. To grant access to a computer for a specific service or IP address, simply create an allow rule. In some cases, an administrator may need to disable the Windows Defender Firewall completely, for example, to troubleshoot or debug network connections. This post will explain how to disable and enable the built-in Windows Defender Firewall using several different methods.
Disable or Enable Windows Firewall using Settings App or Control Panel
In Windows 11, the firewall is managed via the Windows Security app.
- Go to Settings -> Update & Security -> Windows Security or run the command
windowsdefender://network/ - Select Firewall and network protection

- Click each of the three network profiles (Domain, Private, and Public) one by one, and disable Microsoft Defender Firewall for each
- Confirm that you want to disable the firewall in the User Account Control prompt.
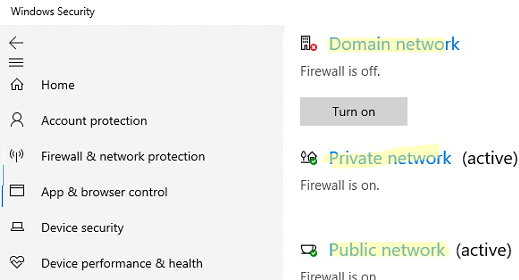

- Domain – used for computers that are joined to an Active Directory domain
- Private – for office LANs, workgroups, and home networks
- Public – for public networks (cafes, airports)
Different firewall rules and Windows Network Discovery settings are applied to a network interface based on the assigned network type. You can change the network profile (location) for a connection as described here.
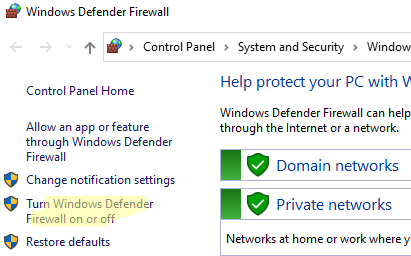
In previous versions of Windows (10, 8.1, 7) and in Windows Server 2012 R2/2016/2019, administrators could disable the firewall using the Windows Firewall with Advanced Security applet in the classic Control Panel.
- Open the Windows Firewall settings by running
firewall.cpl - Click Turn Windows Defender Firewall on or off
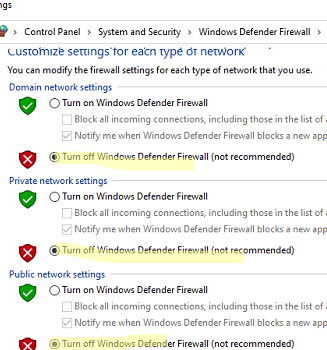
- Disable Windows Defender Firewall for all network profile types.
If your computer has multiple network adapters, it is possible to disable the Windows Defender Firewall for only some of them.
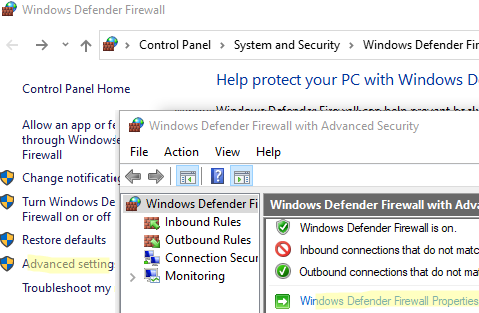
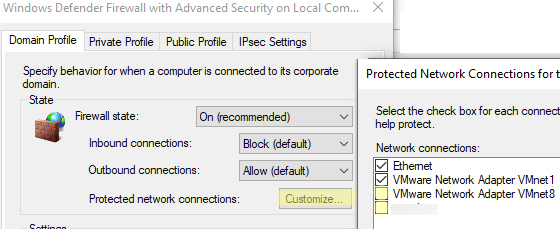
- Go to Advanced Settings and click Windows Defender Firewall Properties
- Each network profile has a settings section called Protected network connections. Click on the Customize button.
- Uncheck the network interfaces for which you want to disable the firewall.
- Disable firewall protection for network interfaces in the settings of other network profiles in the same way.
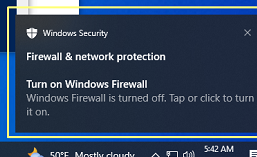
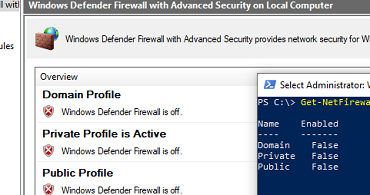
When the Windows Defender Firewall is disabled, a warning notification will appear in the system tray to alert users that their firewall is turned off
To hide this pop-up warning, add the following registry value:
reg add "HKLM\Software\Microsoft\Windows Defender Security Center\Notifications" /v "DisableNotifications" /t REG_DWORD /d "1" /f
mpsvc). Disabling or pausing the Windows Firewall service alone does not turn off the firewall; you must manually disable protection for each network profile to fully deactivate it.
However, you can disable the built-in Windows Defender antivirus by stopping its services.
How to Disable Windows Firewall via Group Policy
An administrator can disable the Windows Defender Firewall using Group Policy (GPO).
On a standalone computer, use the Local Group Policy Editor console (gpedit.msc). In an Active Directory domain environment, you need to create a new GPO using the Group Policy Management snap-in (gpmc.msc).
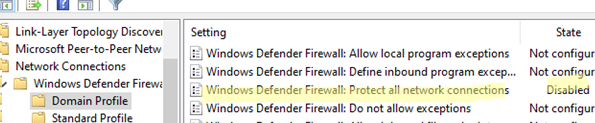
- Open the Group Policy editor and navigate to Computer Configuration -> Administrative Templates -> Network -> Network Connections -> Windows Firewall -> Domain Profile.
- Open the Windows Firewall: Protect all network connections option and change it to Disabled
- Similarly, change the same GPO option in the Standard Profile section
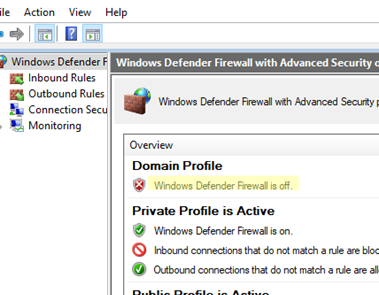
- Update the GPO settings on the computer and ensure that the Firewall is disabled for a domain profile.
- When a computer is connected to a non-domain network (public or private), the Windows Firewall will protect the connection using the appropriate network profile.
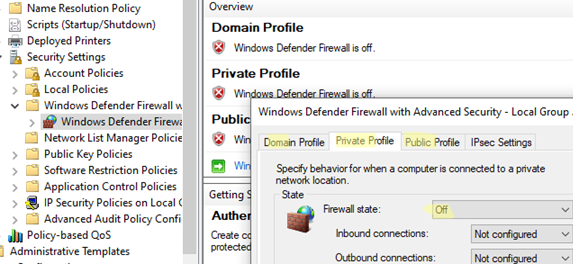
- If you want to disable the firewall for all network profiles, go to the Computer Configuration -> Windows Settings -> Security Settings -> Windows Firewall with Advanced Security. Set the firewall state to Off on each of the three network profile tabs.
If an administrator disables the Windows Firewall via a GPO, users won’t be able to manually enable it using the Control Panel or Settings app.
Turn the Windows Firewall On or Off with PowerShell
Built-in PowerShell cmdlets can be used to manage the Windows Firewall via the command prompt.
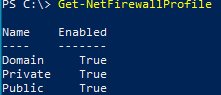
Check if the Windows Defender Firewall is enabled for all three network profiles:
Get-NetFirewallProfile | Format-Table Name, Enabled
It is only possible to disable the firewall for one network profile:
Set-NetFirewallProfile -Profile Domain -Enabled False
Or disable the firewall for all network profiles at once:
Set-NetFirewallProfile -Profile Domain, Public, Private -Enabled False
To turn the Windows Defender Firewall on, run the command:
Set-NetFirewallProfile -Profile Domain, Public, Private -Enabled True
It is possible to disable firewall protection for a specific network connection. To find out the name of a network connection, list them:
Get-NetAdapter
Now you can disable the firewall for the specific network interface:
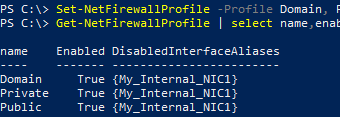
Set-NetFirewallProfile -Profile Domain, Public, Private -DisabledInterfaceAliases "Ethernet_NIC1"
List the network adapters excluded from firewall protection:
Get-NetFirewallProfile | select Name,Enabled,DisabledInterfaceAliases
Clear the firewall’s network adapter exclusion list.
Set-NetFirewallProfile -Profile Domain,Public,Private -DisabledInterfaceAliases @()