In this article we’ll show how to solve problems that occur when a computer running Linux Ubuntu/Mint/Kali doesn’t boot or drops to a busybox prompt during the initramfs initialization. The user can access and use only the initramfs command prompt.

Repairing a broken Ext4 Superblock in LInux
If Ubuntu crashes into a busybox during the initramfs initialization, there may be a damaged superblock on the disk.
everal superblock copies are kept in Linux. To recover a system in case this problem occurs, you need to boot from the rescue image/disk/Live CD and run the terminal prompt. After booting, enter the following command in the terminal:
# sudo fdisk -l|grep Linux|grep -Ev 'swap'
The command returns the information about your volume:
/dev/vda2 4096 83884031 83879936 40G Linux filesystem
Remember the volume name and specify it in the following command:
# sudo dumpe2fs /dev/vda2 | grep superblock
The command will show the list of backup superblocks:
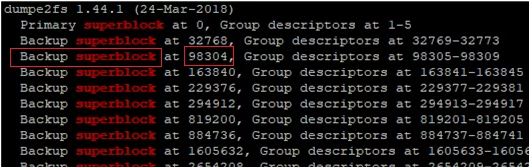
We will use the second backup superblock to replace the damaged one (you can use any superblock except Primary). Check the disk using the backup superblock:
# sudo fsck -b 98304 /dev/vda2 -y
fsck from util-linux 2.31.1
e2fsck 1.44.1 (24-Mar-2018)
/dev/vda2 is mounted.
e2fsck: Cannot continue, aborting
Unmount the volume:
# umount /dev/vda2
After successfully replacing the superblock, you will get a message like this:
fsck from util-linux 2.31.1
e2fsck 1.44.1 (24-Mar-2018)
/dev/vda2 was not cleanly unmounted, check forced.
Pass 1: Checking inodes, blocks, and sizes
Pass 2: Checking directory structure
Pass 3: Checking directory connectivity
Pass 4: Checking reference counts
Pass 5: Checking group summary information
Free blocks count wrong for group #231 (32254, counted=32253).
Fix? yes
Free blocks count wrong for group #352 (32254, counted=32248).
Fix? yes
Free blocks count wrong for group #358 (32254, counted=27774).
Fix? yes
..........
/dev/vda2: ***** FILE SYSTEM WAS MODIFIED *****
/dev/vda2: 85986/905464576 files (0.2% non-contiguous), 3904682/905464576 blocks
Then unmount the boot media and restart your computer. Everything should work properly.
Fsck Boot Error: Unexpected Inconsistency
The second variant of the initramfs (BusyBox) issue includes the following message in the terminal window:
/dev/sda1: UNEXPECTED INCONSISTENCY; RUN fsck MANUALLY
The root filesystem on /dev/sda1 requires a manual fsck.
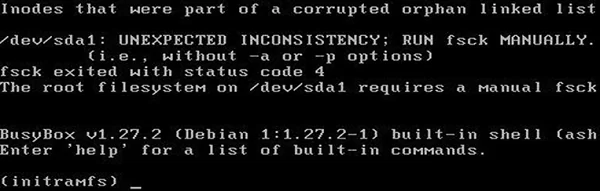
(initramfs) exit in the terminal window. The error may appear after you do it…The message will show a volume that that requires running a manual disk check. Run the following command in the initramfs prompt:
# fsck /dev/sda1 -y
After the disk check is over, restart your computer and make sure that Linux boots correctly.
Alert! /dev/volume Does Not Exist
Fstab Issue
You can see the following error when booting the Linux host:
ALERT! /dev/sda1 does not exist. Dropping to a shell.
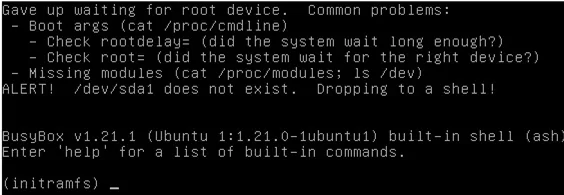
You may have just installed your Linux or your host has some fstab problems. The most often the problem occurs when a system is installed from a USB drive. The system may show an error of any volume. Like in the first case, we have to boot from the rescue/boor Linux media and do some actions. Check the disk UUID using this command:
# sudo blkid
The system will return something like this:
/dev/sda2: UUID="36cce3d5-cbdb-46f4-adbf-3f9aaa01d729" TYPE="ext4" PARTUUID="fea4dab1-4e12-4327-85c6-76ade18f64e1"
Here we see that the system must boot from sda2, but actually it tries to boot from sda1.
Mount the volume to any directory, for example:
# sudo mount /dev/sda2 /mnt
When you see /dev/sda2 in the /mnt directory, find the file /etc/fstab there and modify the line containing /dev/sda1 as follows:
UUID=36cce3d5-cbdb-46f4-adbf-3f9aaa01d729 / ext4 errors=remount-rw 0 1
Save the file. Unmount the volume from /mnt and reboot. If the problem was related to the wrong volume name, the server would boot.
Also, you can solve this problem by booting in the emergency mode. Remount the root directory as read/write:
# sudo mount -o remount,rw /
Then change fstab and restart the server.
Hardware Problem
On some motherboards, SATA ports may get random numbers. It may also cause the error described in the previous section. To fix it, you must edit the grub bootloader.
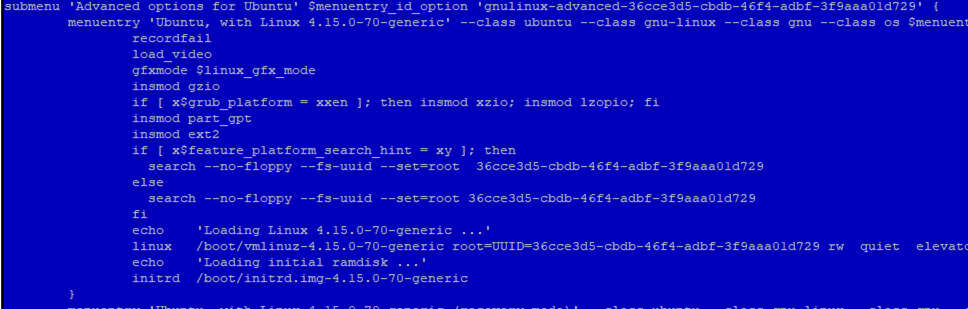
Boot in the emergency mode or from a Live CD and edit the /boot/grub/grub.cfg file.
In the line that determines the boot volume, for example:
Linux /boot/vmlinuz-4.15.0-70-generic root=/dev/sda1 rw quiet elevator=noop fsck.repair=yes
Replace the path to the disk by its UUID:
Linux /boot/vmlinuz-4.15.0-70-generic root=UUID=36cce3d5-cbdb-46f4-adbf-3f9aaa01d729 ro quiet elevator=noop fsck.repair=yes
4 comments
Amazing!!! Thanks alot
Great THREAD EXPLAINING.
At first I was affaraid that windows OS hub makes some harm to mine Linux distro since it is infected by Windows mindset. At the begining I was a little disgusted by the name and expect the gates face poking on me and ask for a ‘support payments’ and for mine windoze PRODUCT_ID, Confirmation ID, purchase proof_ID, size of mine shoe and size of mine Willy, but luckly any windows related crap and spying was ommited and I could go straight to the `service`. The explained prodecure went smoothly for me, and I have not to be pushed to pay for some to sc.mbags. I’m kinda scared that I fall in ubuntu/Debian/systemd trap but soon I will tear away from me that wicked mindset and migrate to true FOSS environment. It worked – I did this for all mine filesystem – I have 3 Linuxes in mine box. For most bizzare thing – as I sam fsck in action – the last empty ext4 partition /dev/sda6 was full of errors in 1st attampt (just fsck), at nd attempt, I used backup of superblock from each partition and forced fsck to check them again. After finishing and restart everything OK /root password escaped :D/. Thanks to the Porteus Live CD
Thanks, this got my Mint box going again.