Connecting SharePoint Online document libraries through the OneDrive client or using the Web interface are the preferred and recommended ways to access document library files on SharePoint. But you can also mount SharePoint Online and OneDrive site libraries in Windows as regular network drives. You can map a SharePoint Online network drive manually or by GPO.
The WebDAV protocol can be used to access SharePoint Online document libraries over HTTPS. This requires the WebClient service to be running in Windows.
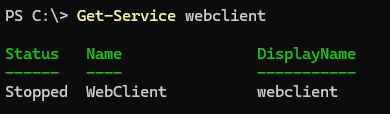
Check that the service is running and, if necessary, configure it to start automatically:
Get-Service webclient
 Set-Service webclient –startuptype automatic –passthru
Windows 10 and 11 have the WebDAV client built into the OS, but Windows Server 2022/2019/2016 requires a separate feature installation:
Install-WindowsFeature WebDAV-Redirector –Restart
This will install two new services:
WebClientMRxDAV– WebDAV file system driver
How to Manually Map a SharePoint Online Site as a Network Drive
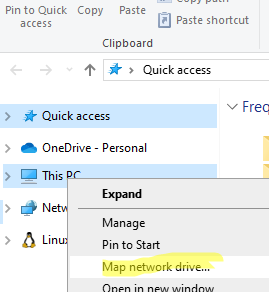
To manually map a SharePoint Online document library in Windows, open File Explorer, right-click This PC, and select Map Network Drive.
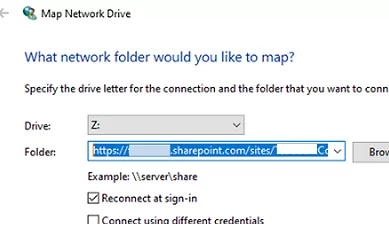
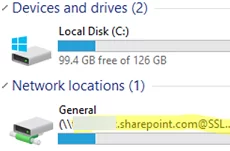
Select a drive letter and specify the HTTPS path to the target SharePoint site (for example, https://woshub.sharepoint.com/sites/company/Shared%20Documents/General). Enable the Reconnect at sign-in option if required.
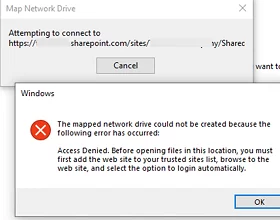
However, an error occurs when connecting the network drive:
The mapped network drive could not be created because the following error has occurred:
Access Denied. Before opening files in this location, you must first add the web site to your trusted site list, browse to the web sites, and select the option to login automatically.
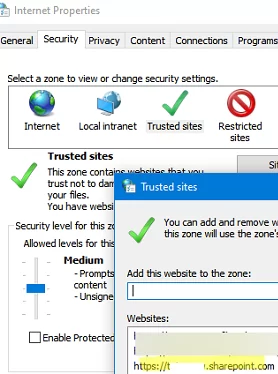
To fix this, add your SharePoint site address to the trusted list. Open the Internet Options in the Control Panel (run the inetcpl.cpl command).
Go to the Security tab, select the Trusted sites zone, click Sites, and add the URL address of your SharePoint site.
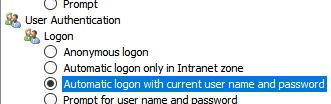
Then click Custom Level button and change the User Authentication -> Logon value to Automatically logon with current user name and password.
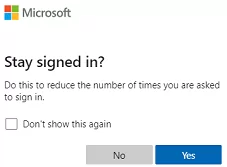
Accessing a SharePoint Online site requires a user to obtain a Microsoft Modern Authentication token. So, open your Internet Explorer (IE) browser and go to https://login.microsoftonline.com/
edge://settings/defaultBrowser -> Internet Explorer Mode Pages -> Add.Perform authentication with your Azure (Microsoft 365) account, and check the option Stay signed in.
This gives you an Entra ID access token valid for 90 days. If the user session is active, this token is automatically renewed.
You can also map a SharePoint Online library as a network drive from the command prompt:
net use T: "https://woshub.sharepoint.com/sites/company/Shared Documents/General" /persistent:yes
Or use the New-PSDrive PowerShell cmdlet:
$SPOLibrary = "https://woshub.sharepoint.com/sites/company/Shared Documents/General"
 New-PSDrive -name "Z" -Root $SPOLibrary -PSProvider filesystem
An error may occur when mapping a network drive from the command line:
System error 224 has occurred.
Access Denied. Access Denied. Before opening files in this location, you must first add the web site to your trusted site list….
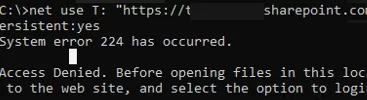
In this case, check that the SharePoint Online site is added to trusted and that you have authenticated with your Microsoft 365 account (or the authentication token may have expired).
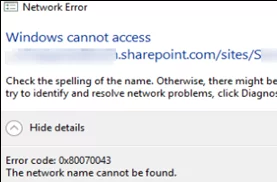
An error will occur if the WebDav client is not installed on the computer:
Error code: 0x80070043
The network name cannot be found.
Mapping SharePoint Online Library Using GPO
Now let’s look at how to automatically map a network drive for a SharePoint Online site using Group Policies.
Create a new policy and assign it to the OU containing the target computers on which you want to mount the SharePoint drive.
- Open the Group Policy Management snap-in (
gpmc.msc); - Create a new GPO and link it to the OU with the computers on which you want to mount the SharePoint drive;
- Navigate to Computer Configuration -> Policies -> Administrative Templates -> Windows Components -> Internet Explorer -> Internet Control Panel -> Security Page
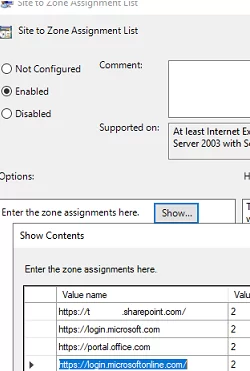
- Enable the policy Site to Zone Assignment List and add the following URLs to the trusted list (code 2):
https://woshub.sharepoint.com/
 https://login.microsoft.com
 https://portal.office.com
 https://login.microsoftonline.com/
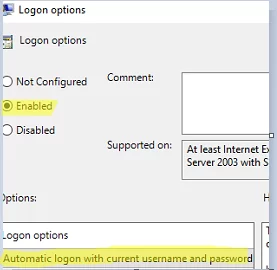
- Then go to the Trusted Sites Zone section and enable the policy Logon options. Select the option Automatic logon with current username and password.
- Next, to enable users to authenticate in Microsoft 365 via IE, you’ll need to install administrative (ADMX) templates for MS Edge and copy them to the central GPO store.
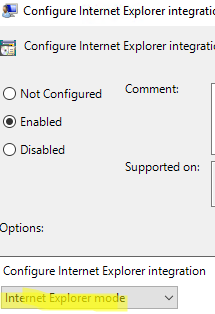
- Go to Computer Configuration -> Administrative Templates -> Microsoft Edge. Enable the policy Configure Internet Explorer Integrations and set it to Internet Explorer Mode;
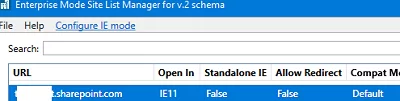
- Install the Enterprise Mode Site List Manager v2 tool (https://www.microsoft.com/en-us/download/details.aspx?id=49974) and generate the XML file containing the following settings:
URL:woshub.sharepoint.com
Open in:IE 11
Default:Compat modeSave the file to the NetLogon folder on the domain controller (for example, \\woshub.loc\NETLOGON\edge_iemode_sharepoint.xml) - Open the GPO policy Configure the Enterprise Mode Site List. Enable it and specify the UNC path to the XML file containing the list of sites you created earlier.
- Enable the following policies to disable unnecessary prompts the first time you run the Edge browser:
–Hide the one-time redirection dialog and the banner on Microsoft Edge
–Hide the first-run experience and splash screen
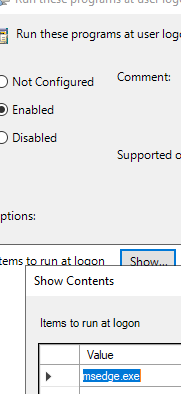
- To show the Microsoft Modern Authentication prompt when a user logs on, enable the
msedge.exeprocess to start automatically using the Run these programs when the user logs on policy (Computer Configuration -> Administrative Templates -> System -> Logon); - Then go to Microsoft Edge -> Start, home page and new tab. Enable the policies: Actions to take on startup: Open a list of URLs and Sites to open when the browser starts:
https://login.microsoftonline.com/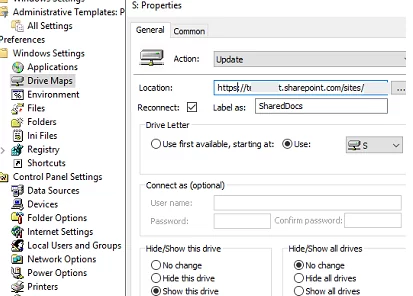
https://woshub.sharepoint.com/ - Now configure the network drive mapping using Group Policy Preferences. Go to User Configuration -> Preferences -> Windows Settings -> Drive Maps. Select New -> Mapped Drive and set the drive map options:
Action: Update
Location:https://woshub.sharepoint.com/sites/company/Shared%20Documents/General
Reconnect:True
Drive Letter:Show this drive
 Save the file to the NetLogon folder on the domain controller (for example,
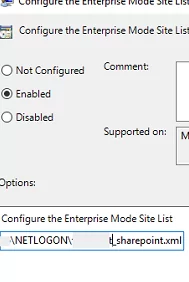


The Microsoft Authentication window will now open when you start the Edge browser. Enter your username and password and confirm login with MFA. End the user session (logoff).
The SharePoint network drive will be automatically mapped via GPO the next time the user logs in.
Some notes about using a SharePoint network drive:
- Users must periodically (once a month) open the SharePoint Online site in a browser to update the security token.
- The network drive is only available in an active user session;