Replication in SQL databases is the process of copying data from the source database to another one (or multiple ones) and vice versa. Data from one database server are constantly copied to one or more servers. You can use replication to distribute and balance requests across a pool of replicated servers, provide failover and high availability of MariaDB databases. The MariaDB (and MySQL) allows to use two types database replication mades: Master-Master and Master-Slave. In this article we’ll consider how to configure both types of MariaDB replication on Linux CentOS 7.
Installing MariaDB
Earlier we published an article describing the process of MariaDB installation on CentOS 7. So we won’t focus on the MariaDB installation itself, but move on to how to configure the replication.
Configuring Simple Master-Master Replication on MariaDB
In a Master-Master replication scheme, any of the MariaDB/MySQL database servers may be used both to write or read data. Replication is based on a special binlog file, a Master server saves all operations with the database to. A Slave server connects to the Master and applies the commands to its databases.
1. MariaDB: Configuration of the First Master Server (Master-1)
Add the following lines to my.cnf file on your first MariaDB server:
#replication
server_id = 1
report_host = master
log_bin = /var/lib/mysql/mariadb-bin
log_bin_index = /var/lib/mysql/mariadb-bin.index
relay_log = /var/lib/mysql/relay-bin
relay_log_index = /var/lib/mysql/relay-bin.index

service mariadb restart
Create a user to configure replication:
mysql
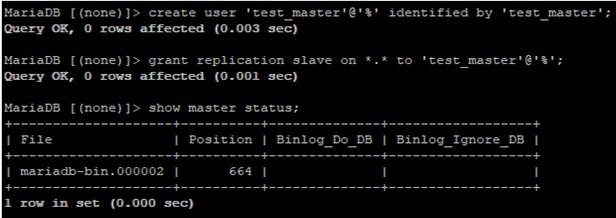
create user 'test_master'@'%' identified by 'test_master';
grant replication slave on *.* to 'test_master'@'%';
To add a Slave, we need to get bin_log data from the Master-1 server:
MariaDB [(none)]> show master status;
+--------------------+----------+--------------+------------------+
| File | Position | Binlog_Do_DB | Binlog_Ignore_DB |
+--------------------+----------+--------------+------------------+
| mariadb-bin.000002 | 664 | | |
+--------------------+----------+--------------+------------------+
1 row in set (0.000 sec)
2. MariaDB: Configuration of the Second Master Server (Master-2)
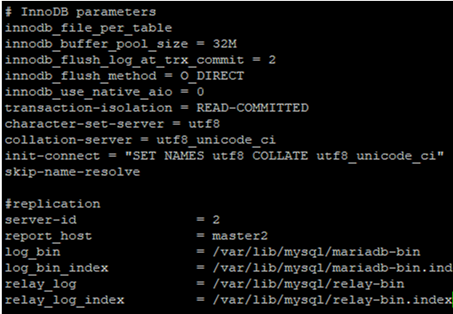
Connect to the second MariaDB server, open the my.cnf file and add the following configuration to it:
#replication
server_id = 2
report_host = master2
log_bin = /var/lib/mysql/mariadb-bin
log_bin_index = /var/lib/mysql/mariadb-bin.index
relay_log = /var/lib/mysql/relay-bin
relay_log_index = /var/lib/mysql/relay-bin.index
Create a new user on the second server as well:
create user 'test_master2'@'%' identified by 'test_master2';
 grant replication slave on *.* to 'test_master2'@'%';
Get bin_log on Master-2:
MariaDB [(none)]> show master status;
+--------------------+----------+--------------+------------------+
| File | Position | Binlog_Do_DB | Binlog_Ignore_DB |
+--------------------+----------+--------------+------------------+
| mariadb-bin.000001 | 667 | | |
+--------------------+----------+--------------+------------------+
1 row in set (0.000 sec)
Let’s configure the connection between MariaDB servers in our software replication cluster:
Stop the slave:
STOP SLAVE;
Add Master-1 to the second server:
CHANGE MASTER TO MASTER_HOST='IP_master1', MASTER_USER='test_master', MASTER_PASSWORD='test_master', MASTER_LOG_FILE='mariadb-bin.000002', MASTER_LOG_POS=664;
Start the replication:
START SLAVE;
Connect to Master-1 and follow the same steps, but specify the information about the second server instead:
STOP SLAVE;
 CHANGE MASTER TO MASTER_HOST='10.2.10.36', MASTER_USER='test_master2', MASTER_PASSWORD='test_master2', MASTER_LOG_FILE='mariadb-bin.000001', MASTER_LOG_POS=667;
 START SLAVE;
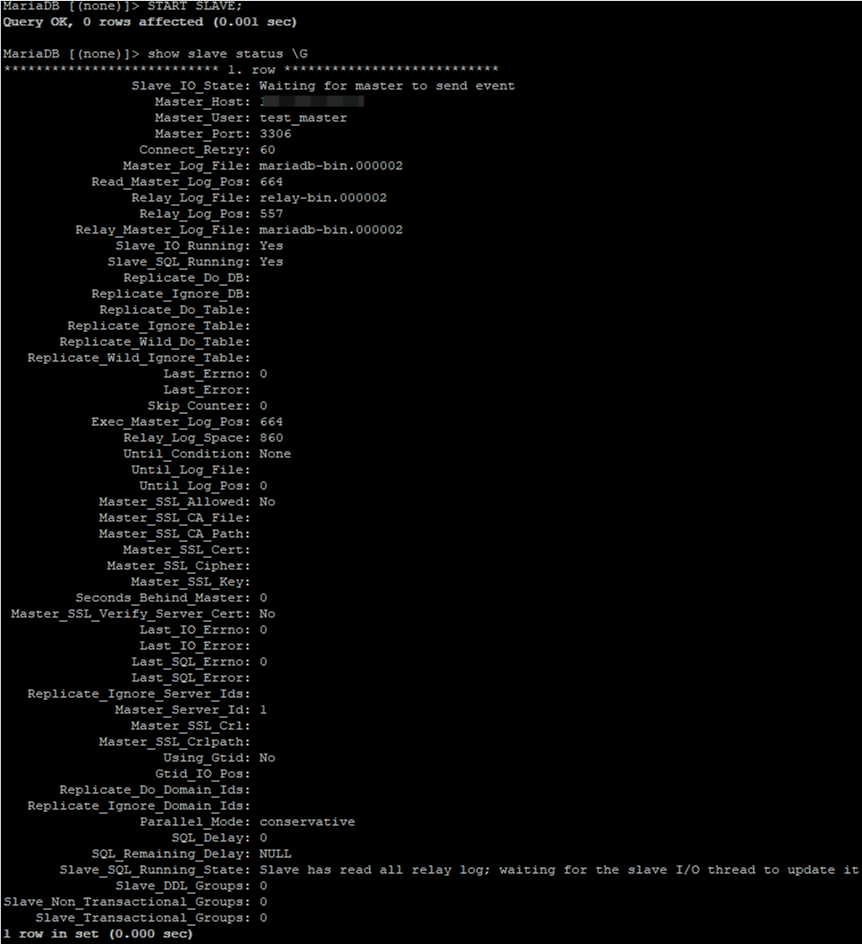
Check the second server status:
show slave status \G
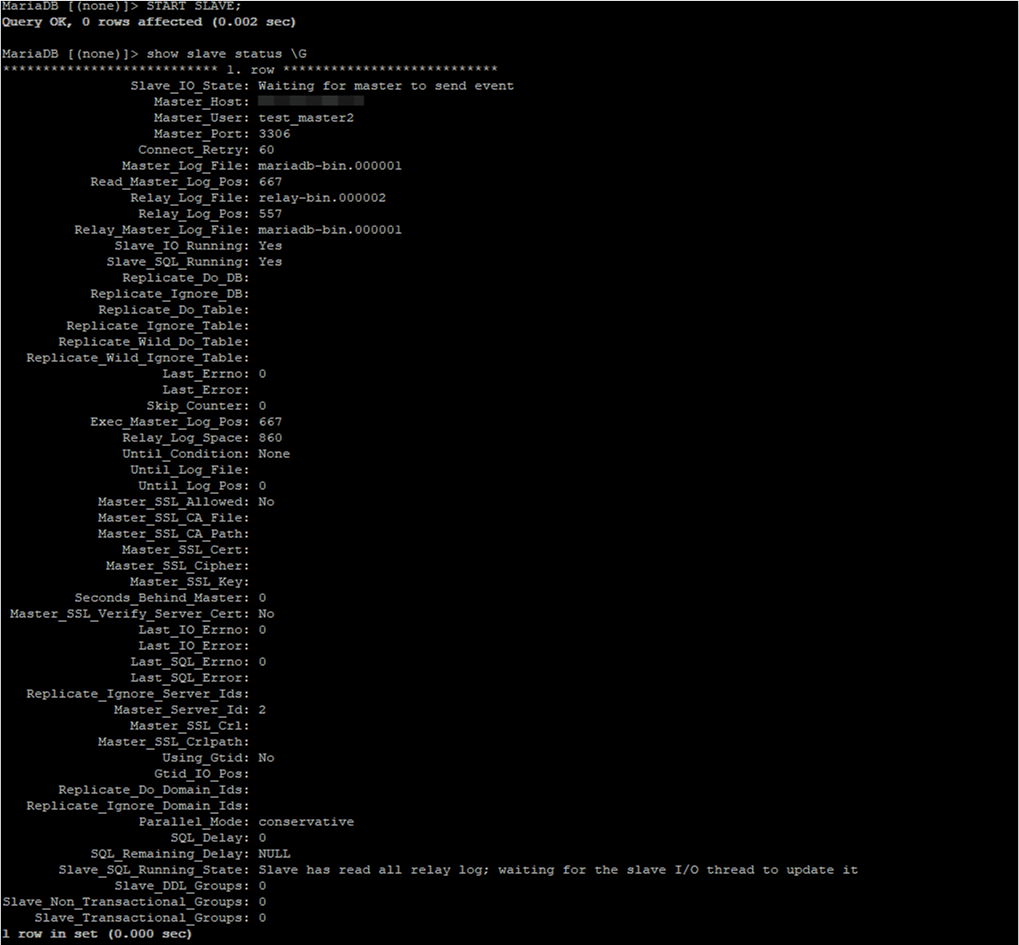
As you can see in the screenshots, there is the connection between two servers, and no errors occur.
3. How to Check Replication Between MariaDB Servers?
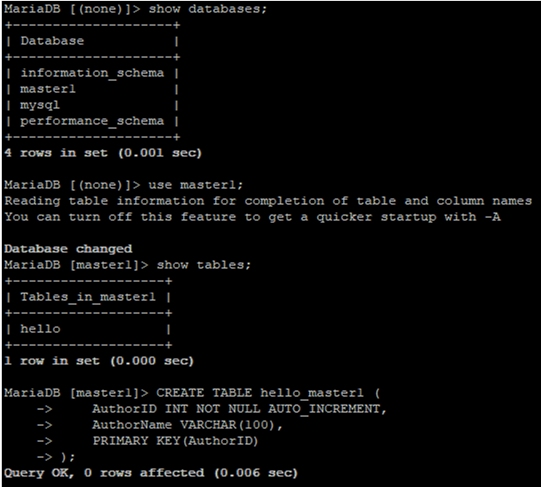
Then to make sure that the replication between two MariaDB servers works in master+master, we will create a new database on Master-1 and create a table in it.
MariaDB [(none)]> create database master1;
MariaDB [(none)]> use master1;
MariaDB [master1]> CREATE TABLE hello (
 -> AuthorID INT NOT NULL AUTO_INCREMENT,
 -> AuthorName VARCHAR(100),
 -> PRIMARY KEY(AuthorID)
 -> );
Make sure that this database has automatically replicated on the second master and contains the same table:
MariaDB [(none)]> show databases;
+--------------------+
| Database |
+--------------------+
| information_schema |
| master1 |
| mysql |
| performance_schema |
+--------------------+
MariaDB [(none)]> use master1;
 MariaDB [master1]> show tables;
+-------------------+
| Tables_in_master1 |
+-------------------+
| hello |
+-------------------+
The database has been created on the second master as well. To check the full cycle, create a table in the Master1 database on the second Master server and check if it appears on the first server.
MariaDB [master1]> CREATE TABLE hello_master1 (
 -> AuthorID INT NOT NULL AUTO_INCREMENT,
 -> AuthorName VARCHAR(100),
 -> PRIMARY KEY(AuthorID)
 -> );
The hello_master1 table has been replicated to the first server:
MariaDB [master1]> show tables;
+-------------------+
| Tables_in_master1 |
+-------------------+
| hello |
| hello_master1 |
+-------------------+
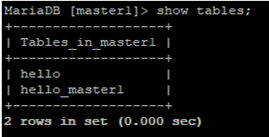
As you can see, the new table has appeared on Master-1. The replication works.
How to Set Up Master-Slave Replication in MariaDB?
In the master-slave MariaDB replication mode, one server acts as a slave, and data from the Master server are constantly written to it. All changes you make on the Slave server won’t be transferred to the Master server. This database replication type is more resilient and used more often. In this configuration, you always have a backup server with up-to-date database, and if a slave server fails, the Master will not lost any data. You can also distribute the database load for your project so that the apps will read data from your Slave servers and write the data only to the Master server. Thus, you make the database response as fast as possible.
When configuring the master+slave replication of MariaDB database, the master server (master1) is configured as described above.
Move on to the slave server. Add the following configuration to the slave my.cnf file:
#replication
server_id = 2
report_host = slave2
log_bin = /var/lib/mysql/mariadb-bin
log_bin_index = /var/lib/mysql/mariadb-bin.index
relay_log = /var/lib/mysql/relay-bin
relay_log_index = /var/lib/mysql/relay-bin.index
Restart the MariaDB service. Get the bin_log info from the first server:
MariaDB [(none)]> show master status;
+--------------------+----------+--------------+------------------+
| File | Position | Binlog_Do_DB | Binlog_Ignore_DB |
+--------------------+----------+--------------+------------------+
| mariadb-bin.000001 | 664 | | |
+--------------------+----------+--------------+------------------+
Run these commands in the mariadb console on slave server:
MariaDB [(none)]> STOP SLAVE;
MariaDB [(none)]> CHANGE MASTER TO MASTER_HOST='IP_master', MASTER_USER='test_master', MASTER_PASSWORD='test_master', MASTER_LOG_FILE='mariadb-bin.000001', MASTER_LOG_POS=664;
MariaDB [(none)]> START SLAVE;
SET GLOBAL read_only = ON;
You must also create the database memory dump and use it for initial upload of data to MariaDB on your slave server.
To check the Slave status: SHOW SLAVE STATUS\G;
To create a database on the Master:
MariaDB [(none)]> create database master_hello;
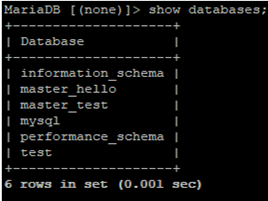
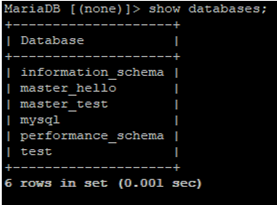
Make sure that the database has been created on the Slave server as well:
MariaDB [(none)]> show databases;
+--------------------+
| Database |
+--------------------+
| information_schema |
| master_hello |
| master_test |
| mysql |
| performance_schema |
| test |
+--------------------+
Create a database on the Slave server and check if the database has been replicated to the Master.
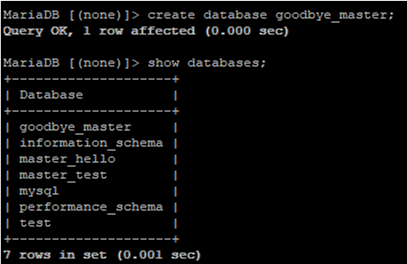
As you can see, we have created the database and it exists on the Slave. Let’s check if it has appeared on the Master. It has not. The data are not replicated from slave to master.
It means that MariaDB replication works in one direction only. Let’s do another check and delete the master_hello database from the Slave server:
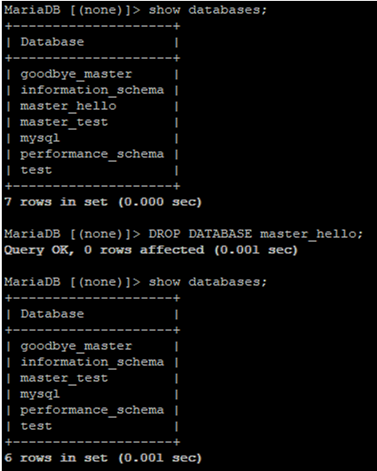
Check if it has deleted from the Master server:
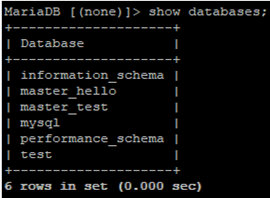
As you can see, it is OK and the database exists.
P. S.: When you configuring mariadb replication, you may come across some pitfalls, with the firewall as the most frequent of them. By default, the firewalld is installed in CentOS, which blocks the MariaDB replication port (TCP 3396). You can either open the port using iptables, or disable your firewall (not the best option).
iptables -I INPUT -p tcp -s ip_address_slave_server --dport 3306 -j ACCEPT
 iptables -I INPUT -p tcp --dport 3306 -j DROP
During the initial setup, I came across this issue, but it is detected easily. If you run the Slave status check SHOW SLAVE STATUS\G, you will see this error:
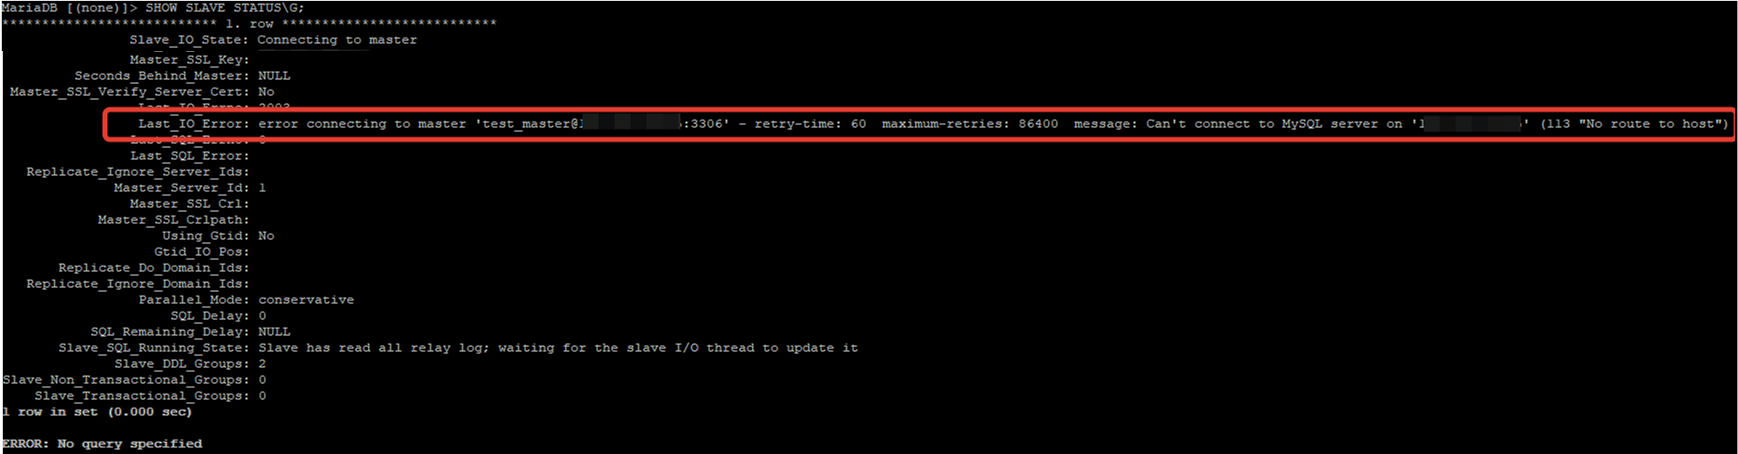
You can add some parameters to the #replication block in my.cnf file. Below I will give some examples and a brief description of the useful parameters. I’ll give some examples of other functions that may be helpful when you configure the mariadb database replication.
server_id = 1 — specify the server ID, usually we start with 1, but you may use any number that will not match with those of other servers used for replication.
report_host = master — usually you specify the host name of the server, but you can enter its IP address instead.
log_bin = /var/lib/mysql/mariadb-bin — is the path to the update log (log_bin).
log_bin_index = /var/lib/mysql/mariadb-bin.index — allows you to find out, which log is currently active and which logs were used earlier.
relay_log = /var/lib/mysql/relay-bin
relay_log_index = /var/lib/mysql/relay-bin.index — are the replication logs.
If you want to configure the replica of a specific database or selected databases, use the following parameters:
replicate-do-db = dbname — if you need multiple databases, specify their names separated by commas.
To exclude some databases from replication (as usual, service databases are excluded from replication: information_schema, mysql and performance_schema):
binlog-ignore-db = dbname
To set the log history time for your bin_log:
expire_logs_days = 10 — where 10 is the number of days the logs will be stored.
Also, if the data from your Master server are written to a database with a different name, you can set it in the config file:
replicate-rewrite-db=dbmastername->dbslavename
The replication configuration is completed. I think that using this article you will be able to configure MariaDB replication both in Master + Master and Master + Slave mode without any problems.
9 comments
Not is server-id, is server_id, please fix it.
Thank you.
Best regards
Fixed, thanks!
Not fixed, still its server-id. Please update.
+
Good document for those who are doing it first time.
Dear Team,
I have configure MariaDB Master-Master in centos7 as per our instruction , new database replication done successfully but my old database changes not replication, how can resolve this issue ?
Hello,
How we can verify whether this two mariadb/mysql is having same data?
just do a diff of your database files or from a dump of them?
thank you very much for the document. it solved my business. i am grateful to you.