Windows OS Hub
  • Windows
    • Windows 11
    • Windows 10
    • Windows Server 2025
    • Windows Server 2022
    • Windows Server 2019
    • Windows Server 2016
  • Microsoft
    • Active Directory (AD DS)
    • Group Policies (GPOs)
    • Exchange Server
    • Azure and Microsoft 365
    • Microsoft Office
  • Virtualization
    • VMware
    • Hyper-V
    • Proxmox
  • PowerShell
  • Linux
  • Home
  • About

Windows OS Hub

  • Windows
    • Windows 11
    • Windows 10
    • Windows Server 2025
    • Windows Server 2022
    • Windows Server 2019
    • Windows Server 2016
  • Microsoft
    • Active Directory (AD DS)
    • Group Policies (GPOs)
    • Exchange Server
    • Azure and Microsoft 365
    • Microsoft Office
  • Virtualization
    • VMware
    • Hyper-V
    • Proxmox
  • PowerShell
  • Linux

 Windows OS Hub / Exchange / Create a No-Reply Email Address in Exchange Server/Microsoft 365

March 15, 2024

Create a No-Reply Email Address in Exchange Server/Microsoft 365

You can use a no-reply mailbox in scenarios where you need to send automatic mailings, notifications, or information newsletters to your customers and do not expect anyone to reply. A no-reply mailbox is usually not checked and all incoming emails are automatically deleted. In this example, we will show how to create a no-reply email address in Exchange Server and Microsoft 365 (Exchange Online).

It is usually recommended to create a separate shared mailbox for a no-reply email address:

  • You can allow other Exchange users to send e-mail messages on behalf of this address;
  • No separate license is required for shared mailboxes in Exchange Online;
  • There is an important limitation if you want to use this mailbox to send mail outside of Outlook: you cannot perform SMTP Auth as a shared mailbox. You can’t use the PowerShell Send-Message cmdlet, but you can use the Microsoft Graph API to send email from PowerShell.
In some cases, it is possible to assign a no-reply SMTP address as a proxy address to another mailbox, but this is a less convenient solution (you can send email on behalf of an SMTP alias in Exchange Online)

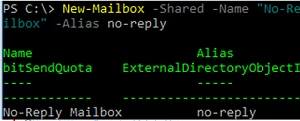
Create a new shared mailbox using Exchange Admin Center or using PowerShell:

New-Mailbox -Shared -Name "No-Reply Mailbox" -DisplayName "No-Reply Mailbox" -Alias no-reply

Create a No-Reply email address in Exchange

Delegate the permissions to send emails on behalf of this mailbox to a security group:

Set-Mailbox no-reply -GrantSendOnBehalfTo B2BSales| Add-MailboxPermission -User B2BSales -AccessRights FullAccess -InheritanceType All

Then you have to create a rule to delete all incoming emails. You can create a mailbox Inbox rule or enable an auto-reply (out-of-office), but it is more convenient to use an Exchange transport rule to delete the email before it reaches the mailbox.

If you use Exchange Online, open Exchange Admin Center -> Mail flow -> Rules -> Add a rule.

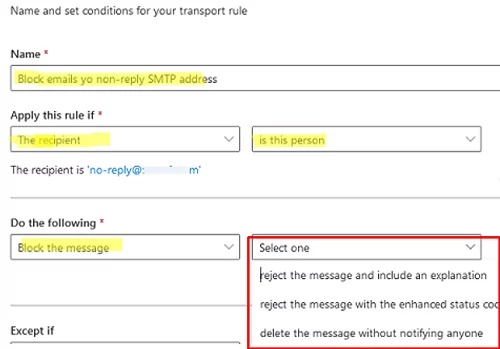
Create a transport rule with the following settings:

  • Name: Block emails to non-reply SMTP address;
  • Apply this rule if: The recipient -> is this person -> select the no-reply shared mailbox you created earlier
  • Do the following: Block the message -> and select an action: Reject the message and include an explanation (if you want to reply to an email with a simple template that says that the mailbox is not checked and specify contact information) or simply delete the email (Delete the message without notifying anyone).

Block messages to no-reply mailbox with mailflow transport rule in Exchnage

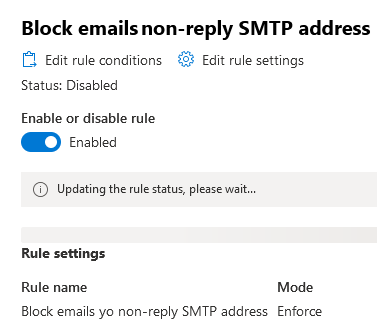
Do not forget to activate a transport rule once you have created it.

Enable Transport rule in Exchange Admin Center

You can create an Exchange transport rule in PowerShell:

New-TransportRule -Name "Reject messages to non-reply email address" -RecipientAddressMatchesPatterns "[email protected]" –RejectMessageSilently

Or

New-TransportRule -Name "Block messages to non-reply address" -RecipientAddressMatchesPatterns "[email protected]" -RejectMessageReasonText "This recipient is not allowed to receive messages" -RejectMessageEnhancedStatusCode "5.7.1" -Mode Enforce

For the convenience of your organization’s users, you can hide this mailbox from the Exchange address book and enable MailTip for it:

Set-Mailbox no-reply -MailTip "Nobody reads this mailbox"

Your email will not be saved to the mailbox database, and a DROP event should appear in the Exchange tracking logs.

You can also create a no-reply mailbox based on an Exchange Distribution Group containing no users.
0 comment
3
Facebook Twitter Google + Pinterest
Azure and Microsoft 365ExchangePowerShell
previous post
How to Connect VPN Before Windows Logon
next post
Install Windows Terminal without the Microsoft Store

Related Reading

How to Block Sender Domain or Email Address...

March 17, 2024

Automatic Outlook User Profile Configuration with ZeroConfigExchange

May 21, 2024

PowerShell: Configure Certificate-Based Authentication for Exchange Online (Azure)

March 17, 2024

How to Manually Configure Exchange or Microsoft 365...

March 17, 2024

Send Emails with Microsoft Graph API and PowerShell

March 17, 2024

Find Inactive (Unused) Distribution Lists in Exchange/Microsoft 365

March 17, 2024

Managing Inbox Rules in Exchange with PowerShell

March 15, 2024

Convert a User Mailbox to a Shared in...

March 15, 2024

Leave a Comment Cancel Reply

join us telegram channel https://t.me/woshub
Join WindowsHub Telegram channel to get the latest updates!

Recent Posts

  • Encrypt Any Client-Server App Traffic on Windows with Stunnel

    June 12, 2025
  • Failed to Open the Group Policy Object on a Computer

    June 2, 2025
  • Remote Desktop Printing with RD Easy Print Redirection

    June 2, 2025
  • Disable the Lock Screen Widgets in Windows 11

    May 26, 2025
  • Configuring Windows Protected Print Mode (WPP)

    May 19, 2025
  • Map a Network Drive over SSH (SSHFS) in Windows

    May 13, 2025
  • Configure NTP Time Source for Active Directory Domain

    May 6, 2025
  • Cannot Install Network Adapter Drivers on Windows Server

    April 29, 2025
  • Change BIOS from Legacy to UEFI without Reinstalling Windows

    April 21, 2025
  • How to Prefer IPv4 over IPv6 in Windows Networks

    April 9, 2025

Follow us

  • Facebook
  • Twitter
  • Telegram
Popular Posts
  • Outlook Keeps Asking for Password on Windows
  • Checking User Sign-in Logs in Entra ID (Microsoft 365)
  • How to Manually Configure Exchange or Microsoft 365 Account in Outlook 365/2019/2016
  • Search and Delete Emails from User Mailboxes on Exchange Server (Microsoft 365) with PowerShell
  • Configuring Password Policy in Microsoft Entra ID
  • Fix: Microsoft Outlook Search Not Working on Windows 10/11
  • Blank Sign-in Screen in Office 365 Apps (Outlook, Teams, etc.)
Footer Logo

@2014 - 2024 - Windows OS Hub. All about operating systems for sysadmins


Back To Top