Modern versions of Outlook (starting with Outlook 2016) don’t allow you to manually configure a connection to a mailbox hosted on Exchange Server or Exchange Online (Microsoft 365). Microsoft developers believe that Outlook should always use the Autodiscover mechanism to automatically discover the connection settings for an Exchange mailbox.
In this article, we’ll show you how to manually set up a connection in Outlook 2019/2016 or Outlook 365 to a mailbox on an on-premises Exchange Server or Microsoft 365 (Office 365 or Exchange Online) using a local XML file that contains the necessary connection information. This method will help you configure Outlook connection to the mailbox if autodiscovery cannot be performed (Autodiscover is not configured correctly, the Autodiscover.xml file is not available, Internet access is limited, a proxy or VPN connection is used to access the internal Exchange Server, etc.) .
Method 1. Local XML Redirect for Outlook Client
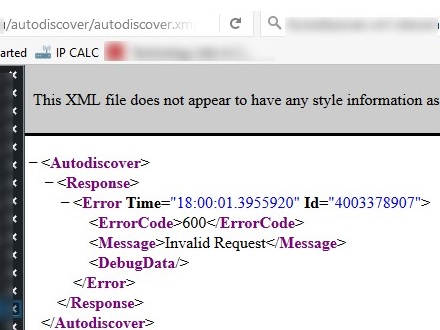
- If you know the URL to access your Exchange through OWA, check if the following URL address is available: _https://mail.woshub.com/autodiscover/autodiscover.xml (you must authenticate to access the XML file). If the file is available, go to the next step. If not, go to the second method;

- Create a custom XML file on the local disk of your computer that will redirect Outlook to the URL with the file autodiscover.xml. Create a text file autodiscover.xml containing the following text and save it to the local directory on your computer (for example, C:\Autodiscover\autodiscover.xml);
<?xml version=”1.0″ encoding=”utf-8″ ?>
<Autodiscover xmlns=”http://schemas.microsoft.com/exchange/autodiscover/responseschema/2006″>
<Response xmlns=”http://schemas.microsoft.com/exchange/autodiscover/outlook/responseschema/2006a”>
<Account>
<AccountType>email</AccountType>
<Action>redirectUrl</Action>
<RedirectUrl>_https://mail.woshub.com/autodiscover/autodiscover.xml</RedirectUrl>
</Account>
</Response>
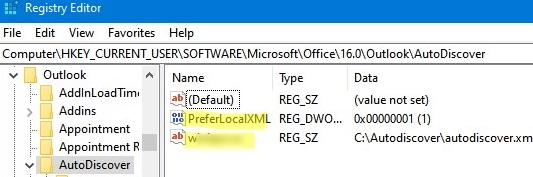
</Autodiscover>Note. Replace the value in the RedirectUrl parameter with the Autodiscover URL for your domain. - Open the Registry Editor and go to the reg key HKEY_CURRENT_USER\SOFTWARE\Microsoft\Office\16.0\Outlook\AutoDiscover. Create a new REG_SZ registry parameter with the name of your domain and the value containing the path to the local XML file you created in the previous step. For example:
Parameter name:woshub.com
Value:C:\Autodiscover\autodiscover.xml
Then create a PreferLocalXML (REG_DWORD) parameter with a value of 1. After that, Outlook will always look at your local autodiscover.xml file first when performing autodiscovery;

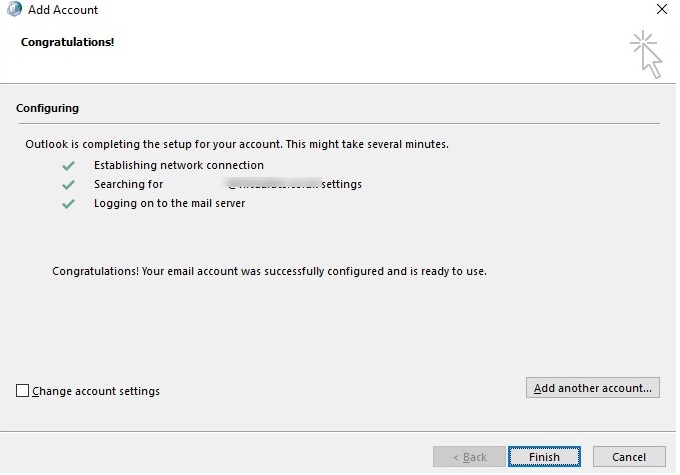
- Just start Outlook and run the Add Account wizard. Enter your mailbox name, email address, and password. If you do everything correctly, Outlook will automatically configure the Exchange mailbox connection.

Method 2. Local Autodiscover.XML File with Exchange Connection Settings
If the URL with autodiscover.xml is not available from your computer, you will have to manually create a local XML file containing full user settings to connect to the Exchange Server or Microsoft 365 mailbox. You can get sample parameters for this file from any configured Outlook client. To do it, go to the folder C:\Users\%username%\AppData\Local\Microsoft\Outlook, where you will find the file with the name [longGUID]-Autodiscover.xml.
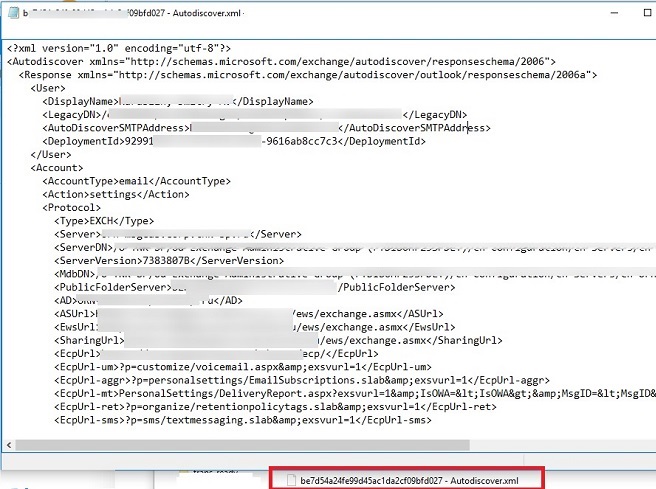
Copy this file, change the account settings if necessary, and save it to the C:\Autodiscover\autodiscover.xml. Then follow steps 3 and 4 from the first method.
If you cannot get this file, you can create it manually. The file must have the following format.
If you are using Outlook Anywhere (RPC/HTTP)
<?xml version=”1.0″ encoding=”utf-8″?>
<Autodiscover xmlns=”http://schemas.microsoft.com/exchange/autodiscover/responseschema/2006″>
<Response xmlns=”http://schemas.microsoft.com/exchange/autodiscover/outlook/responseschema/2006a”>
<User>
<AutoDiscoverSMTPAddress>[SMTP_ADDRESS]</AutoDiscoverSMTPAddress>
<LegacyDN>[USER_LEGACYDN]</LegacyDN>
</User>
<Account>
<AccountType>email</AccountType>
<Action>settings</Action>
<Protocol>
<Type>EXCH</Type>
<Server>[SERVER_NAME]</Server>
<ServerDN>[SERVER_DN]</ServerDN>
<AuthPackage>[RPC_AUTH_PACKAGE]</AuthPackage>
</Protocol>
<Protocol>
<Type>EXPR</Type>
<Server>[OUTLOOK_ANYWHERE_SERVER]</Server>
<SSL>On</SSL>
<AuthPackage>[HTTP_AUTH_PACKAGE]</AuthPackage>
<ServerExclusiveConnect>on</ServerExclusiveConnect>
<CertPrincipalName>[CERTIFICATE_PRINCIPAL_NAME]</CertPrincipalName>
<ServerExclusiveConnect>off</ServerExclusiveConnect>
</Protocol>
</Account>
</Response>
</Autodiscover>
If you connect without Outlook Anywhere:
<?xml version=”1.0″ encoding=”utf-8″?>
<Autodiscover xmlns=”http://schemas.microsoft.com/exchange/autodiscover/responseschema/2006″>
<Response xmlns=”http://schemas.microsoft.com/exchange/autodiscover/outlook/responseschema/2006a”>
<User>
<AutoDiscoverSMTPAddress>[SMTP_ADDRESS]</AutoDiscoverSMTPAddress>
<LegacyDN>[USER_LEGACYDN]</LegacyDN>
</User>
<Account>
<AccountType>email</AccountType>
<Action>settings</Action>
<Protocol>
<Type>EXCH</Type>
<Server>[SERVER_NAME]</Server>
<ServerDN>[SERVER_DN]</ServerDN>
<AuthPackage>[RPC_AUTH_PACKAGE]</AuthPackage>
</Protocol>
</Account>
</Response>
</Autodiscover>
Change the parameters in square brackets in these XML files to the information that matches your domain (you can get it from your Exchange or AD administrator).
Method 3. Autodiscover.XML File Example for Microsoft 365 (Exchange Online)
If you want to manually connect a mailbox from Microsoft 365 (Exchange Online) in Outlook 365/2019/2016, you can get all the required mailbox settings for the local autodiscover.xml file using PowerShell.
Connect to your EOL tenant using the Exchange Online PowerShell v3 module:
Connect-ExchangeOnline -UserPrincipalName max@woshub.com -ShowProgress $true
Get the user mailbox settings with the command:
Get-Mailbox -Identity maxbak | select DisplayName,LegacyExchangeDN,PrimarySmtpAddress,ExchangeGuid|fl

The following is an example of an Autodiscover.xml file for the Exchange Online (Microsoft 365) mailbox. Replace the highlighted parameters with the attribute values you got using PowerShell:
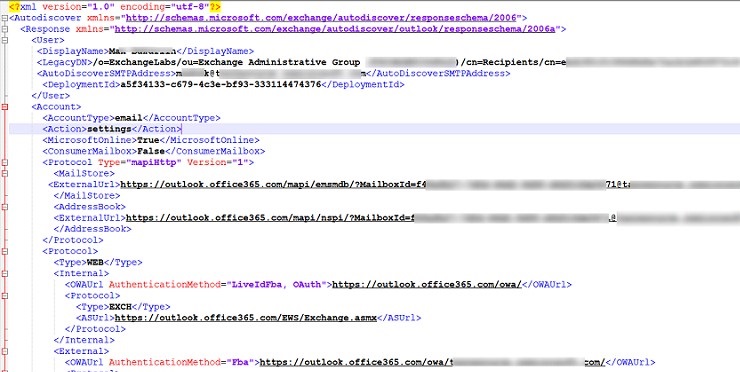
<?xml version="1.0" encoding="utf-8"?>
<Autodiscover xmlns="http://schemas.microsoft.com/exchange/autodiscover/responseschema/2006">
<Response xmlns="http://schemas.microsoft.com/exchange/autodiscover/outlook/responseschema/2006a">
<User>
<DisplayName> [DisplayName] </DisplayName>
<LegacyDN>[LegacyExchangeDN] </LegacyDN>
<AutoDiscoverSMTPAddress>[PrimarySmtpAddress] </AutoDiscoverSMTPAddress>
<DeploymentId>1234</DeploymentId>
</User>
<Account>
<AccountType>email</AccountType>
<Action>settings</Action>
<MicrosoftOnline>True</MicrosoftOnline>
<ConsumerMailbox>False</ConsumerMailbox>
<Protocol Type="mapiHttp" Version="1">
<MailStore>
<ExternalUrl>https://outlook.office365.com/mapi/emsmdb/?MailboxId=[ExchangeGuid]@woshub.com</ExternalUrl>
</MailStore>
<AddressBook>
<ExternalUrl>https://outlook.office365.com/mapi/nspi/?MailboxId=[ExchangeGuid]@woshub.com</ExternalUrl>
</AddressBook>
</Protocol>
<Protocol>
<Type>WEB</Type>
<Internal>
<OWAUrl AuthenticationMethod="LiveIdFba, OAuth">https://outlook.office365.com/owa/</OWAUrl>
<Protocol>
<Type>EXCH</Type>
<ASUrl>https://outlook.office365.com/EWS/Exchange.asmx</ASUrl>
</Protocol>
</Internal>
<External>
<OWAUrl AuthenticationMethod="Fba">https://outlook.office365.com/owa/woshub.com/</OWAUrl>
<Protocol>
<Type>EXPR</Type>
<ASUrl>https://outlook.office365.com/EWS/Exchange.asmx</ASUrl>
</Protocol>
</External>
</Protocol>
<Protocol>
<Type>EXHTTP</Type>
<Server>outlook.office365.com</Server>
<SSL>On</SSL>
<AuthPackage>Basic</AuthPackage>
<ServerExclusiveConnect>On</ServerExclusiveConnect>
</Protocol>
</Account>
</Response>
</Autodiscover>
Save the file as C:\Autodiscover\autodiscover.xm. Then make changes to the registry as described in Method 1 -> Step 3 and 4. Restart Outlook after adding a new user account.
The first time you open it, you should see the Microsoft 365 Modern Authentication prompt. Enter your username and password. If the user is enabled for MFA in Microsoft 36, confirm sign-in with the second factor.

Your Outlook should connect to the Exchange mailbox, and you will see a list of mailbox folders and e-mail items.
7 comments
I tried this and it worked except I can’t open Outlook, I get the error “nnot start microsoft outlook. the set of folders cannot be opened. the attempt to log on to the server has failed”
Any idea?
What version of Exchange do you use? Is your mailbox available over OWA?
Try to create a new clean Outlook configuration.
Thank you very much. I work in remote through VPN and the Exchange server 2013 is not published on Internet, so the only way is to configure manually. With Outlook 2013 there weren’t problems but with Outlook 2016 was impossible until I find your article.
Thanks!
Outlook 2016 \ Exchange 2010.
Is there a way to add an additional account of a generic mailbox with PowerShell, in an outlook already configured for a domain user? because I always have to go through [File], [Account Settings], [Account Settings], in the [Messaging] tab [Edit] button, [Additional settings], [Advanced] tab, [Add] …
You can use an Outlook Profile (PRF) file to modify existing Outlook profiles.
And then import this prf file into user’s Outlook configuration:
outlook.exe /importprf \\server1\share\outlook.prfThanks a lot, this worked perfectly fine with Outlook 2016. After hours of searching finally some easy fix.
Thanks a lot our Dear BOOS!!!!!!!!!!!!!!!!!!!!!!!!!!!!!
It’s working perfectly in Outlook 2016 on Exchange 2016