By default, Active Directory users can log on to any domain-joined computer locally with their accounts. This is because all new users created in Active Directory are automatically added to the Domain Users group. The Domain Users group is added to the local Users group on Windows workstations when they join the AD domain. For security reasons, many organizations restrict which computers users can log on to, and they may also impose additional time-based logon limitations.
Allow a User to Logon Only to Specific AD Computers
A list of computers that a user is allowed to log on locally can be specified in the properties (attributes) of an Active Directory user account. For example, you might want to restrict a user to logging in only to their own computer. To do it:
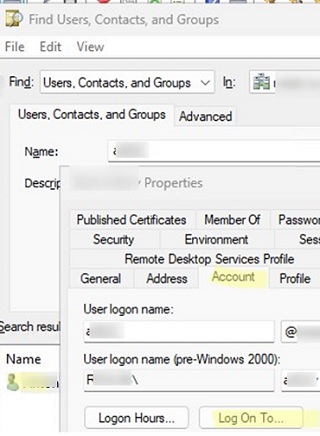
- Open the ADUC snap-in (Active Directory Users and Computers) by running the
dsa.msccommand. - Search for the AD user account for which you want to enable logon restrictions and open its properties
- Go to the Account tab and click on the Log On To button.

- By default, users can log on to any domain-joined computer (The user can log on to: All computers).
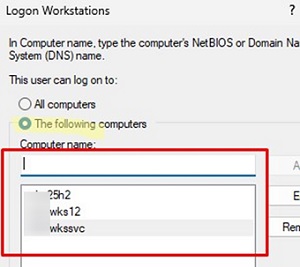
- To restrict the list of permitted to logon computers, select The following computers option and add the
hostnamesof computers a user can log on to. Specify the NetBIOS or DNS computer name here (wildcards are not supported). The value is not case-sensitive. The maximum length for a NetBIOS hostname in Windows is 15 characters.
 - Save the account changes.
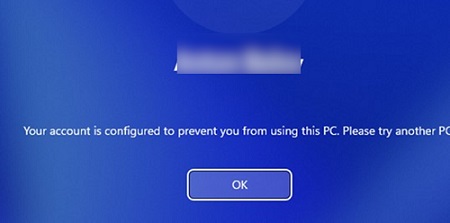
This user can now only log in to the allowed computers list. Users will receive the following error if they try to access any computer outside the allowed list in AD:
Your account is configured to prevent you from using this PC. Please try another PC.
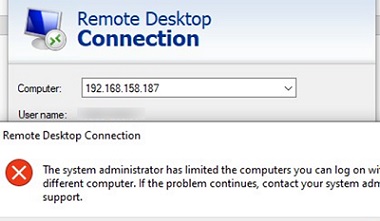
Additionally, when Network Level Authentication (NLA) for Remote Desktop is enabled (the default Windows behaviour), the configured ‘Log On To’ computers list blocks RDP connections to permitted hosts (including RDS farms). In this case, an error will appear when trying to connect to an allowed host via RDP under the user:
The system administrator has limited the computers you can log on with. Try logging on at a different computer. If the problem continues, contact your system administrator or technical support.
To resolve this, add the source computer’s hostname to the TrustedHosts list (even for non-domain members), or disable NLA for RDP (not recommended due to security risks).
UserWorkstations Attribute in Active Directory
In fact, the list of computers that users are allowed to log on to is stored in their userWorkstations attribute in Active Directory (as a comma-separated list of computer names). The current value of userWorkstations can also be viewed or edited from the Attribute Editor tab.
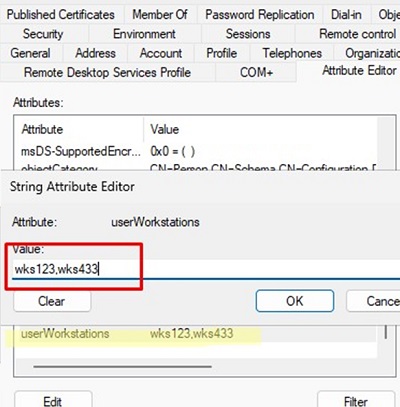
The userWorkstations attribute can contain up to 1024 characters (enough for 64 computers, each with a 16-character name). If you try to add a large number of computers to the list, an error will appear:
This property is limited to 64 values. You must remove some of the existing values before you can add new ones.
How to Set Log On To (userWorkstations) Attribute with PowerShell
Manually adding hostnames to the list of devices allowed to log in to each user’s account is rather tedious (this attribute doesn’t support wildcards). PowerShell makes it easier to add another hostname to the list of allowed computers that can log on (the AD module for PowerShell must be installed). The following command will allow the specified user to log on to the specified computer (the computer name will be added to the current list in the userWorkstations attribute):
$allowPC = "ny-wks123"
 $user = "amsith"
 $current = (Get-ADUser $user -Properties userWorkstations).userWorkstations
 $newValue = if ($current) {"$current,$allowPC"} else { $allowPC }
 Set-ADUser $user -LogonWorkstations $newValue
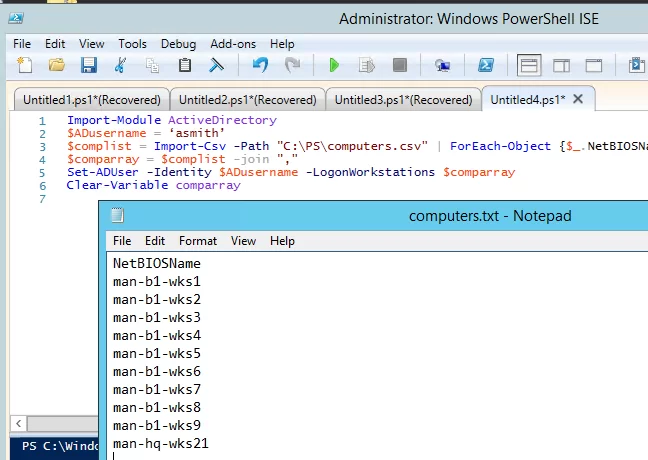
There’s a really easy way to add a bunch of entries to the list of allowed computers: just save the hostname list as a CSV file (in my example, NetBIOSName is the name of the column in the CSV file), then run:
$ADusername = 'asmith'
 $complist = Import-Csv -Path "C:\PS\computers.csv" | ForEach-Object {$_.NetBIOSName}
 $comparray = $complist -join ","
 Set-ADUser -Identity $ADusername -LogonWorkstations $comparray
 Clear-Variable comparray
Using the Get-ADUser cmdlet, you can display a list of computers a user is allowed to log on to.
Get-ADUser $ADusername -Properties userWorkstations | Format-List Name, userWorkstations

To clear the list of allowed computers so that the user can log on to any domain computer:
Set-ADUser -Identity 'asmith' -LogonWorkstations $null
List all users for whom domain logon restrictions have been enabled:
Get-ADUser -ldapfilter '(userWorkstations=*)'|ft

Configure Permitted Logon Hours for Users in Active Directory
By default, domain users can log on to domain computers at any time (24/7). For security reasons, you may wish to restrict domain access to business hours only (for example, from 8:00 am to 7:00 pm).
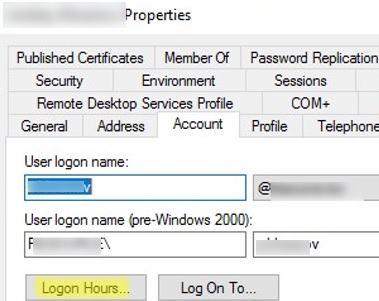
- Open the user properties in the ADUC snap-in, go to the Account tab, and click the Logon Hours button

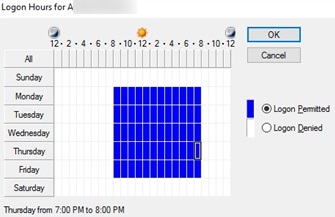
- A calendar-style interface will appear, where you can set the permitted/denied hours and days of the week. By default, users can log into the domain at any time (all timespans are highlighted in blue).
- Highlight the time ranges during which you want to prevent users from logging on, and then click the Logon Denied button (the color of the logon hours during which users are not permitted to sign in will change to white).

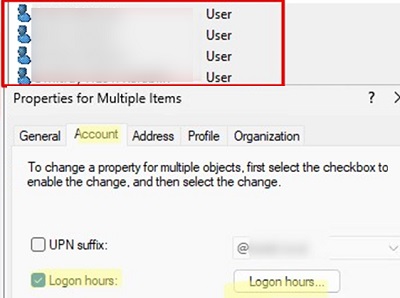
To restrict the logon time for multiple users in an OU at once, select their accounts and open their properties. Go to the Accounts tab, enable the Logon hours option, and then set permitted and denied logon hours. These changes will apply to all selected accounts.
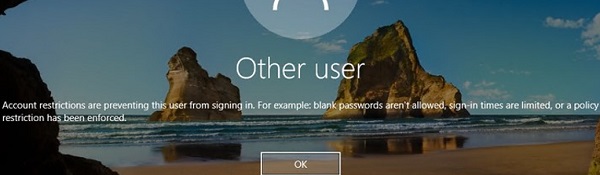
If a user tries to sign in to the computer outside the allowed hours, they will receive an error:
Account restrictions are preventing this user from signing in. For example: blank passwords aren't allowed, sign-in times are limited, or a policy restriction has been enforced.
Using PowerShell, an administrator can copy the value of the configured Logon Hours attribute from one (template) user and apply it to all users. For example, you want to restrict the logon hours for a group of VPN users:
$template_user='k.muller'
 $template_hours= Get-ADUser -Identity $template_user -properties logonHours
 Get-ADGroupmember "mun-VPNUsers" |foreach {Set-ADUSer $_.samaccountname -Replace @{logonHours = $template_hours.logonHours} }
The Set action to take when logon hours expire GPO option (User Configuration -> Administrative Templates -> Windows Components -> Windows Logon Options) allows you to select the action to be taken when a user’s allowed logon hours expire. It is possible to lock the user session, finish it (logoff), or disconnect it.
Two more GPO options can be used to prevent users from accessing domain resources outside of the working hours specified in their account settings. In the GPO editor, navigate to Computer configurations -> Policies -> Windows Settings -> Security Settings -> Local Policies -> Security Options.
- Network security: Force logoff when logon hours expire
- Microsoft network server: Disconnect clients when logon hours expire

These policies will prevent users from accessing SMB shares outside of their working hours.
net user <login> /time:<allowed-time>Deny Local Workstation Logon for Specific Users via GPO
It is inconvenient to use the userWorkstations user attribute to restrict user access to computers in large enterprise networks. This approach is not flexible enough (the maximum number of computers that can be added to the attribute is limited), and it requires ongoing manual administrative intervention.
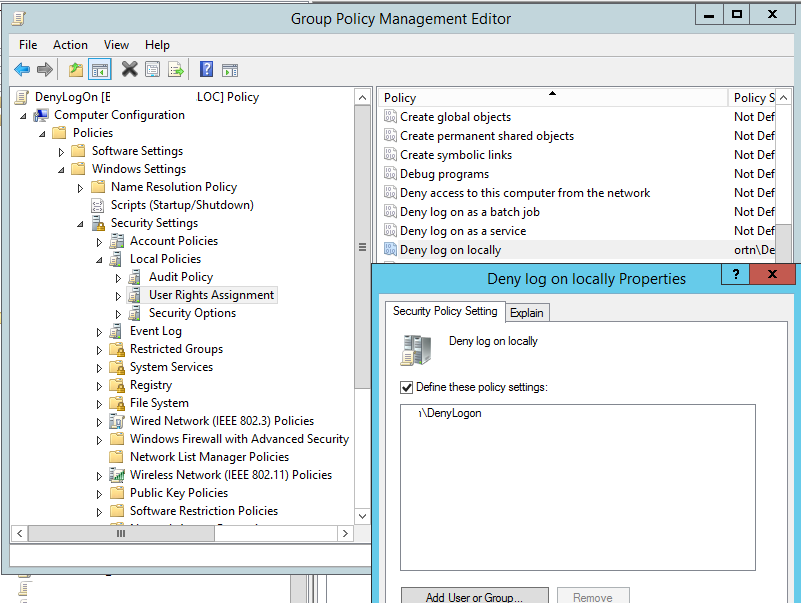
It is more convenient to configure rules for denying or allowing local interactive access to computers via the GPO security settings in the Computer Configuration -> Policies -> Security Settings -> Local Policies -> User Rights Assignment:
There are two Group Policy options located in the GPO section Computer Configuration -> Policies -> Security Settings -> Local Policies -> User Rights Assignment:
- Deny log on locally – prevents specific users or groups from logging on to the computer locally.
- Allow log on locally – contains a list of users who are permitted to log on to the computer locally.
For example, to prevent users in a specific group from logging on to computers in a targeted Organizational Unit (OU), create a separate user group, add it to the Deny log on locally policy, and link the GPO to the OU containing the computers you want to restrict logon to. Or remove the Users group from the Allow log on locally policy.
In large Active Directory domains, it is most common to use a combination of these approaches.
In corporate networks, it is often necessary to prevent users from logging on to computers located in other Organizational Units. To achieve this, create a security group in each OU and add all the users in that OU to it.
Get-ADUser and Add-ADGroupMember.$rootOU = "OU=Users,OU=UK,DC=corp,DC=woshub,DC=com"
$group = "corp\lon-users"
Get-ADUser -SearchBase $rootOu -Filter * | ForEach-Object {Add-ADGroupMember -Identity $group -Members $_ }
Then enable the GPO option “Allow log on locally,” add the group (plus different administrator groups like Domain Admins and workstation admins), and link the policy to the OU containing the target computers. Now, only users from a specific OU will be allowed to log on to the target computers.
Update the Group Policy settings on the client computers. If a user from a different OU (who is not allowed to log on locally) tries to logon to the computer, an error message will appear:
You cannot log on because the logon method you are using is not allowed on this computer. Please see your network administrator for more information.
Or:
The sign-in method you are trying to use isn’t allowed. For more info, contact your network administrator.

Here are some important points to consider when implementing logon restriction policies in AD:
- Don’t use these policies to restrict access to member servers or AD domain controllers (How to allow non-admin users to access domain controllers over RDP).
- Don’t enable these settings via the built-in GPOs: Default Domain Policy or Default Domain Controllers Policy
- A deny policy takes precedence
- Remember about service accounts (including gMSA), which can be used to run services on computers.
- Don’t apply GPOs that restrict local logon to the entire domain. Only link them to the specific OUs.
- Even when the ‘Deny log on locally’ policy is enabled, users will still be able to connect to computers via interactive RDP sessions.
5 comments
Good day,
It is that I have a problem when implementing Log On To in the company where I am working, since when I choose and configure the user so that he only enters a certain computer that is in the domain, he loses the connection with the other applications that are on the servers, it is necessary add the servers in the Log On To so that the users can manage the applications?
Are your applications on remote servers published via RDS/RemoteApp?
Thanks, Never used this feature before. Your post made my day easier.
Hi!
The LogonWorkstations attribute is not just valid for “logon locally” but also logon over the network.
rgds Christian
Hi!
I can’t follow your logic here:
“Another interesting issue occurs if you restrict the user’s list of computers allowed to log on using the LogonWorkstation attribute. When you try to connect to a remote computer (or RDS farm) via RDP, you may get an error:
The system administrator has limited the computers you can log on with.
To solve this problem, you need to add the computer name from which (!!!) the RDP login is performed to the LogonWorkstation list.”
LogonWorkstations attribute can’t be both the to and from allowed computers. To my knowledge you restrict the computers a user can login from with the UserWorkstations attribute: https://learn.microsoft.com/en-us/windows/win32/adschema/a-userworkstations
rgds Christian