By default, Windows Explorer displays standard icons for local, removable, or mapped network drives based on drive type. You can assign custom icon files to each drive to make navigation more convenient and intuitive for users. In this post, we’ll demonstrate how to manually configure custom icons for mapped network and local drives, as well as how to centrally assign network drive icons via Active Directory Group Policy.
You can set custom drive icons using these methods:
- Using the
autorun.inffile in the root of the drive’s file system - Via the registry for all users or only specific users.
![]()
Prepare icon files for each drive whose appearance you want to customize. You can draw your own icons or find suitable ICO files on any online service. To ensure proper scaling and display of icons in Windows Explorer, create .ICO files containing multiple image resolutions (16x16, 32x32, 48x48, and up to 512x512). I used the online service https://redketchup.io/icon to combine multiple ICO files of different resolutions into a single ICO file. Windows automatically selects the correct resolution from the ICO file according to the display context.
First, let’s try assigning a custom ICO file to a specific drive letter through the registry:
- Copy your custom *.ico files to the
%public%\Picturesdirectory
- Open the Registry Editor and navigate to:
HKLM\SOFTWARE\Microsoft\Windows\CurrentVersion\Explorer\DriveIcons - Create a subkey with the drive letter for which you want to change the icon. For example, Z
- Create a subkey named DefaultIcon under this key.
- Specify the path to the ICO file that you want to use as the drive icon in the Default value of the registry key. For example,
%PUBLIC%\Pictures\reports.ico

In Windows 11, refresh File Explorer (in previous Windows versions, restart the explorer.exe process) and verify that the new icon appears for drive letter Z.
reg add "HKLM\SOFTWARE\Microsoft\Windows\CurrentVersion\Explorer\DriveIcons\E\DefaultIcon" /ve /d "%PUBLIC%\Pictures\delivery.ico" /f
![]()
For local drives, in addition to the icon, you can change the drive description displayed in File Explorer. To do it, create a registry item:
reg add "HKEY_LOCAL_MACHINE\SOFTWARE\Microsoft\Windows\CurrentVersion\Explorer\DriveIcons\E\DefaultLabel" /ve /d "My custom drive description" /f
The description of mapped network drives can be changed through the HKCU (user) registry hive (in this example, the network folder has a UNC path \\fs01\docs):
HKEY_CURRENT_USER\Software\Microsoft\Windows\CurrentVersion\Explorer\MountPoints2##FS01#DOCS]"_LabelFromReg"="Public DOCS"
To display a custom folder icon for a specific user only, specify the path to the *.ICO file in that user’s registry key:
[HKEY_CURRENT_USER\Software\Classes\Applications\Explorer.exe\Drives\E\DefaultIcon]
@="%public\\pictures\my.ico"
You can customize the drive icon displayed using the autorun.inf file stored in the drive’s root directory. This is convenient for removable USB drives, which always display the same icon, regardless of their assigned drive letter.
- Copy the icon file to the drive whose icon you want to change. You can put it in the root directory or any other directory.
- Create an
autorun.inftext file in the root directory of the drive. In this file, specify the relative path to the icon file and the description (optional).[autorun] label=Backup Keys USB Drive icon=backup.ico
- Restart File Explorer and verify that your USB drive now has a new icon.
You can centrally assign the same drive icons on all computers using a domain GPO. The Network Drive Mapping option in Group Policy Preferences doesn’t have a setting for configuring custom drive icons. 
First, copy the ICO file to the users’ computers. Then, assign it as a drive icon through the registry.
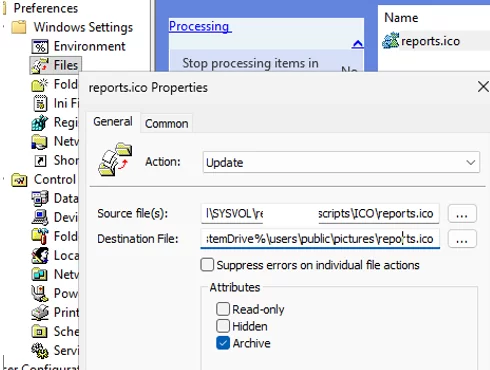
- ICO files can be copied to users’ computers via Group Policy Preferences: Computer Configuration -> Preferences -> Windows Settings -> Files -> New -> File. Copy the file to
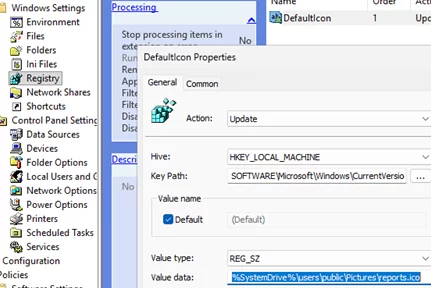
%SystemDrive%\users\public\pictures\reports.ico - Then, create a registry item for the target drive letter and set the copied ICO file as its icon. Create a registry key via GPO: Computer Configuration -> Preferences -> Windows Settings -> Registry -> New -> Registry Item:
SOFTWARE\Microsoft\Windows\CurrentVersion\Explorer\DriveIcons\Z\DefaultIcon(In this example, the drive is Z), Set the following REG_SZ value for theDefaultoption:%SystemDrive%\users\public\Pictures\reports.ico - Update the GPO settings on the clients and verify that the custom icon now displays for drive Z.