In this article, we will look at how to use Group Policy (GPO) to centrally create, modify, import, and delete any registry keys and parameters on domain-joined computers.
You can manage registry items using special extensions, called Group Policy Preferences (GPP). There is a separate section in GPP where you can centrally configure (create, delete, modify, update) any parameter or registry branch, and deploy these changes to all computers in the domain
Suppose, you want to disable the automatic driver update on all computers in a specific Active Directory OU (Organizational Unit). In order to do this, you will need to change the value of the registry parameter SearchOrderConfig in the reg key HKEY_LOCAL_MACHINE\SOFTWARE\Microsoft\Windows\CurrentVersion\DriverSearching. You can configure a registry setting on target computers in the domain in two ways: using the built-in GPP Registry Browser, or manually by specifying the path to the registry key, the parameter name, and the value.
Deploy Registry Items Using the Registry Wizard in GPO
The Registry Wizard in the GPO is the easiest way to make changes to the registry.
- Run the Group Policy Management console (
gpmc.msc); - Create a new GPO (or edit the existing one), link it to the required container (OU) in AD with the computers (or users) on which you want to apply the registry key, and switch to the policy edit mode;
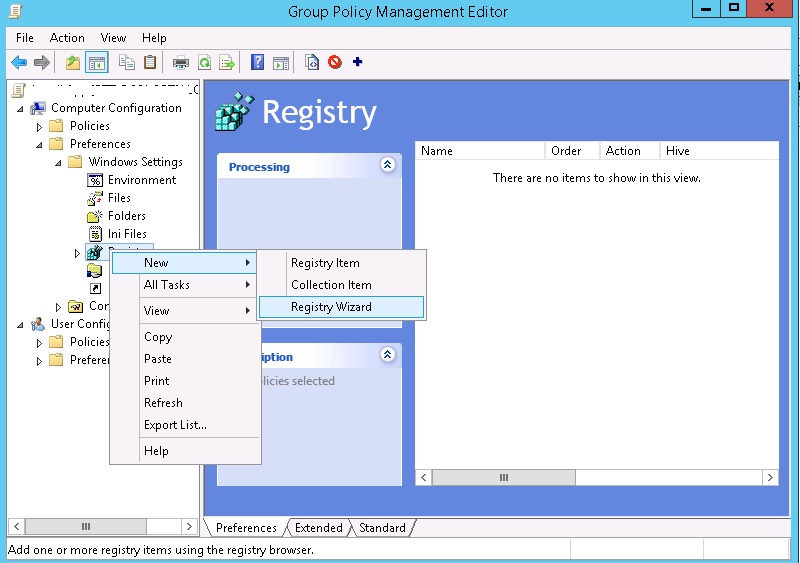
- Expand the GPO section Computer (or User) Configuration -> Preferences -> Windows Settings -> Registry and select New -> Registry Wizard in the context menu;

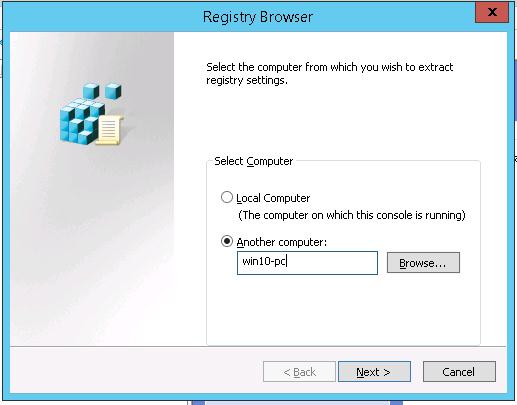
- The Registry Wizard allows you to connect to the registry on a remote computer and select the existing registry key;
- Specify the remote computer name you want to connect to;
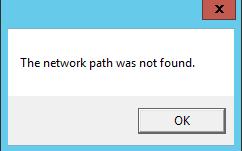
 Note. If the error The network path was not found appears when you try to connect to a computer through the Registry Browser, it most likely this remote computer is turned off, access to it is blocked by a firewall or the Remote Registry service is not started on it.
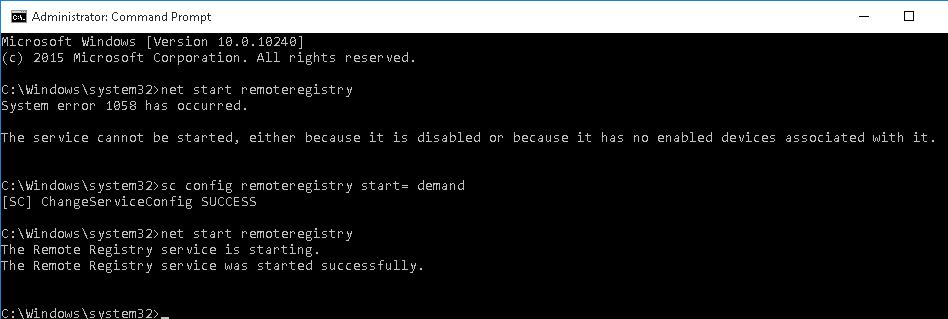
 To start the service manually, run these commands on the remote computer:
 sc config remoteregistry start= demand
net start remoteregistry
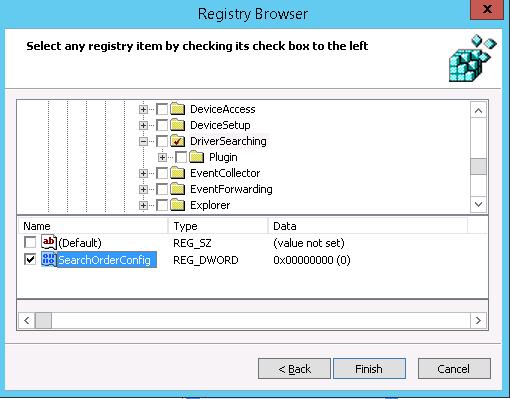
- Use the Remote Registry Browser to find and select all the registry parameters that you want to deploy through the GPO;Note. This registry browser allows you to select only registry keys from the HKEY_LOCAL_MACHINE and HKEY_USERS hives on a remote computer. If you need to set the keys contained in other registry hives, you need to install RSAT on the remote computer. Then run the gpmc.msc console on this computer and use the same procedure to select the registry keys you need.
- In this example, I want to import only one registry parameter to the GPP — SearchOrderConfig;

- The specified registry entry is imported into the GPP console along with the path and current value (0). You can change its value and the desired action (this will be considered later);

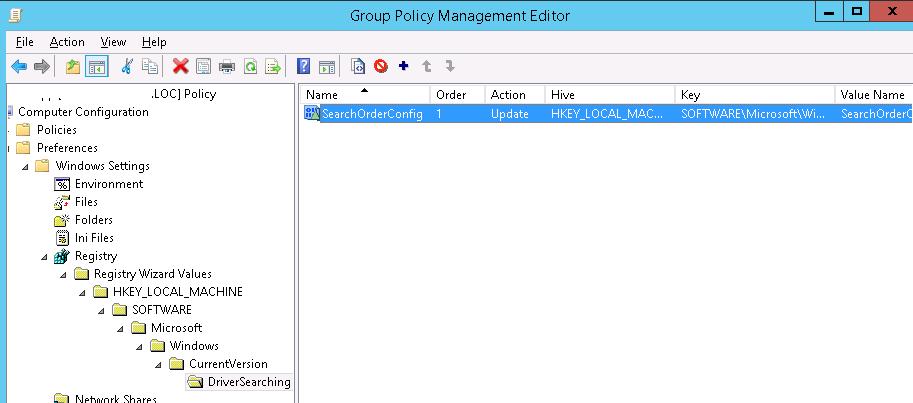
- Thus, you have created a Group Policy to deploy your registry key. The next time the Group Policy settings are updated on the target computers, the value of the SearchOrderConfig registry key will change to 0.If the policy doesn’t apply to the client, you can use the GPResult tool for diagnostics.
If this GPO is removed, unlinked from an AD container, or a target computer is moved to another OU, then the value of the registry parameter won`t return to its original (default) value.
How to Manually Create, Edit or Delete a Registry Key using Group Policy?
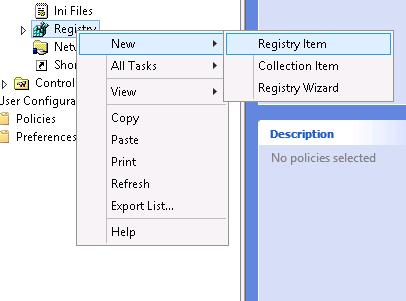
You can use GPP to create, modify, or delete a specific parameter or registry key by manually specifying the path and value of the registry item.
- Select Registry -> New -> Registry Item;

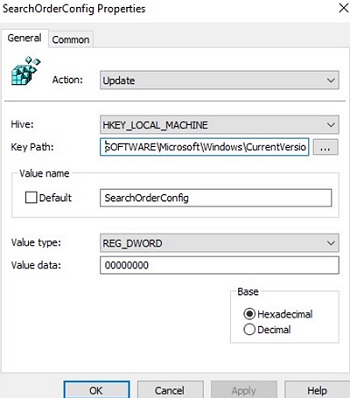
- Configure your registry item settings:
Action: Update
Hive: HKEY_LOCAL_MACHINE
Key Path: SOFTWARE\Microsoft\Windows\CurrentVersion\DriverSearching
Value name: SearchOrderConfig
Value type: REG_DWORD
Value date: 00000000
 Do not enter the name of the HIVE in the key path, or an additional subkey will be created in the registry (such as HKEY_HKEY_XXX).
 - By default, the registry items that are configured by the GPO are set to Update mode.
4 types of actions are available in GPO for registry keys:
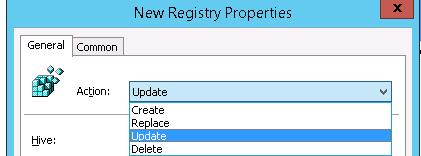
- Create – creates a registry key/parameter. If the parameter already exists, its value is not changed;
- Update (by default) – updates the value of an existing parameter according to the GPP. If the registry parameter doesn’t exist, it will be created automatically (as well as the registry key where it should be located);
- Replace – if the registry parameter/key already exists, it will be deleted and recreated (rarely used);
- Delete – deletes a registry item.
There is a number of other useful options on the Common tab:
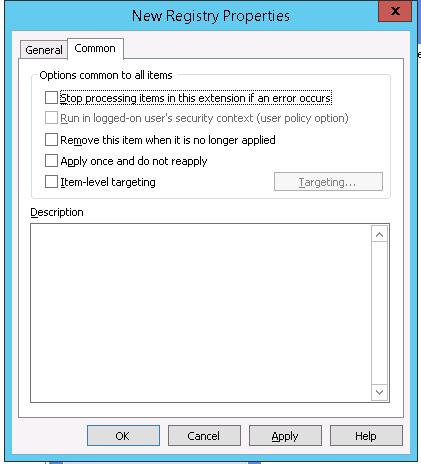
- Run in logged-on user’s security context (user policy option) — a registry key is created only in the current user context (it is possible only for GPP in the User Configuration section of the GPO). If a user doesn’t have administrator privileges, the policy won’t be able to write anything to the protected system registry keys;
- Remove this item when it is no longer applied – if the policy no longer applies to a client, the registry change will be automatically deleted;
- Apply once and do not reapply – a policy is applied to a client (user or computer) only once. Later it won’t be reapplied. If after applying the GPO, the user manually changes the value of the registry item, the policy won’t override its value on the next policy update cycle;
- Item-level targeting – allows you to more accurately target policy to clients (you can target the policy to a specific IP, network mask, computer name, or computers with certain characteristics, similar to how you use WMI filters in GPO). For example, you can specify that the registry parameter should be applied to computers running Windows Server 2016 in the AD OU named Servers.


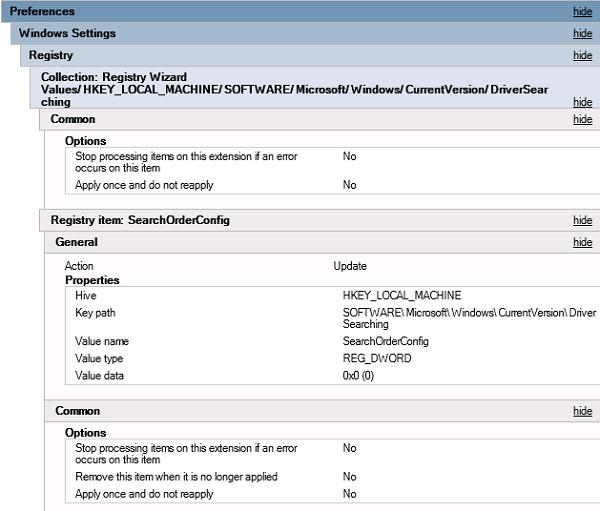
This is how the resulting Group Policy settings will look in the GPMC console (on the Settings tab).
GPO: Import Registry Data from a REG File
The Registry Group Policy Preference allows an administrator to import a .REG file containing multiple registry entries into Group Policy at once. For this, the REG file must be converted to XML (Group Policy Editor allows you to import files in XML format only).
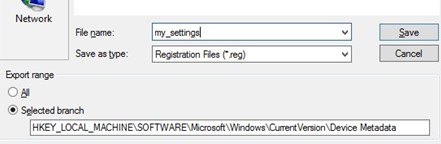
For example, you have a reference computer on which some settings are configured through the registry. You can export these settings to a REG file by right-clicking on the reg key name in the regedit.exe and selecting Export.
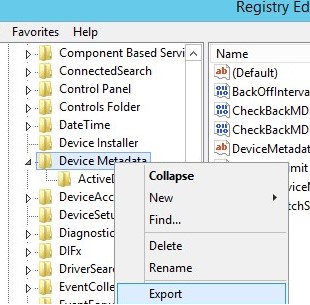
Save the registry key entries to the REG file.
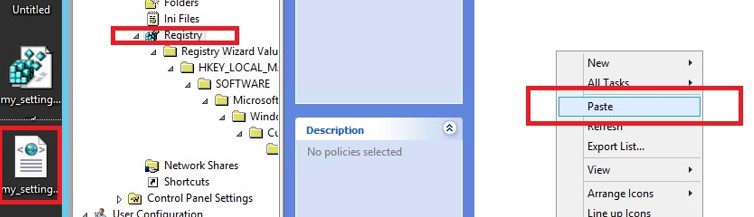
Next, you need to convert this REG file to XML format. You can perform the reg->xml conversation using the online service Reg2GPP https://www.runecasters.com.au/reg2gpp with the PowerShell script RegToXML.ps1.
Copy the resulting XML file in File Explorer and paste it into the Registry section of the Group Policy Editor.
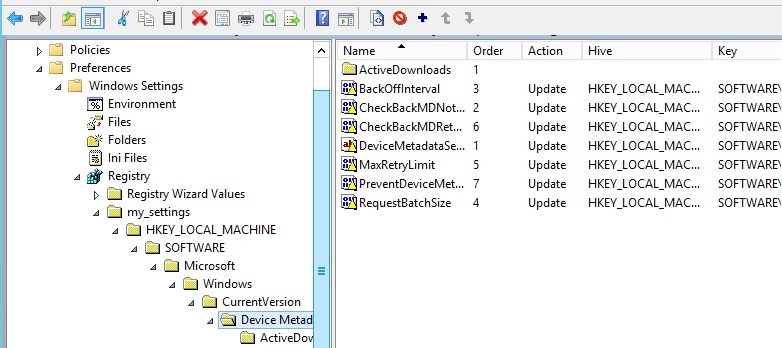
As a result, all the registry settings from your REG file will appear in the Group Policy console and will be applied to the target domain computers.
Set Registry Key Permissions with Group Policy
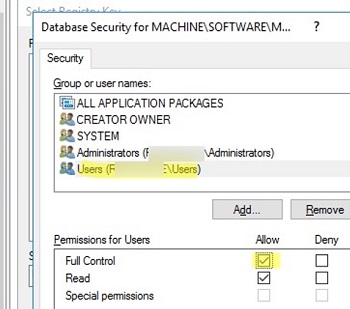
You can use Group Policy to change access permissions (ACL) for specific registry keys. You can use this feature to prevent non-admin users from accessing protected registry keys or to allow regular users the right to modify system keys.
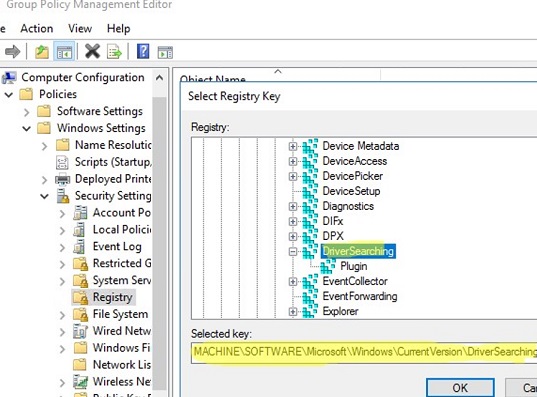
You can configure the registry ACL settings in the GPO section Computer Configuration -> Windows Settings -> Security Settings -> Registry
- Select Add key;
- Use the built-in Registry Browser to find the registry key you need (or specify the path manually in the following format
MACHINE\SOFTWARE\Microsoft\Windows\CurrentVersion\DriverSearching);
- Set the new ACL settings for your registry key that you want to apply in the Database Security window. In this example, I want to allow users to make any changes to the system-protected registry key. You need to select the Users group and grant Full Control permission for it. You can enable the inheritance of permissions to the sub-keys by using the Advanced -> Enable inheritance option;
 You can add or remove any other security groups, users, and other principals from the local computer or Active Directory.
 - Save your changes. The new registry key permissions will apply to clients after the GPO is updated.
How to Modify Registry Entries with a GPO Logon Script?
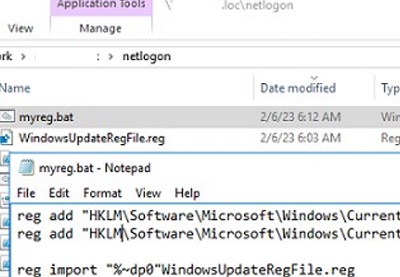
Prior to Windows Server 2008, only logon script BAT files can be used to modify the registry settings by using the GPO. You must use the reg add or reg import commands in such a .bat file to make changes to the registry.
To make changes to the registry using the GPO logon script, you need to create a text file myreg.bat with the necessary commands. For example:
- These two commands allow you to configure proxy settings in Windows (run via Startup script in Computer Configuration):
reg add "HKLM\Software\Microsoft\Windows\CurrentVersion\Internet Settings" /v ProxyEnable /t REG_DWORD /d 1 /f
reg add "HKLM\Software\Microsoft\Windows\CurrentVersion\Internet Settings" /v ProxyServer /t REG_SZ /d yourproxyadress:proxyport /f - The following two commands clear the client’s RDP connection history. In this example, the script must be run from the Logon script section in the User Configuration because we are accessing a user registry hive:
reg delete "HKEY_CURRENT_USER\Software\Microsoft\Terminal Server Client\Default" /va /f
reg delete "HKEY_CURRENT_USER\Software\Microsoft\Terminal Server Client\Servers" /f - The last command lets you import an entire registry key from a REG file ( in order to export the local registry key, use the following command: reg export HKLM\Software\Policies\Microsoft\Windows\WindowsUpdate c:\WindowsUpdateRegFile.reg):
reg import "%~dp0"WindowsUpdateRegFile.reg
%~dp0 parameter is used.Copy your *.bat (and *.reg if you need to import) to the Netlogon directory on the domain controller ( \\woshub.loc\netlogon).
Open your GPO and navigate go to Computer Configuration -> Windows Settings -> Scripts -> Startup.
Click Add and specify the UNC path to your bat file in NETLOGON.
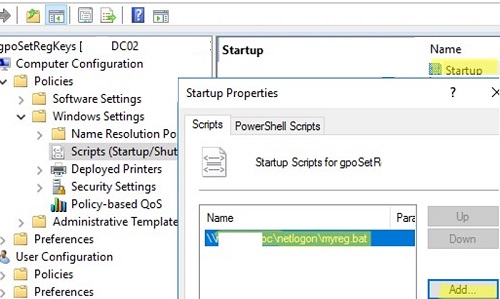
The next time you restart Windows, your BAT file will run and make changes to the registry.
6 comments
Wow, did anyone happen to notice you put the Hive in the Key Path under “New Registry Properties” pane? Anyone following this would have nothing they did work. Great job!
Noticed that as well. Good catch.
Teşekkür ederim.
İyi Çalışmalar.
Do not put the hive name into the key path otherwise it creates a new HKEY_xxx folder in the registry!
Does anyone know a quick way to remove the newly created folders remotely for users?
Can i create GPP registry policy with PowerShell?
The script reg to xml is not needed. You can choose for view xml that will show up in a temp folder. Copy to the new domain. Then you can paste as stated in this article