The warning ‘Virtual Machine disks consolidation is needed’ in the Summary tab of a virtual machine in the VMware vSphere Client console means that when deleting snapshots (using the Delete or Delete All options), there were files left on the disk that could not be merged (committed) with the main virtual disk file (vmdk). As a result, you cannot backup such a virtual machine, and its performance is degraded.

Virtual machine Consolidation Needed status.
Virtual Machine disks consolidation is needed.
The most typical causes of the ‘Virtual Machine disks consolidation is needed’ error are:
- Poor storage performance, due to which snapshots cannot be deleted/consolidated due to a timeout or a large size of a snapshot;
- There is not enough free space on the VMFS datastore to perform consolidation, there must be at least 1 GB free (see how to increase VMFS datastore capacity in VMware ESXi);
- Snapshot files are locked by vSphere or a third-party app (typically by a backup app, such as HP DataPtotector, Veeam, or Netapp VSC). Make sure there are no running VM backup processes;The problem can be caused by adding VM disks (hot-add) to the backup appliance when performing backups. In some cases, you need to manually disconnect the virtual disks of problematic VMs in the backup appliance settings (this happens in Veeam Backup Proxy, Symantec NetBackup, and CommVault Media Agent).
- A VM has more than 32 snapshots (the maximum number recommended by VMware);
- The background process of large snapshots consolidation has been launched;
- Connection problems (possibly temporary) between the vCenter server and the ESXi host.
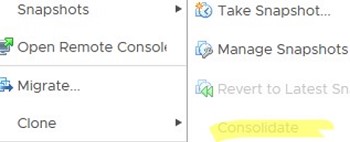
How to Consolidate Disks in VMware?
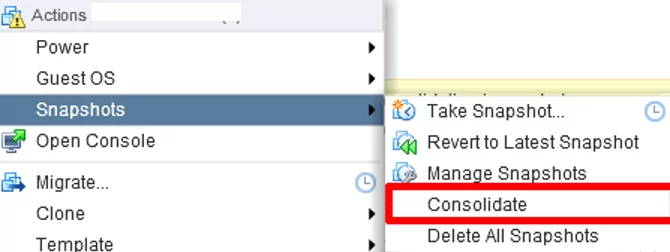
To fix the error ‘Virtual machine Consolidation Needed’, right-click on the virtual machine and select VM -> Actions -> Snapshots -> Consolidate.
A window with the following request appears:
Confirm Consolidate
This operation consolidates all redundant redo logs on your virtual machine. Are you sure you want to continue?
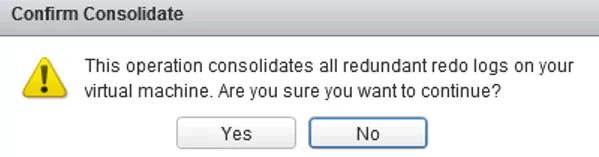
Confirm that you want to delete the redundant logs. Then vCenter will consolidate disks and clear the logs. The consolidation process can take a long time depending on the size of the VM, the number of snapshots, and the current host/datastore load. During consolidation, VM performance may degrade. Wait for the “Consolidate virtual machine disk files” task to complete.

When consolidation is performed, data from the delta disks are merged with the main disk and unnecessary files on the storage are removed. After that, the warning of the VM consolidation will disappear.
Disk Consolidation File Lock Errors
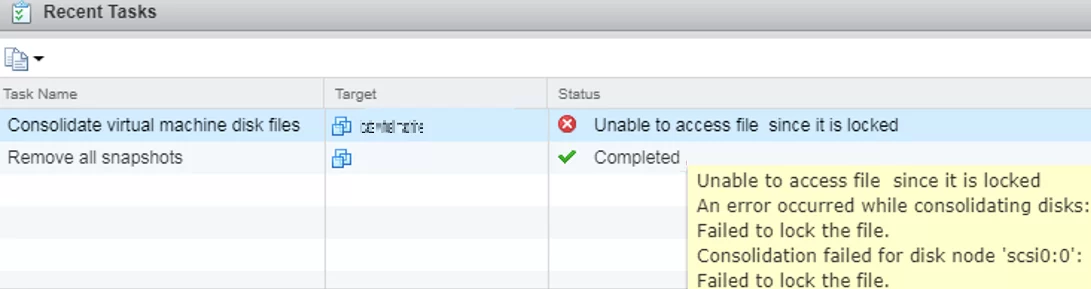
In some cases, when performing a consolidation you may see this error in the vSphere console:
Unable to access file since it is locked. An error occurred while consolidating disks: Failed to lock the file. Consolidation failed for disk node ‘scsi0:0’: Failed to lock the file.
or
Consolidate virtual machine disk files - Unable to access file since it is locked.
In this case, VMware recommends restarting Management agents on the ESXi server. To do it, connect to the ESXi host via SSH and run this command:
services.sh restart

If this doesn’t help, check who has locked the virtual machine files.
- Go to the VM directory on the VMFS datastore:
# cd /vmfs/volumes/xxxxxx-xxxxxx-xxxx-xxxxxxx/WINSRV1 - List locked VM files and which ESXi hosts hold these files:
# for i in `ls`; do vmfsfilelockinfo -p $i ;done|grep 'is locked in\|Host owning the lock\|Total time taken' | sed 's|Host owning the lock on file is||g'|sed 's|Total time|---|g' | awk '{print $1}' |uniq - The previous command will return something like this:
---
"WINSRV1-bf11abd3.vswp"
Esxi01,
---
"WINSRV1-flat.vmdk"
Esxi02,
Esxi01
- In this example, you can see that the WINSRV1-flat.vmdk file is locked by two hosts. To release the file lock from the second host, connect to Esxi02 via SSH and run the commands:
# /etc/init.d/hostd restart
# /etc/init.d/vpxa restart - Run the consolidation from the vSphere Client interface.
Also, you can try to unlock the VM files as follows:
- Shutdown the VM if it is possible;
- Create a new snapshot;
- Remove all the VM snapshots using the ‘Delete All’ option;
- Move running VM to another ESXi host using vMotion;
- Try to consolidate snapshots as described above.
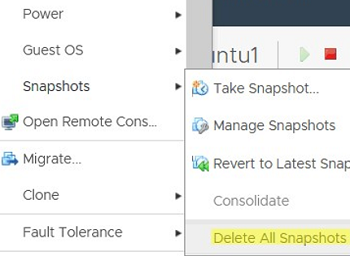
If the Consolidate option is inactive in the VM menu (grayed out button), and there are still a large number of delta snapshot files in the datastore, the integrity of the snapshot chain is most likely broken (error: Unable to enumerate all disks).
Try to manually remove the VM from the list (Remove from Inventory) and re-register the VMX file of the virtual machine from the Datastore Browser. If this doesn’t help, check and fix the errors in the snapshot chain as described here: The parent virtual disk has been modified since the child was created (https://kb.vmware.com/s/article/1007969).
Consolidate VM Snapshots with PowerCLI
You can find all virtual machines that require consolidation using PowerCLI (this module allows you to manage VMware infrastructure). To do it, connect to your vCenter server or ESXi host:
Connect-VIServer mun_vsphere.woshub.com
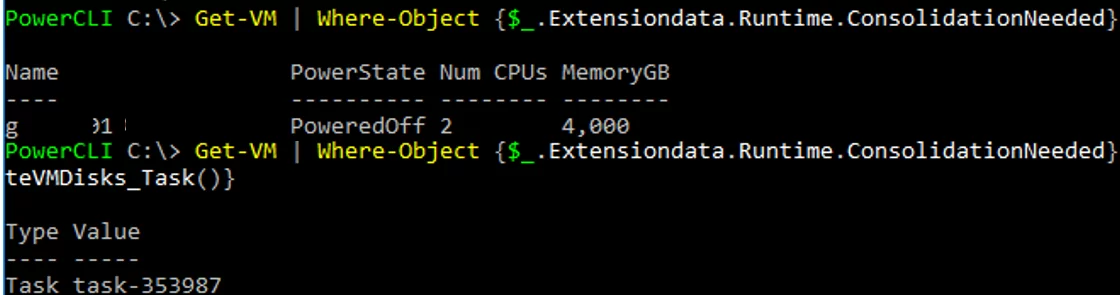
Get the list of all VMs with the status ‘Virtual machine disks consolidation is needed’:
Get-VM | Where-Object {$_.Extensiondata.Runtime.ConsolidationNeeded}
Now you can consolidate the disks of all virtual machines in the list:
Get-VM | Where-Object {$_.Extensiondata.Runtime.ConsolidationNeeded} | foreach {$_.ExtensionData.ConsolidateVMDisks_Task()}
You can automatically consolidate VM snapshots older than 30 days using the following PowerShell script:
$VMName = Get-VM | Get-Snapshot |
 Where {$_.Created -lt (Get-Date).AddDays(-30)} | select VM |
 ForEach-Object {
 $VMName.ExtensionData.ConsolidateVMDisks()
 }