You can use the Get-MessageTrackingLog cmdlet in the Exchange Management Shell to analyze mail flow, message forensics and to get different information about messages sent or received by a specific mailbox in your email organization. In this article, I will show several examples of PowerShell one-liner commands which I often use to track messages on Exchange Server 2016/2013/2010 and Office 365 (Exchange Online).
Let me remind you that the Exchange transport logs are located in the %ExchangeInstallPath%TransportRoles\Logs\MessageTracking folder. And the most efficient and flexible way to analyze message tracking logs in the Exchange is to use the Get-MessageTrackingLog cmdlet.
First of all, consider the main Get-MessageTrackingLog parameters that you can use to filter events in the logs. The following cmdlet parameters are used the most often:
- Sender – search by sender;
- Recipients — search by recipient;
- Server – search on the specific transport server;
- Start “11/30/2019 08:00:00” -End “12/18/2019 21:00:00” — search for the specific period of time;
- MessageSubject — search by message subject;
- EventID – search by Exchange event (as a rule, the following codes are used: RECEIVE, SEND, FAIL, DSN, DELIVER, BADMAIL, RESOLVE, EXPAND, REDIRECT, TRANSFER, SUBMIT, POISONMESSAGE, DEFER);
- messageID – track by a message ID.
If you run the Get-MessageTrackingLog cmdlet without any parameters, all events from the Exchange transport logs for the last 30 days will be displayed. The cmdlet displays the last 1,000 events only. To remove this restriction, use the –ResultSize Unlimited parameter. (It is not recommended to do it without some additional filter parameters due to potentially high load on your transport server.)
You can display the information about your Exchange events page-by-page using this command:
Get-MessageTrackingLog | Out-Host –Paging
![]()
To display the data in the table format and adjust the column width, the Format-Table cmdlet is used:
Get-MessageTrackingLog | Format-Table –AutoSize
If several Hub Transport servers is used in your Exchange organization, you will need to specify the name of a server to search as an argument of the –Server parameter . Or run the message tracking command for each of your Hub Transport servers with the pipe:
Get-TransportServer | Get-MessageTrackingLog
Let’s display all emails for the last 24 hours ((Get-Date).AddHours(-24)), in which a recipient from @gmail.com domain is specified:
Get-MessageTrackingLog -Start (Get-Date).AddHours(-24) -ResultSize unlimited | where {[string]$_.recipients -like "*@gmail.com"}
![]()
To display all emails sent by the specific user through the certain server in a given period of time use the command below (only the specific tracking fields will be displayed in the report):
Get-MessageTrackingLog -ResultSize unlimited –Sender "[email protected]” –server rome-hub-01 -Start "11/30/2019 06:00:00" -End "12/13/2019 22:00:00" |select-object Timestamp,Sender,Recipients,MessageSubject,EventId|ft
![]()
Let’s find all emails sent by a user to another one and export the search results into a CSV file:
Get-MessageTrackingLog -Sender "[email protected]" -Recipients "[email protected]" -ResultSize unlimited –server rome-hub-01| Select-Object Timestamp,Sender,{$_.recipients},MessageSubject | Export-Csv -Path "C:\Export\exchange\exchange_tracking_logs.csv" -Encoding Default -Delimiter ";"
You can search by the message subject. To display all emails with “test” word in the subject field, run the following command. (To display the results in a separate graphic window as a table with the convenient sorting, filtering and search features, you can use the Out-gridview cmdlet.)
Get-MessageTrackingLog -MessageSubject "test" -ResultSize unlimited –server rome-hub-01| Select-Object Timestamp,Sender, {$_.recipients}, MessageSubject | out-gridview
![]()
You can search by the specific message ID (you can get it from the message header in Outlook):
Get-MessageTrackingLog -messageID "[email protected]" -ResultSize unlimited –server rome-hub-01| Select-Object Timestamp,Sender, {$_.recipients}, MessageSubject
To count the number of incoming email messages for the specific mailbox for the last 7 days, run the following command:
(Get-MessageTrackingLog -EventID "RECEIVE" -Recipients "[email protected]" -ResultSize unlimited).Count
You can display the more insteresing message statistics. For example, you want to see how many emails from different senders from the gmail.com have been received by users of your company during the last 5 days (we will display the total number of emails sent by each external sender):
Get-MessageTrackingLog -EventId "Receive" -Start (Get-Date).AddDays(-5) -ResultSize Unlimited | Where-Object {$_.Sender -like "*@gmail.com"} | Group-Object Sender | Sort-Object Count -Descending | Format-Table *
![]()
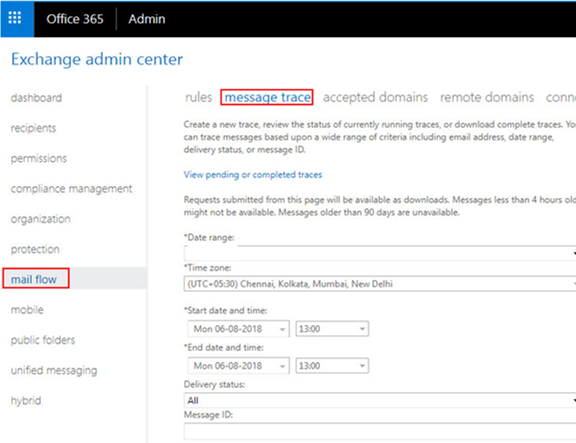
Office 365 allows you to perform message tracking logs search from the Exchange Admin Center (EAC). Go to the Mail Flow -> Message Trace. Fill in the search fields. This is actually the web interface for the Get-MessageTrackingLog cmdlet, which allows the user to generate PowerShell tracking command in a simple web form.
The methods considered above will help you to get the statistics on the sent and received messages in your Exchange system and diagnose different email transport problems.
3 comments
Hi,
I am getting this error. Not sure why.
I tried in both Exchange shell and PowerShell
I have Exchange 2019
Welcome to the Exchange Management Shell!
Full list of cmdlets: Get-Command
Only Exchange cmdlets: Get-ExCommand
Cmdlets that match a specific string: Help **
Get general help: Help
Get help for a cmdlet: Help or -?
Exchange team blog: Get-ExBlog
Show full output for a command: | Format-List
Show quick reference guide: QuickRef
VERBOSE: Connecting to Exchange-2019.ans.red.
VERBOSE: Connected to Exchange-2019.ans.red.
[PS] C:\Windows\system32>Get-MessageTrackingLog
Get-MessageTrackingLog : The term ‘Get-MessageTrackingLog’ is not recognized as the name of a cmdlet, function, script
file, or operable program. Check the spelling of the name, or if a path was included, verify that the path is correct
and try again.
At line:1 char:1
+ Get-MessageTrackingLog
+ ~~~~~~~~~~~~~~~~~~~~~~
+ CategoryInfo : ObjectNotFound: (Get-MessageTrackingLog:String) [], CommandNotFoundException
+ FullyQualifiedErrorId : CommandNotFoundException
[PS] C:\Windows\system32>
Run “Add-PSSnapin *exch*” command and see if it makes a difference.
Message tracking in Exchange Online (microsoft 365):
Get-MessageTrace -RecipientAddress [email protected] -StartDate 03/15/24 -EndDate 03/17/24| select Received,SenderAddress,RecipientAddress, Subject,Size,Status|ft
List detailed information on the found trace events:
Get-MessageTrace -SenderAddress [email protected] -StartDate 03/15/24 -EndDate 03/17/24|Get-MessageTraceDetail|fl
Unlike the on-prem Get-MessageTrackingLog cmdlet that searches all available logs, Get-MessageTrace allows to search messages for the last 10 days only. If you want to get information about emails sent/delivered over 10 days ago, run historical queries using the Start-HistoricalSearch cmdlet.
Start-HistoricalSearch -ReportTitle “Trace123” -ReportType MessageTrace -SenderAddress [email protected] -StartDate 12/01/2024 -EndDate 03/18/2024 -NotifyAddress [email protected]
Get-HistoricalSearch