NFS storage can be used in VMware infrastructure to store virtual machine files, disk images, and other files. In this post, we’ll look at how to unmount an NFS datastore from VMware ESXi and what to do if an error occurs when you try to unmount an NFS share or if the NFS storage becomes inactive.
How to Properly Remove/Unmount NFS Storage on VMware?
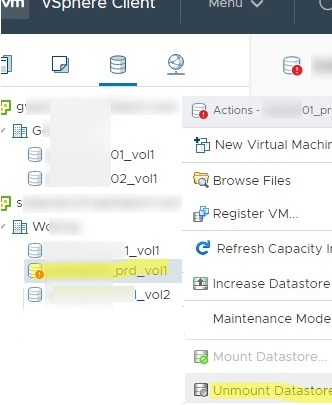
To unmount an NFS storage on an ESXi host, simply right-click it in the vSphere Client console and select Unmount Datastore. A list of ESXi hosts on which this NFS share is mounted appears in the list.
You must unmount NFS storage on all ESXi hosts to make it disappear in the vSphere interface.
An ESXi host can unmount NFS storage if:
- There are no running or registered virtual machines on the NFS volume. You need to shut down the VMs or move them to another datastore using the Storage vMotion;
- There are no snapshots, ISO images, or virtual disks (VMDK) on the datastore that are mounted in other VMs;
- The datastore is not managed by Storage DRS and is s not part of a datastore cluster;
- vSphere HA heartbeat does not use storage;
- Storage I/O control for the datastore is disabled;
- In the advanced system settings of the ESXi host, verify that the NFS datastore is not being used to store log or swap files (check the
global.logDirandScratchConfig.CurrentScratchLocationoptions under Configure -> Advanced system settings -> Edit;
An error will occur when unmounting the NFS storage if one of these conditions is not met:
The "remove datastore" operation failed.
The resource 'nfs_datastore' is in use.
Or:
Cannot remove datastore 'nfs_datastore' because system swap is enabled on it.
Removing an Inactive NFS Datastore on VMware ESXi Host
If the NFS share was disabled on the NFS server side before it was unmounted on ESXi, or if there are still VMs running on the NFS volume, an error occurs when you try to unmount the NFS datastore from the vSphere Client interface:
Error performing operation:
NFS Error: Unable to Unmount filesystem: Busy
Or:
The object ‘vim.Datastore:ds:///vmfs/volumes/NFS_Store1/’ has already been deleted or has not been completely created
$ esxcli network firewall ruleset set --ruleset-id nfs41Client --enabled=true
 $ esxcli network firewall ruleset set --ruleset-id nfsClient --enabled=true
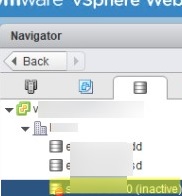
If the NFS storage is not available, it becomes inactive (greyed out) in the host’s storage list in the vSphere interface. In my case, an error occurred when I tried to remove an inactive NFS volume from the ESXi host configuration:
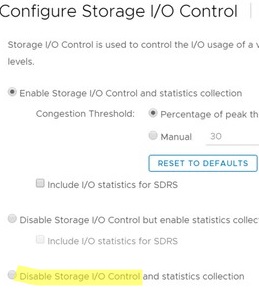
The resource datastore_nfs02 is in use.
Call “HostDatastoreSystem.RemoveDatastore” form object “datastoreSystem-28″ on vCenter Server “xxxx” failed.
CannotRemove datastore ‘datastore_name’ because Storage I/O control is enabled on it. Correct it and re-try the operation.
Based on the error, the NFS storage cannot be removed due to the Storage I/O control (SIOC) is enabled. Another error occurs when disabling Storage I/O Control for a datastore:
Datastore is not accessible
Solution:
In order to properly remove the inactive NFS storage from the ESXi host, you will need to connect to the console of the ESXi host server using SSH (How to enable SSH on VMware ESXi).
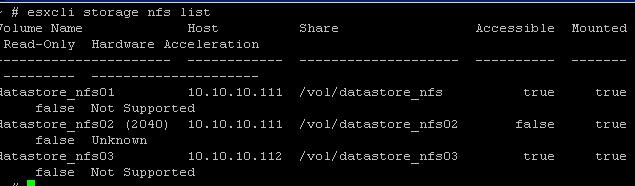
View the list of the NFS volumes available on the VMware ESXi host:
# esxcli storage nfs list
If required, you can view detailed information about the NFS storage:
# vim-cmd hostsvc/datastore/info datastore_nfs02
To unmount the NFS volume from the ESXi host, run the command:
# esxcli storage nfs remove –v datastore_nfs02
![]()
If the NFS datastore isn’t removed from the vSphere Client, click the Refresh button in the ESXi Storage section (Configuration -> Storage) or click Rescan Storage.
1 comment
In my case the NFS storage was bisy with one of VM. Via thick vSphere Client I so it in Inventory “Datastores and Datastore Clusters” at “Virtual Machines” tab. Although there was no devices placed there at that moment and in fact of that the VM’s properties didnt content storage in storage list. But earlier there was mounted a CDROM to iso file at (i used this storage for delploy ), and there was a snapshot (i dont use snapshots in my work, but it was autogenerated with clone operation and in unknown reason didnt removed automaticaly). Then I deleted snapshot and occured VM covered from earlier tab, and then I abled to unmount storage.
Clearly, in except of using so hard manipulations (and in commonly, not preferable), in first step we should release storage from any obvious relations.