Let’s look at the issue when your VMFS datastore attached to an ESXi host/vSphere is deleted, lost, or damaged. It may happen, for example, due to a human error when a VMware administrator accidentally removes a VMFS datastore or a disk/LUN with a VMFS partition was disabled/lost due to errors on your storage/backup device. In this article, we’ll show how to manually recover the partition table on the disk with the VMFS datastore.
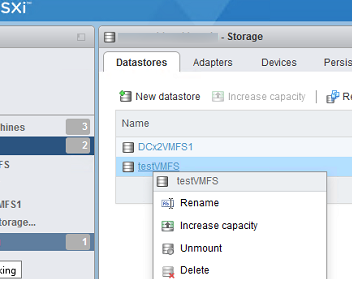
Suppose, a VMware administrator accidentally selected Delete instead of Unmount and removed a VMFS datastore.
Open the vCenter client interface, go to Storage -> Devices, and find in the list the disk/LUN with the VMFS datastore connected earlier. Get the full path to the disk (with the naa identifier). In my screenshot, it is:
/vmfs/devices/disks/naa.60003ff44dc75adc87daa4e08f467565

Enable SSH on your ESXi host on which the target LUN is available and connect to it using an SSH client (I am using the built-in Windows SSH client).
Make sure that the partition table exists on the device:
partedUtil getptbl /vmfs/devices/disks/naa.60003ff44dc75adc87daa4e08f467565
The command has returned that there is a GPT on the disk/LUN.
gpt
1305 255 63 20971520

Then you must get the first and the last block of the VMFS partition on the disk.
To display a summary of all partitions available from the ESXi host and find the first block of the deleted VMFS partition, run the script below in the ESXi cli:
offset="128 2048"; for dev in `esxcfg-scsidevs -l | grep "Console Device:" | awk {'print $3'}`; do disk=$dev; echo $disk; partedUtil getptbl $disk; { for i in `echo $offset`; do echo "Checking offset found at $i:"; hexdump -n4 -s $((0x100000+(512*$i))) $disk; hexdump -n4 -s $((0x1300000+(512*$i))) $disk; hexdump -C -n 128 -s $((0x130001d + (512*$i))) $disk; done; } | grep -B 1 -A 5 d00d; echo "---------------------"; done
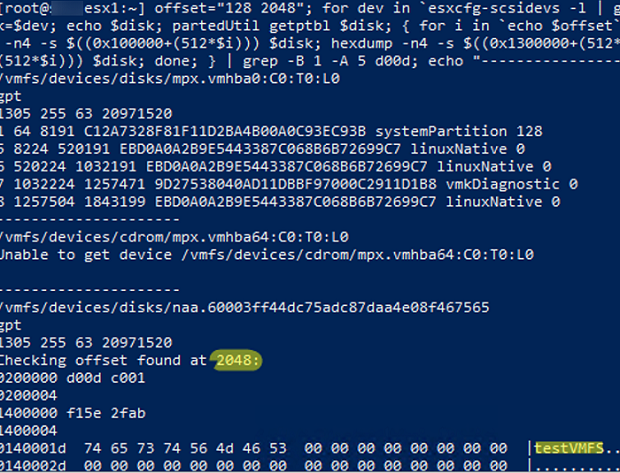
In this example, we have displayed information about the deleted partition (testVMFS) and got the number of the first block of the partition: 2048.
Now we need to get the last block of the VMFS partition on the disk:
partedUtil getUsableSectors /vmfs/devices/disks/naa.60003ff44dc75adc87daa4e08f467565

In our example, it is 20971486.
partedUtil mklabel /vmfs/devices/disks/naa.60003ff44dc75adc87daa4e08f467565 gpt
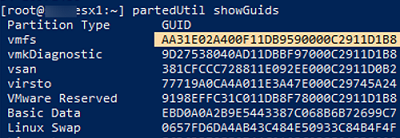
Then get a partition table GUID for the VMFS partition. It is always AA31E02A400F11DB9590000C2911D1B8.
You can display all possible partition table GUIDs using this command:
partedUtil showGuids
So we have got the following information:
- LUN ID — naa.60003ff44dc75adc87daa4e08f467565
- Start Block – 2048
- End Block – 2097148
- GPT GUID – AA31E02A400F11DB9590000C2911D1B8
Then create a partition table on the disk using the information you have got:
partedUtil setptbl /vmfs/devices/disks/naa.60003ff44dc75adc87daa4e08f467565 gpt "1 2048 20971486 AA31E02A400F11DB9590000C2911D1B8 0"

Check the partitions on the disk again and make sure that the VMFS partition is now visible:
partedUtil getptbl /vmfs/devices/disks/naa.60003ff44dc75adc87daa4e08f467565

Now you need to mount the VMFS datastore:
vmkfstools -V
 esxcli storage core adapter rescan --all

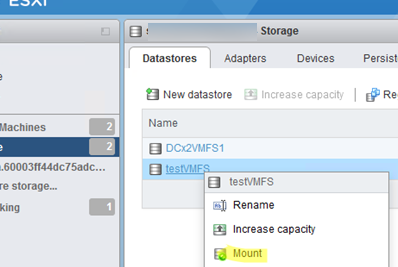
Go to the vSphere client and make sure that the accidentally deleted VMFS datastore appears. You can mount it on the VMware ESXi host or access it from a Linux or Windows host.
All files, including ISO images and virtual machine files, are available on the restored VMFS datastore.

This guide is relevant for VMware ESXi/vSphere 6.0, 6.5, and 7.0.
14 comments
I can’t thank the author enough for taking the time to craft this very detailed, easy to follow article. It saved us a world of hurt in the form of a long recovery outage. We followed the steps and the sense of relief when the VMFS volumes ‘re-appeared’ during an array migration gone wrong was palpable. Raise a glass to the author THANK-YOU.
Is this still relevant at all when you have recreated a data store and vmdk? I panicked an recreated one to mount it to a VM and use some recovery software to see if anything could be recovered, but the description here seems way better.
I’m afraid I messed it up so that this guide isn’t relevant anymore..
It looks like you have already overwritten the VMFS partition structure and files on the disk, so this guide is not for your case
Thanks a lot, successfully recovered 3 datastores
You are a legend! Thanks you 100x’s! You’re guide was perfect!
非常感謝您,很祥細的教學。
不過我卡在兩行指令:
vmkfstools -V
esxcli storage core adapter rescan –all
該指令對我沒有作用,替換成下列指令已成功。
esxcli storage vmfs snapshot list
esxcli storage vmfs snapshot mount -u [UUID]
ty bro!
GOD BLESS YOU ALL!!!
THX !!!!1
You cab use vSphere On-disk Metadata Analyzer (VOMA) to scan the VMFS volume metadata and highlights any inconsistencie
Any ideas on why the final setptbl command would fail with this..?
> 0 0 0 0
> 1 2048 2000409230 AA31E02A400F11DB9590000C2911D1B8 0
> Error: Read-only file system during write on /dev/disks/t10.NVMe____Samsung_SSD_970_PRO_1TB_________________AEAEB49155382500
> SetPtableGpt: Unable to commit to disk
The vSphere host is not in maintenance mode, and I get the same error after a reboot
THanks
First, check the SMART status of the drive:
esxcli storage core device smart get -d drivename
Try mount datastote manually:
1) list detected volumes:
esxcfg-volume -l
2) copy the vo;ume label (VMFS UUID/label)
3) mount the volume:
esxcfg-volume -M [VMFS UUID/label]
You are a lifesaver! Thank you very much!!!
You just saved my life, and probably my companies’.
Thanks!