NIC Teaming (or Load Balancing/Failover – LBFO, or NIC bonding) allows joining multiple physical network adapters (NICs) into a single logical network card. In this article, we’ll show how to configure NIC Teaming on Windows Server 2019/2016/2012R2 and on Windows 10/11 desktop computers.
Why may you need to combine multiple network adapters into a NIC Team?
- Increase throughput. For example, by joining two 1GB network cards into a NIC Team, you will get a 2Gbit/s bandwidth on a logical adapter;
- Manage network card load balancing. You can balance the network traffic across active NICs.
- Fault tolerance. If any of your network cards in a NIC Team fails, the rest cards take their functions and the connection with the server is not interrupted. For critical servers, the mechanism protects a service against downtime if a network switch or an Ethernet port on it fails, or if a network cable (connecting your host and switch) is damaged. To implement this feature, it is enough to connect network cards to different physical switches.
Configuring a NIC Teaming on Windows Server 2019
You can configure NIC Teaming on Windows Server 2012 or newer. Let’s see how to combine multiple network adapters into a NIC Team interface on Windows Server 2019. NIC Teaming is disabled by default on Windows Server.
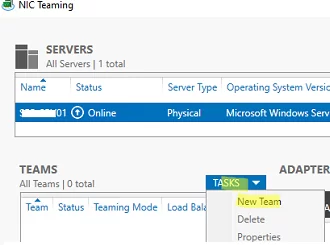
To enable it, open the Server Manager, select Local Server, and click NIC Teaming: Disabled in its properties.

In the next window, select Tasks -> New Team in the left bottom pane.
Then enter a Team name and select the network adapters you want to add to the group.
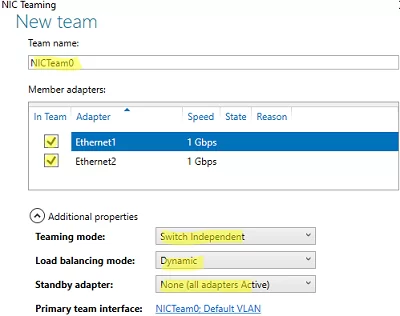
You can select special team options. The options set NIC Teaming rules and performance. Let’s take a closer look at these settings.
Teaming Mode. The option sets how the group interacts with the network switches:
- Static Teaming (IEEE 802.3ad) is a static operation mode depending on your network hardware. All team adapters must be connected to the same switch, which Ethernet ports are configured to use static channel aggregation (additional switch configuration is required);
- Switch Independent (a default mode) — the NIC Team works independently of the switch; no additional configuration of network hardware is needed. If this mode is on, you can connect different network adapters to different switches to improve fault tolerance (protection against switch failure);
- LACP (Link Aggregation Control Protocol, LACP, IEEE 802.1ax) is the mode that depends on your network hardware as well. You need to enable and configure the dynamic link aggregation using the LACP on your switch.
Load Balancing mode sets how network traffic is distributed between NICs in the team.
- Address Hash — a special hash is assigned to each physical adapter (based on sender and recipient MAC or IP addresses). All traffic from a specific sender will go through this NIC;
- Hyper-V Port — you can use this mode on a server with the Hyper-V role. It allows you to bind an adapter from your NIC Team to a specific port on a Hyper-V virtual switch;
- Dynamic is a default option combining both load balancing types.
You can make one of the adapters in the group a Standby adapter. In a normal operation mode, this NIC is not used to process traffic. If any other adapter in your NIC Team fails, it will be replaced by a standby one. Actually, if this function is not enabled, there will be no service downtime when any network adapter fails, since its load will be automatically distributed among other cards in the group.
Select the settings you need, click OK and a new NIC Team will be created.
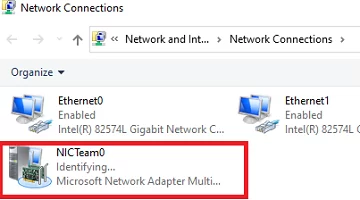
Open the list of network connections in the Control Panel. Make sure that a new device labeled Microsoft Network Adapter Multiplexor Driver (it has a different icon) has appeared. This is the NIC Teaming virtual adapter.
Further configuration of the network card (protocols, IPv4/v6 address) is performed in the properties of the NICTeam adapter.
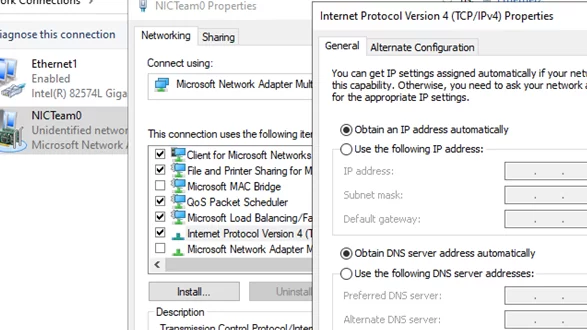
Network adapters that you add to a NIC group will no longer have their own IP addresses.

Later you can add or remove network adapters to your NIC Team.
You can use the NIC Teaming to configure multiple VLAN interfaces on Windows Server. To do it, you can even create a NIC Teaming group from a single network adapter.
How to Create NIC Teaming on Windows Server with PowerShell?
You can create and manage NIC Teams both through the Windows graphical interface and PowerShell. PowerShell can be used to set up NIC Teaming on Windows Server Core.
You can use the built-in NetLbfo module on Windows Server to manage NIC Teaming. Display a list of network adapters on your server:
Get-NetAdapter

Create a new Team0 from the adapters named Ethernet1 and Ethernet3. Select NIC Teaming mode: Switch Independent with dynamic load balancing.
New-NetLbfoTeam -Name Team0 -TeamMembers Ethernet1,Ethernet3 -TeamingMode SwitchIndependent -LoadBalancingAlgorithm Dynamic
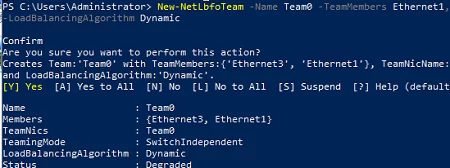
- TeamingMode: Static SwitchIndependent, Lacp
- LoadBalansingAlgorithm: TransportPorts, IPAddresses, MacAddresses, HyperVPort, Dynamic
To get information about NIC Teams on a server, use the command below:
Get-NetLbfoTeam
Name : Team0
Members : {Ethernet3, Ethernet1}
TeamNics : Team0
TeamingMode : SwitchIndependent
LoadBalancingAlgorithm : Dynamic
Status : Up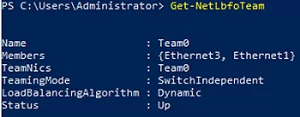
You can use PowerShell to configure an IP address of your NIC Teaming interface and other network settings:
New-NetIPAddress -InterfaceAlias team0 -IPAddress 192.168.13.100 -PrefixLength 24 -DefaultGateway 192.168.13.1
 Set-DnsClientServerAddress -InterfaceAlias team0 -ServerAddresses 192.168.13.10
Run the Get-NetAdapter command. Note that the LinkSpeed of the NIC Teaming network adapter is 2 Gbit/s.

To change the NIC Teaming group settings, use the NetLbfoTeam cmdlet:
Set-NetLbfoTeam -Name Team0 -TeamingMode LACP
Set-NetLbfoTeam : 'SwitchIndependent' is the only TeamingMode value supported in a Virtual Machine
To add an additional VLAN interface via NIC Teaming, run the command below:
Add-NetLbfoTeamNIC -Team Team0 -VlanID 44
You can remove a NIC Team using this command:
Remove-NetLbfoTeam -Name Team0
How to Enable NIC Teaming on Windows 10 and 11?
You can use NIC Teaming to combine network adapters both in Windows Server and in desktop versions of Windows 10 and 11. The main thing is that your network card must support Link aggregation, NIC teaming, or LBFO.
For example, NIC Teaming works out of the box with Realtek PCIe GbE Family Controller (10.35.510.2019) or Intel(R) 82574L Gigabit Network Adapter.
To create a NIC Team on Windows 10 (in this example, it is Windows 10 20H2), open your PowerShell console and list network adapters:
Get-NetAdapter
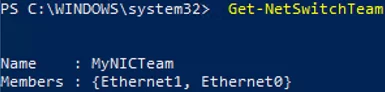
Let’s create a NIC Team of Ethernet0 and Ethernet1 adapters.
New-NetSwitchTeam -Name "MyNICTeam" -TeamMembers "Ethernet0","Ethernet1"

Make sure that a new NIC Teaming interface has appeared on the computer:
Get-NetSwitchTeam
Don’t forget to set its network settings. Now you have got a new 2 Gbit/s interface.

To remove a NIC Team, use PowerShell:
Remove-NetSwitchTeam -Name "MyNICTeam"
3 comments
I got “new-NetLbfoTeam : The parameter is incorrect.”
output like this
new-NetLbfoTeam : The parameter is incorrect.
At line:1 char:1
+ new-NetLbfoTeam
+ ~~~~~~~~~~~~~~~
+ CategoryInfo : NotSpecified: (MSFT_NetLbfoTeam:root/StandardCimv2/MSFT_NetLbfoTeam) [New-NetLbfoTeam],
CimException
+ FullyQualifiedErrorId : Windows System Error -2147024809,New-NetLbfoTeam
I have my team made and work but it is i guess only fail over…in network setting of team says 2gb, but not getting that much.
Well, this method is obsolete since Server 2022 and not recommended to use – even you use server 2016 / 2019. Microsoft as deprecated the support of this Teaming-Mode adapter. Microsoft has implemented a new vswitch called “SET-Switch”. SET stays for “Switch Embedded Teaming” and is configured only by using the PowerShell.
To create one of that magic Switches open PowerShell in admin mode and sent following command:
New-VMSwitch -name “SET-Switch LiveMig” -Netadaptername “Embedded Lom 1 Port 0”, “Embedded Lom 1 Port 1” -EnableEmbeddedTeaming $true
Later u can add a nic easy with:
Add-VMSwitchTeamMember -VMSWITCH “SET-Switch LiveMig” -Netadaptername “Embedded Lom 1 Port 1”
The NIC ports will be a member port of the vswitch. This not acts like an regular nic teamed by the regular teaming adapter.
In the GUI, not many info is displayed about this configured nics. In the older control panel / network u can see them again.
The handling is similar like a regular vswitch in HyperV or failover cluster console.