This article will show you how to manually restore an accidentally deleted Windows EFI boot partition on a UEFI computer. This easy way to manually re-create bootable EFI and MSR Windows partitions will allow you to boot the operating system after accidentally formatting or deleting an EFI partition. This guide is relevant to all Windows versions (including Windows 10 and 11, and Windows Server 2022/2019/2016).
Suppose that the EFI boot partition on your UEFI (non-BIOS) computer was accidentally deleted or formatted (for example, when you tried to move or delete an OEM recovery partition). As a result, your Windows 11/10/8.1/7 doesn’t boot correctly and cycles prompting you to select the boot device (Reboot and select proper boot device or insert boot media in selected boot device and press a key). Next, we will show how to restore Windows boot after deleting the EFI System disk partition (with a Boot Manager and BCD configuration) without reinstalling the OS.
UEFI/GPT-based Hard Disk Partitions in Windows
Consider how the default partition table of a boot hard drive with GUID partition table (GPT) on the UEFI computer should look like. You should have at least the following partitions:
- EFI System Partition (ESP – Extensible Firmware Interface) — 100 MB (partition type — EFI);
- Microsoft Reserved partition — 16 MB (partition type — MSR);
- Primary Windows partition (the partition containing Windows).

This is the minimum configuration. These partitions are created by Windows Installer during a clean install of the OS to an unformatted drive.
Computer manufacturers or users can create additional partitions containing, for example, Windows Recovery Environment (Windows RE) in the winre.wim file, a partition with the system image backup provided by the OEM (allows to roll back to the original state of the computer), user partitions, etc.
The EFI partition with the FAT32 file system is a mandatory partition on GPT disks on UEFI computers and has the GUIDc12a7328-f81f-11d2-ba4b-00a0c93ec93b. The default size of the EFI partition is 100 MB (on advanced format disks with 4KB sectors the size of the EFI partition is 260MB).
The MSR partition (Microsoft System Reserved) on the GPT disk is used to simplify partition management and is used for service operations (for example, when converting a disk from basic to dynamic). This is a partition with the GUID label e3c9e316-0b5c-4db8-817d-f92df00215aewith no drive letter assigned. This partition can’t store user data. In Windows 10 and 11, the size of the MSR partition is only 16 MB (in Windows 8.1 the MSR size is 128 MB), and the file system is NTFS. The MSR partition must be between the EFI System partition (ESP) and the primary Windows operating system partition.
The main partition with the NTFS file system contains the installed Windows, programs, and user data. There may also be additional data partitions on the disk.
Missing EFI Partition in Windows
The EFI partition (similar to the System Reserved partition on drives with the MBR partition table) stores the boot configuration store (BCD) and several files needed to boot Windows. When the computer boots, the UEFI environment loads the bootloader file (EFI\Microsoft\Boot\bootmgfw.efi) from the EFI System (ESP) partition and transfers control to it. The bootmgfw.efi executable launches the Windows Boot Manager, which loads configuration data from the BCD. Once the BCD is loaded, Windows starts booting via winload.efi.

When a UEFI computer boots, it looks for the EFI system partition on all attached drives. If the EFI partition is deleted or corrupted, you won’t be able to boot Windows from that drive. A UEFI error will appear could not locate \efi\boot\bootx64.efi – not foundor an empty UEFI Shell prompting you to select a boot device.
Also, you won’t be able to boot Windows if the EFI partition is formatted with the NTFS file system. Even then performing a clean Windows installation, you will receive an error:
Windows detected that the EFI system partition was formatted as NTFS. Format the EFI system partition as FAT32, and restart the installation.
How to Create EFI System and MSR Partitions on GPT Drive?
Because Windows doesn’t correctly, we’ll need a Windows 10/11 installation drive (see how to create a UEFI Bootable USB drive with Windows install files) or any other boot/rescue media. Boot from the installation media and press the Shift+F10 key combination on the first installation screen. A command prompt window should open.
Run the disk and partition management tool:
Diskpart
List the hard disks connected to the computer:
list disk
In our example, there is only one disk 0 connected. The asterisk (*) in the GPT column indicates that a GUID partition table has been created on the disk.
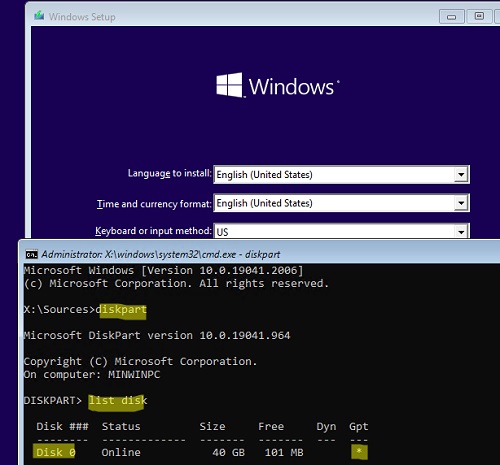
*in the GPT column, then the disk partition table is MBR. You need to make sure that you previously booted your computer in the native UEFI mode (otherwise, following this instruction is pointless). If you are sure that the partition table type has changed, it may be worth converting the drive from MBR to GPT.Select this disk:
Select disk 0
Display the list of partitions on the disk:
List partition
In my example, only three partitions are left on the drive:
- MSR partition — 16 MB
- Windows system partition — 30 GB
- Recovery partition – 541 MB
As you can see, the EFI partition (may be called System) is missing (has been deleted).
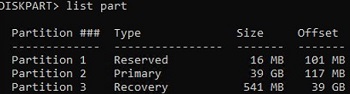
Our task is to remove the remaining MSR partition so that we have at least 116 MB of unallocated space on the disk (for MSR and EFI partitions). You can remove this partition using the graphical Gparted tool or directly from the command prompt (that’s exactly what we’ll do).
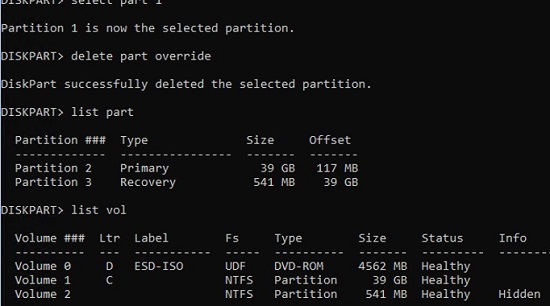
Select the partition to remove:
Select partition 1
And delete it:
Delete partition override
Make sure that there is only 30 GB primary Windows partition and the recovery partition left (in our case):
List partition
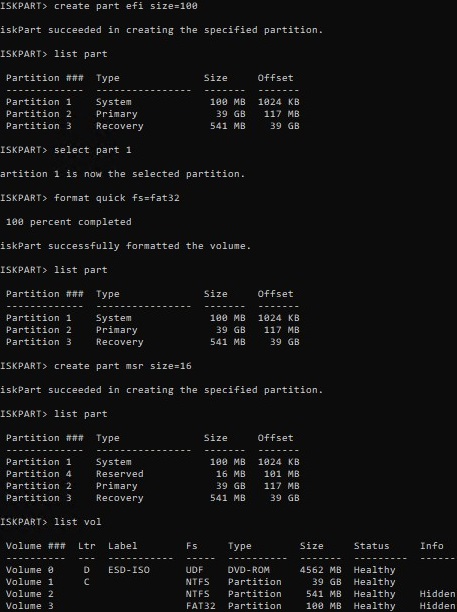
You can now manually create the EFI and MSR partitions to place the Windows bootloader files. To do it, run these commands in the diskpart context one by one.
Select the disk:
select disk 0
Create a 100 MB EFI partition:
create partition efi size=100
Make sure that the 100 MB partition is selected in diskpart (an asterisk before Partition 1). Format your EFI partition with FAT32 file system, and assign a drive letter to it:
list partition
 select partition 1
 format quick fs=fat32 label="System"
 assign letter=G
Now you need to create a 16MB MSR partition (for Windows 10 or 11).
create partition msr size=16
 list partition
 list vol
In my case, the drive letter C: is already assigned to the main Windows partition. If it’s not, assign the drive letter to it as follows:
select vol 1
 assign letter=C
 exit
Close the diskpart:
exit
An error may appear when creating an EFI or MSR partition using diskpart:
No usable free extent could be found. It may be that there is insufficient free space to create a partition at the specified size and offset. Specify different size and offset values or don't specify either to create the maximum sized partition. It may be that the disk is partitioned using the MBR disk partitioning format and the disk contains either 4 primary partitions, (no more partitions may be created), or 3 primary partitions and one extended partition, (only logical drives may be created).
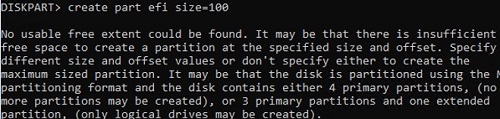
This means that there is not enough unallocated (free) space on the disk for the new partition. In this case, you need to reduce the size of the main Windows partition (in our example, this is volume 1) by 128 MB:
select volume 1
 shrink desired=128 minimum=128

Then create the EFI and MSR partitions as described above.
Repair the EFI bootloader and Windows BCD on a GPT Drive
After you have created a minimal disk partition structure for the GPT drive on the UEFI computer, you can proceed to copy the EFI boot files to the new partition and create a bootloader configuration file (BCD).
Now use the bcdboot.exe tool to copy the UEFI boot environment files from the Windows system directory to the EFI boot partition and recreate the BCD bootloader configuration. Run the command:
bcdboot c:\windows /s G: /f UEFI
Boot files successfully created.

As a result, a predefined directory structure will be created on the EFI partition. The following files must be present on the EFI system volume:
- \EFI\Microsoft\Boot\bootmgfw.efi
- \EFI\Microsoft\Boot\bootmgr.efi
- \EFI\Microsoft\Boot\memtest.efi
- \EFI\Microsoft\Boot\BCD
- \EFI\Microsoft\Boot\Fonts\wgl4_boot.ttf
- \EFI\Boot\bootx64.efi
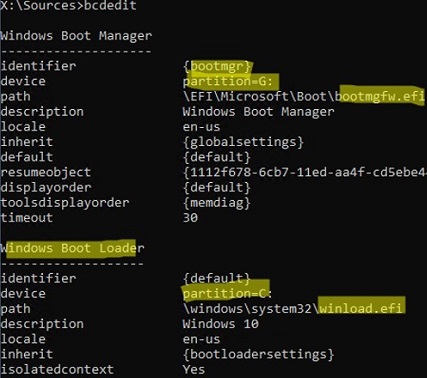
List the current Windows Boot Manager bootloader configuration. An entry should appear in the {bootmgr} section pointing to the partition containing the UEFI boot control file (\EFI\MICROSOFT\BOOT\bootmgfw.efi). In this example, it is partition=G , or partition=\Device\HarddiskVolume2 (if you haven’t assigned a drive letter for the EFI partition).
The UEFI bootloader must then pass the control to the Windows Boot Loader file \Windows\system32\winload.efi on partition=C:
Reboot your computer (use the wpeutil reboot command in order to reboot from the WinPE environment) and remove the bootable USB flash drive.
Copy the EFI environment boot files from the directory of your drive where your Windows is installed:
mkdir G:\EFI\Microsoft\Boot

xcopy /s C:\Windows\Boot\EFI\*.* G:\EFI\Microsoft\Boot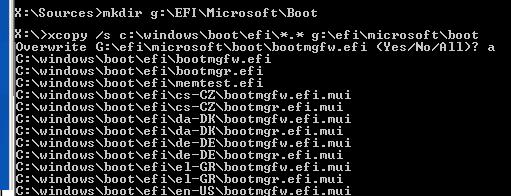
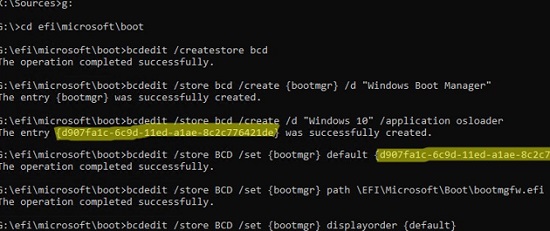
Rebuild the Boot Configuration Data (BCD) entry in Window Boot Manager:
g:
 cd EFI\Microsoft\Boot
 bcdedit /createstore BCD
 bcdedit /store BCD  /create {bootmgr} /d “Windows Boot Manager”
 bcdedit /store BCD /create /d “My Windows 10” /application osloader
The command returns the GUID of the created BCD entry. Use this GUID instead of {your_guid} in the following command:
bcdedit /store BCD /set {bootmgr} default {your_guid}
 bcdedit /store BCD /set {bootmgr} path \EFI\Microsoft\Boot\bootmgfw.efi
 bcdedit /store BCD /set {bootmgr} displayorder {default}
The following bcdedit commands are run in the {default} context:
bcdedit /store BCD /set {default} device partition=c:
 bcdedit /store BCD /set {default} osdevice partition=c:
 bcdedit /store BCD /set {default} path \Windows\System32\winload.efi
 bcdedit /store BCD /set {default} systemroot \Windows
 exit
If Windows didn’t boot correctly the first time, try the following:
- Power off your device;
- Unplug (physically) your hard drive;
- Turn your computer on, wait till the boot error window appears (An Operating System not found), and turn it off again;
- Plug your drive back.
If this doesn’t help, boot from the installation USB flash drive and run the command:
bootrec /rebuildbcd
Restart your computer

Then in our case (tested on a VMWare virtual machine with UEFI firmware), we had to add a new item to the boot menu by selecting the EFI\Microsoft\Boot\bootmgrfw.efi file on the EFI partition.
In some UEFI menus, by analogy, you need to change the priority of boot partitions.
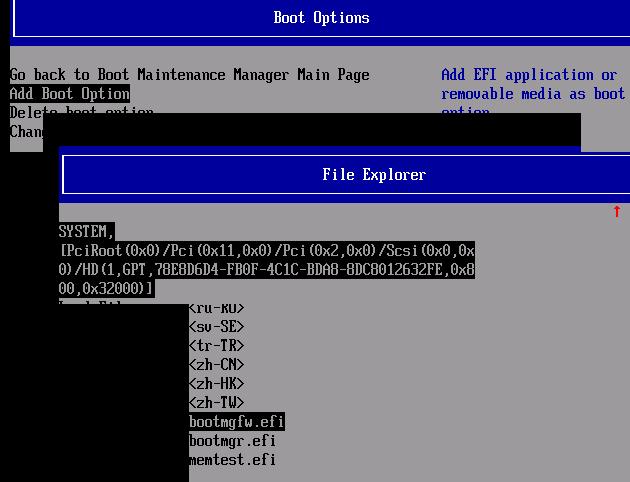
After all these actions, your Windows should boot correctly.
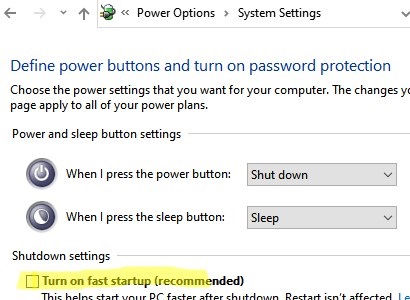
In some cases, after recreating the EFI and MSR partitions and restoring the BCD bootloader, Windows may stop shutting down gracefully. If you experience this problem, you can fix it by disabling the Fast Startup feature in Windows:
- Open the Power Options in the Control Panel
powercfg.cpl; - Select Choose what the power button does;
- Click the Change settings that are currently unavailable button and disable the “Turn on fast startup” option in the “Shutdown settings” section.

210 comments
Thank you very much!!!!!! Thats the only solution for me in the entire internet!!!!
I’m on a laptop. It didn’t work. The last step is difficult because my screen is broke so I don’t know where or how I can select it.
I’ve been viewing my screen on linux via my tv. I need windows 10 unfortunately. I think I’m screwed. I’ll have to save up for a new version because i can’t find the product key as chntpw doesn’t work. I have a dying iphone and that’s it. I’m struggking with health issues and only just got myself together to do this. I’m saddened. It’s my fault for accidentally deleting the bootloader in the 1st place (archlinux accident).
I tried my best and I learned something though. So thanks for the educational experience.
Fantastic, after hours of fannying around with various other “how to” guides, this is THE one that WORKED!! Fixed SSD after Windows update somehow wiped the boot sector. Many, many thanks
This worked perfectly, thank you. I accidentally selected my boot partition to format when installing Linux, and this did the job.
It does work for me…
If I were you, guys, I would try running CMD as Administrator (just type CMD in the start menu, right click, Run As Administrator)
then type and run (enter key):
powercfg.exe /hibernate off
reboot (yeah, in windows it does actually help)
then again CMD as admin and:
powercfg.exe /hibernate on
reboot (sorry)
This disable and reenanble hibernation on your machines, but, indeed, the bootloader must be aware of it, and i cant see any relevant section in bcdedit /? (the guide to the windows bootloader configuration program)
You might also want to manually check and delete c:\hyberfil.sys (the hybernation file) between reboots.
Shot in the dark, sorry I can’t be of any more help. Tell me how it goes anyway, and good luck.
I did the same thing lol
I’ve been studying uefi for far too long and nobody knows shiz about it… I wrote over all my drives trying different linux distros and my gpu wouldn’t work without uefi, after installing 100s of operating systems, I was setting up my gfs laptop and now I see this simple explanation… idk why nobody on the internet was able to explain this to me until this site… wtf lol
Read many articles for efi understanding. But your is awesome. Found my solution , thanks.
Is there article giving proper explanation of each and every command , you used here .
Thank you for saving my Windows partition, great guide, very detailed, had to adjust it a bit for my system, but once I got the logic it worked like a charm.
Great Job!!
You saved my life, thank you. I had my efi partition on another drive that i removed and exactly this is what i needed to get windows to boot
Usually I almost never comment on guides, but this time, you just saved my Windows! It was very detailed, telling you each and every step you have to take. I was installing Arch and I accidentally formatted my EFI partition of Windows 10. I used up the whole day trying to find out how to fix this, and after I almost gave up, I saw your article, followed it and it worked like a charm!
Thank you so much for the help, and please keep making guides like these
You are welcome 🙂
Saved my life. Decimated partitions because of dynamic basic disk conversions. Refused to lose data again and surely you saved me.
For me the same, i was uninstalling refind but instead of removing the refind folder i deleted the whole efi folder. All works now except the hibernate function. Does anyone knows an fix???
I have the same problem. I was able to boot back into windows but hibernation is now broken, the pc restarts instead.
I have the same problem. When I select hibernate it just brings the computer to the lock screen and hangs idle.
The good side is that my computer boots up again so at least the OS works
Mee toooo, but it was Manjaro (Arch based anyway). And Windows 7 Ultimate.
What got me was the fact that when you use the standard MBR loader on any linux distro, the installer normally preserves any other OSes on the system and add custom entries for them (in fact, grub-update itself, through os-prober, does that). So when the installer asked me to format the win7 boot partition to install its own efi loader, I just said yes… I thought: “worst case scenario? I’ll disable UEFI in the bios, run legacy, update-grub ; grub-install /dev/sda… DONE….” YET… IT DOESN’T WOOOORKKK. Not even grub rescue and manually chainloading are able to load, or even recognize the windows installation without the files in /BOOT.
Fixing through Windows Install Disk (7 or 10)? Forget about it. They basically said: “I can see you have a perfectly valid installation of windows 7 Ultimate… Yet… We genuinely don’t know how to fix the boot, sorry mate…” O___O
All other tutorials online? “Try fixmbr (’cause THAT will work ), try the WRE automatic boot fix, and if that fails too, reboot, try again, reboot, try again… Reboot for a third time, would you? And, well, eventually you can always just reinstall windows, can’t you? You don’t expect us to actually read the whole >bcdedit /help for you, do you?”
Well done guys!
For the record, and posterity: this worked on a uefi boot partition of a Windows Ultimate 7 of an HP 255 G3 notebook from a w10 install disk on an SDcard. I think a DVD would have worked the same, either w7 or 10, even 8/8.1. Yet, it has to be plugged from an external reader/drive. It is a known quirk with this model of notebook, that the internal sd/optical readers won’t see all the hard disks and/or partitions, for some weird reasons.
Came to say this. First time, I think, in my life, I follow a guide and it works, first try. Restored my Windows after completely nuking the EFI partition. Problem was this machine came with SSDs, HDDs, NVMEs, a RAID0, and Windows install decided to place the EFI/MSR on a disk different than the one the main NTFS Windows partition was. I never checked before removing the disk with the EFI one, because I never thought the clean install would be that horrible. Boy I was wrong.
Thanks.
Same Here! Thanks for a brilliant and very thorough walk-through! This post is a gift to the world at large!
Thank you very much!!! This saved me a lot of time, because a reinstall isn’t necessary anymore!
This is also working perfect for Win10.
Thanks man!
I’ve moved partitions from mbr to gpt (from 500GB to 3TB hard drive) and needed to recreate UEFI/GPT boot partitions – only way that worked for me (just leave some space at the beginning of drive).
Just thinking if I just create those two partitions and xcopy files to boot partition, won’t it be enought to run “startup” repair from Windows 7/8 cd and just remove that bcdedit hassle?
I’ll check it next time I will have those problems. Thanks again!
Hi, and thanks for your patience in writing such a detailed solution. I’ve messed up my UEFI Win 10 partition when migraating to a SSD disk and trying to restore dual boot. To make short a long story, I decided to delet and rebuild UEFI partition, and I’ve got stuck at the copying files step. Whenever I try to use the {xcopy /s C:\Windows\Boot\EFI\*.* G:\EFI\Microsoft\Boot} command, I receive a message like “failure to copy files from source”. Everytime. This is driving me crazy. The files are there, I can see them, but I just can’t copy them. Any thoughts will be appreciated. Thanks again.
Jal_lah, if you’re still having trouble, you could try creating a Linux live CD or USB and boot into it. You can then mount both the EFI partition and your Windows partition, and copy the files over.
Thank you for the detailed guide! Exactly what I’m looking for. Do you know if there are any differences for applying this guide to restoring a Windows 10 EFI partition? Can I just replace the third ‘bcdedit’ command with the following?
bcdedit /store BCD /create /d “Windows 10” /application osloader
Any help would be appreciated!
I myself had to restore a Windows 10 UEFI partition and had no issues with changing the “Windows 7” part to “Windows 10”.
As far as I can tell, it’s really just a label so what goes in the quotes probably doesn’t matter too much.
After a few days of frustration, I’m happy to say this guide finally resolved the issue. I had 2 UEFI partitions, 4 recovery partitions, and then 2 partitions for my OSes (Win10 and Ubuntu). After messing around with getting rid of grub and returning the partition space back to windows, I ended up screwing up my entire boot.
And after about 2 days of scouring the internet and trying all solutions available, this is thankfully the first one that got me back to a usable system. Great thanks to the writer(s) of this article for getting me out of a bind.
Thanks for the detailed and thorough description of the recovery process.
In the case of a dual boot system, with Windows 7 and Fedora (installed on a newly added hard disk), and where only the Windows 7 boot is failing, would there be any concerns with following this method to recover the Windows 7 EFI boot partition?
Thank you very much!
A restored the win10 Pro boot after installing ubuntu and accidentally deleting the Windows Boot Manager partition.
Thanks a lot for this guide, saved my day!
hey man its really helpfull thank you so much for sharing this at least it show me a efi disk but after applying delete Partition override cmnd i get an error saying “virtual disk server error” and delete is not allowed on current boot, system.pagefile crashdamp or hibernation volume ……can i get a solution for that please thanks in advance <3
A big thank you! Your write-up saved me this weekend. HP Workstation Z440, shrank windows partition and tried with Acronis True Image (comes free with new SSD Crucial MX300) to clone HDD to SSD. But upon reboot nothing, no OS can be found. Your method saved me.
One point. If the windows partition does not extend to the end, then upon remaking EFI and MSR partitions, they are placed after the windows partition which I am not sure if it would work. One has to add the OFFSET flag to create partition. For MSR the offset should be 101*1024 = 103424.
Hope this is helpful to someone else…
I accidentally nuked the MSR & EFI partitions on a notebook I brought home to help a friend fix over St. Patrick’s weekend. Almost gave up on a startup repair versus a wipe and reload after countless hours on the internet before stumbling on your site.
My feedback based on your prescribed solution boils down to five words: Meticulous Guide with Amazing Results.
Thank You so much bro
I impressed and I love you so much
I don’t know how can I thank you
Thank you so much, very informative and helpful.
Also works for Win10 if you stop at the boot loader instruction and then follow https://woshub.com/how-to-repair-uefi-bootloader-in-windows-8/
This was amazing. I didn’t believe it could help, but you’re genious. This realy save my day.
Awsome…!!!! Work very well Thank You… Detail Solution…!!!!
God would bless you for this fix saved me a lot of time I just had to convert to gpt before creating efi
Feel unbelievable happy right now. You know what you are doing. Thanks a lot, will have some good sleep now.
Thanks a lot.
You sir, just saved my butt. Week before exams, all my papers are almost done and windows decided to shit the bed tonight. I had everything backed up to my server but it was all compressed and would take too much effort to reinstall everything to my laptop. Excellent explanations and the only thing I can add to this guide is that everything has to be in order, it most likely will not move on if you try something too early (I missed the creation of the {bootmgr} and it took me a bit to trace my steps). Thank you so much!
Can i do this from another PC ?
Oh my God! You saved sooo much headache and worry!! Thank you so much! I deleted the EFI partition on my computer 2 times and both times, your article came to the rescue!
Thank you very much. It’s work!
thank you so much…..thankyou thank you….
Wow thank you man, you rock!!!
Worked perfectly. Best guide in the world. Thank you.
Well, one thing doesn’t seem to work. The computer won’t shutdown properly and will just go to the sign out screen instead. Oh well.
I’m having this issue as well. As a workaround so far, I’ve created a .bat file with “shutdown /s” and run it as administrator whenever I want to shut down. And, ADMIN, this is not user error; the system simply won’t shut down right from that UI.
Amazing guide, the only one I could find that worked. It’s a life saver, nothing in the install CD was working (couldn’t repair because of mismatched version) but opening the command line and rebuilding the boot from scratch is genius
Thank you!
Thank you for this. I removed a Ubuntu installation off of one of my secondary drives and for some reason windows didnt have an efi partition or even room for one. I had to shrink my boot drive before doing this. Thhhhannnkkkkk you so much for this easy to follow tutorial! One extra step I had to do. I had to do start up repair as it said originally something was messed up on the efi partiition I created and that fixed that issue.
Thank you.. Saved my day!
Thanks ! Your guide worked 🙂
PS: Instead of removing the hard disk , you can also force UEFI device detection by turning off the UEFI boot mode in your bios and rebooting it.
On the first boot it will say no boot devices found.
Then reboot again and enable UEFI, save settings and try again. This time your PC should redetect the new UEFI sector.
..At least it worked for me.. I was using a Intel Hades Canyon NUC.
All I can say is THANK YOU!
Thank you! Works perfectly!
Thank you! And google search leading to this article.
Fixed a windows 7 and now it boots.
Someone said in the earlier comments, “I don’t typically comment on guides”. Well I am usually the same. All I can say is THANK YOU!!! You just saved me rebuilding a domain controller after the backup failed to restore the EFI partition correctly. Awesome!
Thank you! You save my data with this tutorial!
I installed a fresh copy of Windows 10 1903, but after install everything i need to work, my boot partition doesn’t appears on BIOS settings.
Following entire steps above, i restore the EFI partition and voila! Windows boot again!
Thank you Guy!
This is the only one right solution in whole internet when it comes to this EFI. Awesome
God bless you. You have just saved me a lot of time and also my data because i was planning to reinstall my windows. I think this solution you have provided is the only one i could find in the internet except from reinstalling your windows. Thank you so much.
Great writeup! One of my coworkers borked his Windows 10 install beyond repair and all he had left was the naked VHDX file from a recent Windows Image backup he took a few days ago.
I created a naked HyperV VM, attached the VHDX and using your howto, was able to boot into his Windows 10 installation successfully.
Thanks alot!
You are a super star!! That saved my hair and my sanity!.
Hi I just went thru days trying to switch a 500 gig SSD drive to a Larger one. Clone copy, well apparently clone the Windows 10 OS, but not the EFI partition. I then went back to the small to try and salvage the mistake and it ran out of disk space trying to fix my the EFI issue. It snowballed from there and I ended up here. I was fooled a bit when you took those 2 dos command windows and combined them. lol. I just kept comparing and realized what you did. I like to add that at the end you had a couple problems booting and had to disconnect a drive and restart and then add a EFI boot line. This is confusing to me since I am not clear about why, but I am just about ready to restart the system that I used your great tutorial and crossing fingers. Everything went perfect entering commands with not one error. Thank You for taking the time to create this post and letting it remain in public. †
Not all heroes wear capes
Thanks for this guide. Finally someone who can provide solution with proper explanation. All other guides are just a bunch of console commands without any justification why we’re using them.
Thanks so much! This guide was literally the only one that helped me, because I accidentally deleted my EFI while hackintoshing D:
Dude you saved my ass big time. This was THE only solution on the whole internet i could find. Thats what i get for trying a dua boot windows 10/kali dual boot. note to self: DONT DUAL BOOT GET A SEPARATE DRIVE (yes im yelling at myself)
Awesome it worked perfectly for windows 10 without a single problem…Thanks you so much.
I love you. Thank you soooo much.
Thank you so much! It worked perfectly!
Thousand thanks!
I worked charms. Great tutorial =)
I was totally worried after accidentally deleting my boot files. Hats off to you for creating such a precise and simple guide with screenshots! You have saved my time and data bro. Kudos & Cheers to you!
best guide for EFI / GPT / Win corrupted bootloader ever! Thank you very much. I am doing for ages the PC repairs with MBR – classic BIOS but this is kinda new to me. When my favourite bootrec.exe /fixboot says acess denied it started to be funny. Also the command “bootsect/nt60 sys” saves lives but that did not helped me. I´ve done stupid thing. I make space on my drive. (EFI,MSR.Win, space, recovery) the HDD was bitlocker encrypted and I let linux mint to do automatic intall to the empty space. It was ok. Then nothing booted and all my traditional skills using gparted, windows recovery cmd went to dead end. Only this restored my Win. Now about to add Linux boot line. And thats it.
Thank you once more!
Fantastic guide!!! Saved my day.
Than you so much my bro!Tou helped me to restore my windows.God bless u man
THANKS
Thank you very much
Thank you for the detailed guide it helped me fix my boot problem which occurred after I cloned my drive to an SSD with clonezilla but then booted with both drives in the machine not work sure what step it was but somehow the EFI partition got messed up. I tried many things but this is the only guide that worked. I really appreciate you making the information available. John F.
Wondering to know, what about using bcdboot command, it is look simpler than bcdedit ?! Is bcdboot can used too in this case ?
Do you have article about it ?
You are my hero, thank you!!!!
Great job with the document! I had one such a PC with a broken EFI partition due an interrupted Ubuntu installation. This was the only guide that helped me get the whole thing back to life. That’s some good info on the GPT partition table structure but I managed to get my PC running without the MSR partition.
Thanks and you guys rock!
The best guide on the internet ever!!! It saved my PC!!
Woaw my hero.
Very good guide well detailed and solve mostly every boot errors
Sorry I replied to someone with this but can’t delete it. Repeat it here. I’m on a laptop. It didn’t work. The last step is difficult because my screen is broke so I don’t know where or how I can select it.
I’ve been viewing my screen on linux via my tv. I need windows 10 unfortunately. I think I’m screwed. I’ll have to save up for a new version because i can’t find the product key as chntpw doesn’t work. I have a dying iphone and that’s it. I’m struggking with health issues and only just got myself together to do this. I’m saddened. It’s my fault for accidentally deleting the bootloader in the 1st place (archlinux accident).
I tried my best and I learned something though. So thanks for the educational experience.
I can’t find my boot options.
Gah I used to be good at IT.
Hope you can help with this boot options part and where I can find it. I’m on a HP Pavillion. I’d have to pay for recovery software and I’m broke. Please help. I’m at my wits end.
THANK YOU VERY MUCH! YOU SAVED MY DAY!
I was trying to install archlinux as second OS but it turned out to messing up with some windows partitions. After about 10 hours I found this amazing guide that saved my laptop. You were very, very helpful!
Why is there a x:\Sources> before the mkdir G:\EFI\Microsoft\Boot in the console when we are supposed to type only mkdir G:\EFI\Microsoft\Boot at that step?
Thank you, you saved my pc!
Thank you very much, you save me from reinstalling windows 10, best regards from Croatia.
PLEASE PLEASE HELP! I’ve change id of (set id =…) of FAT32 partition which was successful and did exit. But now I can’t see FAT32 in my volume list, what to do please??! I really really need help! How can I bring it back to the list?
I think it will be easier for you to recreate the EFI partiotion from scratch according to this guide.
Thanks for the guide! This helped me successfully recreate my EFI partition for Windows 10.
I installed Windows 10 education on a new SSD, but the EFI partition was not created on it during install due to it already existing on my old SSD with the previous Windows 10 installation! When I formatted the old SSD and installed Linux, the partition with Windows boot loader was obviously deleted.
In my case, I was only missing the 100 MB EFI partition. I did not need to create the 16 MB MSR partition, it was already there. Before creating the EFI partition I had to shrink down the primary volume. Select the primary volume and shrink desired=100.
I also had 2 SSD and 1 HDD, and diskpart labeled my drives differently than what I expected. My C: drive on Windows was represented as volume D in diskpart, my E: drive represented as C, so it was confusing to identify the correct one for the bcdedit commands. Once I did, everything worked flawlessly.
I was hoping this would work. I followed the direction but still no luck. The only thing I didn’t do was disconnect my harddrive. I was hoping I didn’t have to. I have two hardrives and I can’t disconnect one of them. HDD2. I put all of my BIOS settings back to how they originally were but I saw in the boot configuration page that their are two windows boot drives that I can choose. when I reboot I get the 0000255 error code. I’m gonna try the disconnect the harddrive option and see what happens. I gotta be doing something wrong on my end. Any advice?
Forgot to click on the notify followup option below so I’m leaving another comment.
Anyone stuvk at mkdir not pivking up the line, just close cmd and reopen. As you can see it has X:/ in front
Hi there. I’m having this problem. I’ve tried closing cmd and reopening but still can’t seem to get past it. Any advice you can give me?
Thanks a lot
Great stuff. Works fantastically after I spent days trying to fix my laptop.
Still relevant. Took me back to my DOS days lol..thanks
Great Stuff. Works superb
This saved my laptop! Thanks a million!
Great Mister, Thank you so much.
You’ve saved me
Thanks a Million!
I worked. This is a real guide with reference image.
Wow!
Thank you very much!!!
Thank you 1000%!
While partitioning my computer when I was installing linux for a dual boot, I formatted /dev/sda1, the windows EFI partition, instead of /dev/sda8. Thanks for this amazing guide!
I recently did an update on a windows 10 computer which multi-booted with a bunch of Linux distributions, and for reasons I am still trying to figure out, I lost access every OS except Manjaro, Mint and Zorin. I spent the last week or so wondering how I was going to re-create my efi partitions (which I messed up reinstalling grub2) in order to access my windows installations and then I happened on this article. Whew!! Thank you!! :).
Thank you so much. Very concise instructions really saved me!
Thanks a lot…
I ****ed up my partitions trying to make a hackintosh and this brought my laptop back to life! Thank you so, so much.
This explanation looks great. I’m not a tech, but on two occasions when a disk clone (via Macrium Reflect) didn’t boot, Macrium Reflect has a procedure for fixing the boot problem, using the “Recovery Media” USB stick it creates. Just FYI.
Thanks, this guide was amazing to help fix an accidental deletion. Really Appreciate it
Thanks! It worked like a charm, great tutorial!
Just one more thing – for whatever reason my disk was non-gpt so I had to convert it to gpt. Without loosing data you can use windows mbr2gpt executable, maybe you could update your tutorial with that?
If you have the same problem as me I will let you know that this worked.
I bought a computer with Linux on the HDD and it also had an empty SSD. I installed windows on the SSD but the EFI was still on HDD. My PC would work normally but once I turned it off i would get the error 0xc000000e. I had to use my bootable and enter the Recovery Environment to make it work all the time. Then I decided to move the HDD EFI to the SSD using EasyUEFI but it still didnt work. Then I deleted the HDD EFI and the windows was over at this point. Thanks to this very detailed tutorial I managed to create the EFI in the SSD.
Thanks a lot to the admin.
Thanks you so much… You saved my 2 Day time… Good bless
Whoever you are, you are a legend man! Didnt really expect it to work but your steps were so detailed i couldn’t even believe that it worked on the first try. Really respect the work you did helping us all from recovering our lost OS. Almost reinstalled windows but thanks to you it’s saved. Thank you from the bottom of my heart!
THANKS SO MUCH. I’m sure so many people have issues when cloning larger HDD to smaller SSD using software like EASEUS and others I’m sure.
Saved my bacon.
Thank you so much.
Thank you so much. You saved a lot of my time.
I would just repeat all what has been said. Thank you very much, reality great material.
works and its free 🙂
My god this post saved my whole network degree. You rock. Thankkk you very much
THANK YOU!!!
Brilliant job of describing how to get a non booting laptop working. Could see the drive but the EFI partition was toast. Your guide helped me to rebuild the partition and get it booting. Thank you 🙂
I followed all the instructions step by step and my windows returned back to life. At first I thought that it would probably come to another dead-end but it worked fine. Thank you so much.
Thank you very much!!!!!! It is working!!!! Yeaaaaahhhhhh! You are life saver, Big thanks again!!!!!!!
Thank you very much!!! You are “THE BEST”.
Thanks, it works, but i cant use fast startup and hybernate option anymore.
Your steps worked perfectly.
From the bottom of my heart, “thank you”
Does the “Unplug physically harddrive” means internal HDD?
This is the best way I could find after almost spending a whole daytime for: “completely erased boot partition of windows.”.
This is the perfect and most clean solution. Just carefully do whatever written above.
In my case, no reboot after reboot required; just simply worked and my system is back again like nothing ever happened.
This usually happens when I feel like to try new linux distros and gave me a real hard time this time, because googling is also difficult between all mess on internet. Here is what happened, for users who might have a similar problem:
– I have erased everything on the drive but the windows partition. I mean, there is a “C:” drive, but nothnig else.
– I had a bootable ubuntu usb. started ubuntu live with selecting usb in bios
– ubuntu has “gparted” within. so I have started it.
– copied the windows partition to another harddrive by creating another partition a little bigger than windows had (in my case windows had 80gb, I created a 100gb). This was just for anything accidental, have a backup somewhere else; in any case.
a) on an external hdd, if there is enough empty space: right click, “move-resize”. than shrink it to create and empty space enough to backup windows drive. (there is a chance of losing your data in your external drive, so, be very carefull)
b) on the external hdd: create an ntfs partition enough to copy the whole original partition. (there is a chance of losing your data in your external drive, so, be very carefull)
c) choose the windows hdd and right click on original windows partition and select “copy”
d) choose the external hdd and right click on the new partition created for backup and “paste) (there is a chance of losing your data in your external drive, so, be very carefull)
e) select the hdd of windows again and select windows partition and right clisk “move-resize” and push it at the end of the drive.
f) reboot into windows usb drive and did what the guy said on this page.
g) you may consider widenin up your external hdd again by using minitools free if you continue in windows.
Thanks A Lot!
Thank you, this was extremely helpful guide!
I was using Acronis True Image HD to clone an old bootable MBR drive to a GPT data drive as Acronis did not support making it bootable after MBR2GPT conversion. (I had tried also MBR2GPT tool to convert the old drive to GPT before cloning but it didnt work at all.)
With your help and clear step-by-step instructions, I was able to make this new drive bootable.
Thank you !!! Converted from MBR to GUID (GPR) using MBR2GPT MS app to support a Win 10 update and possible did something wrong. Had to dive deep into the article. Only had a EFI partition. Deleted the EFI partition and created new EFI and MSR partition per the instructions and it worked. Great work.
I dont know what to say but THANK YOU VERY MUCH, this guide works very well dude!
I was no hope when i accidently deleted wrong EFI but this guide SAVED ME!
Cool you are great!
Extremely helpful! you have to be aware of some concepts before attempting this, in order to adapt some of the commands if necessary –specially if the assigned letters are not the same– but this surely works! Thanks a lot, you’ve really saved my installation.
Regards.
Worked perfectly! Thanks for sharing this. I went to trouble after rescaling harddrive partitions on a windows system using GParted live. A very good and stable tool – but not the first time i had to work on booting issues after using.
Thank You again and take care. Regards Peter
Thank you so much! You saved me, the only guide on the internet to do this! Thanks!!
Hi there, can anyone help me out please? I’m stuck at the mkdir command. Whenever I type it, all I get is “Microsoft Diskpart version….” and the list of commands. I can’t seem to get past that point. Any help would be greatly appreciated.
Not to worry, I just needed to open into cmd through automatic repair and it worked.
Hi there, can anyone offer me some assistance? I’ve gone through this process twice but get the same result each time: “stop code: INACCESSIBLE BOOT DEVICE”
Ron – Although this is one of the best tech articles I have ever read, and I am NOT a tech but just a real estate lawyer, I have solved similar issues twice in the past by using Macrium Reflect to make a disk clone bootable. Find the related instructions in the Macrium Reflect user guides. (Obviously, first make a backup of whatever you need to save in case all heck blows loose.)
Thanks for the reply 🙂 I may give that a go and see if it helps. I’m at a slightly different stage now, with a different error, but having more options is always helpful. Thanks a lot for taking the time to reply
Thank you, very well explained!
THANK YOU THANK YOU THANK YOU! I deleted the EFI partition that was on my secondary drive when I was expanding my partitions, didn’t realise they were needed after all! Thank you, thank you!!!!
thank you very much that’s help me
I moved the EFI partition and nothing worked then. This is the ultimate guide for the case, can’t find in any other place. Must save this!
Thank You very much!
Man thank you very much. Working great.
I never usually write down comment if a fix worked for me.
I’m usually pretty into that stuff but this tutorial juste made my day! Incredible job from you and this really easy fix that I got working under 10 minutes.
And remember: NEVER DUALBOOT WITH A SEPARATE DRIVE lol!
(also kindafunny) Windows Stores some efi boot sequences files on the main parition.
Thanks
You don’t need to do all that BCD/bcdedit stuff manually. Just run “bootrec /rebuildbcd”…
it worked, thank you!
Thank you – Very helpful
You saved my installation after I deleted these partitions by mixing up the hard disks in GParted under Ubuntu
Thank you, The guide is very good. It’s 4 days that I’m trying repairing windows boot since I accidentally overgrowth the eri partition by installing Linux mint 🙂
Spectacular content. I can’t tell you how many times I’ve used this guide and made money off it.
Thank you so much 🙏 You actually saved my day after I messed up my EFI Partition 😄
FYI for other people who encounter the issue of not having enough space to create a new EFI Partition (e.g. EFI was installed on the wrong or another drive). Theres a shrink command (syntax as follows) in DISKUTIL which will shrink a the selected partition or volume (make sure to select the correct one beforehand!) in MB
shrink [desired=] [minimum=]
e.g. shrink desired=128 minimum=128
So happy to see so many people thinking the same thing and giving you praise. This is an amazing guide without flaw. You are my hero as well. Thank you so much.
You are an absolute legend! I have been searching all day for a fix and this is absolutely what I needed! Intense but did the trick perfectly! Once again you are a lifesaver!
Read many articles for efi understanding. But your is awesome. Found my solution , thanks.
Is there article giving proper explanation of each and every command , you used here
Thank you very much for taking your time to write this article, it worked flawlessly. Best regards
Excellent article!! Got my Win 10 kicking again after a week of agony!! Best article on damaged EFI….
Thank you! It worked well.
Thank you! After I somehow trashed my Windows EFI partition while re-installing a different Linux distribution, I have wasted a whole day (and finally found a Windows recovery disk). Then, YOUR step by step guide was the only solution that I could find that worked! THANK YOU SO MUCH! And bonus points for making this a written guide instead of one more Youtube movie (there are already too many).
Thanks, it works for me! 👍🏻 🙏🏻
You rock!!!!
thanks! I been wasted 9 hours trying solving this boot issue and you saved me!
Dude, you’re a GOD. Was about to reinstall a clean Windows because nothing worked. Then your article came out. Would paid so much beer to you, saved me so much time omg. THANK YOU SO MUCH. I mean it.
There maybe some bits more to this solution than meets the eye…
I did all above based on my GPT drive:
Scenario: I had two drives in my DESKTOP (SSD+HDD) when I did a fresh install a year ago, unbeknown to me win10 placed my “system” FAT32 on the HDD and not C: SSD however the “windows” partition was on the SSD… I ungraded my laptop with a 480GB SSD and pulled my Laptop SSD and HDD out to make a basic network an a SSD game drive with my desktop. Then I decided to tidy my drive partitions using minitool[free] and deleted what I thought was my old “system” partition which it wasn’t.
Tried the above method to NO avail – releasing my partition were now all over the drive I decided to remove everything and reorganise the partition order, Luckily I used macrium reflect [free]and made an ISO of the SSD windows partition (DESKTOP SSD) before all this happened. Using this ISO I moved the “windows” partition to the end of the drive and re-tried the above commands ONLY to the point or creating the MSR partition and the SYSTEM partition, this time with all my partition where in order I tried using the boot USB to troubleshoot windows and self repair. It did make progress and said it could continue to windows but never made it, a reboot and the boot failed, so I re-tried all the commands above AFTER the partition creation. The found this…
IGNORE the NTFS line if you find this guide – google “christitus” “repair-windows-boot-partition”
Since this was my last hail Mary and assuming this was something to do with MBR not GPT I tried it.
bcdboot c:\windows /s g: /f ALL (NB= I did get a funny error/ message here I think something about file already exists- dont worry)
bootrec /mbr
bootrec /fixboot
(NB = you may get an error here “access denied” – don’t worry)
bootrec /rebuildBCD
(NB = you may get a message saying “0 installations of windows found” it still worked for me”
Then I rebooted and it loaded windows 10 and installed an update which I think was pending anyway then it reset and after a few user shutdowns to put case lids on etc it still works. Peace
It works! It works! It works!!!
I can’t thank you enough.
Just remember to use F9 before system boots and select the file. It will work.
Thanks a ton!
Saved me after I deleted “Windoes Boot Manager” from within BIOS on my Win10 laptop. The EFI location was exactly what I needed to recreate that boot option! Thank you!
I never comment on guides. But this one here is pure gold. Thank you guys!
Hi,
I formatted my EFI partition.
The situation actually is as follows: On power, I have nothing else than an EFI command shell.
I tried to boot from a DVD or an USB but it didn’t work.
Would you please tell me how to do?
Thank you!
Daniel
You guys are geniouses! Thank you so efing very much!
Hello, I am in great need of your Help, Admin.
I have one of the volumes as Raw, I believe it is the MSR volume. Could you please let me know what should I do to solve this problem?
https://drive.google.com/file/d/1ykyu43WmOCzPmD_ZUQQ1J-89DH_Dz6yi/view
In your case Volume 4 is the system reserved partition.
https://woshub.com/fix-cant-boot-after-accidentally-deleted-system-reserved-partition/
In Windows 10, the size of the MSR is 16 MB.
https://docs.microsoft.com/en-us/windows-hardware/manufacture/desktop/configure-uefigpt-based-hard-drive-partitions?view=windows-11
Dear Admin, I think I am using UEFI system , GPT disk partition table.
I have checked using list disk and I found the asterisk (*) in the Gpt column according to your article.
https://woshub.com/how-to-repair-uefi-bootloader-in-windows-8/
The article you have mentioned in your reply is referring to MBR (Master Boot Record) partition table
https://woshub.com/fix-cant-boot-after-accidentally-deleted-system-reserved-partition/
Also I have followed every step of this article but my only main remaining issue that I have the raw volume shown in the picture.
Please suggest what should I do to this volume?
Can anyone speak to what unplugging the hard drive and powering on to get “No OS Found” error prior to plugging the hard drive back in and booting will do? I am fixing the boot partition on a Surface so unplugging the hard drive isn’t a great option. I need to replicate that without opening the computer up.
Don’t need need to do that i have a laptop as well. It worked without it.
Thank u soo much guys!!. May God bless you all. U saved all my data.
The best tutorial in the entire web. Thank you so much!
Great. Worked fine for me! Thank you very much!
I have an UEFI dual boot configuration with Ubuntu and Windows 10 Home.
No updates missing.
Grub is the boot loader at the first position in the chain.
I had started a Windows 10 reinstallation for repair and have found the notebook in a BSOD bootloop now.
Cause could have been an interrupt of the power supply.
BSOD boot loop occurs even when booting Windows from stick.
Impossible to get a command window.
However, I could boot in Ubuntu with the dual boot configuration.
Is it possible to simplify the procedure described above due to the situation on my machine?
Unbelievable ! Thank you so much !
Great work my man, thanks so much, keep it up and god bless you!
looks like im the only lucky guy that it doesnt work
for some reason partitions are created at the end not beginning of disk. i can create efi using
create part efi size=100 offset=1
but i cant create msr
list part shows
Partition ### Type Size Offset
Partition 1 System 100 MB 1024 KB
Partition 2 Primary 104 GB 501 MB
Partition 3 Primary 105 GB 105 GB
Trying many different offsets, for example
create part msr size=128 offset=1025
or
create part msr size=128 offset=101
I always get error about not enough usable space.
Correct offset should be 101*1024 = 103424
Amazing tutorial. Thx a lot!
This tutorial is a like an internet landmark. it taught me to backup some parts of the internet not just via bookmarks but by long page screeenshots.
OH MY GOD man you are a true legend.
I swear to God nearly most of the “solutions” found on the internet were useless compared to this gold.
I wasted much time trying commands like bootrec, bcdboot and rebuildbcd. All I got were errors and access denied.
Turnout it seems I screwed up the ESP by merging C: with unallocated partitions on the same SSD.
Thank you. Thank you. Thanks a lot.
I merged the system reserved partition with C drive to save some space. (Biggest mistake ever).
I even tried a windows boot drive, didn’t work.
Also tried Aomei partition wizard for partition recovery, didn’t work. The only thing it gave me was a CMD line access. So, I tried their CMD commands, didn’t work.
And thanks to this guide, my PC is back to normal.
Spent 4 hours scratching my head before I found this one. Your guide fixed my problem in under 30mins.
This is the only guide that actually worked.
Thanks a lot.
Word of caution to other people – don’t even think of touching the system reserved partition. Never mess with them.
Thank you!
Thank you so much, the only guide that actually worked!
Really work, very nice, thanks!!
I can’t thank you enough❤️
Thank you SO MUCH!!
After hours and hours of trying things and following guides, this was the thing that worked and finally actually rebuilt my MBR and let my Windows load!!
Thank you!
I tried to migrate from a slow mechanical hard drive to a fast SSD drive using macrium software to make the copies of all four partitions however the system became unbootable after it ran for a while and I try to make it back up of the new Drive but got errors which then prompted to scan the drive after scanning the drive and rebooting the machine goes to an error 0000225 blue screen and it says something about a missing device. I cannot get into Windows recovery and I cannot boot from CD or USB because it goes to that screen right away. Is there a way to put this drive in a USB Docking Bay and fix it from another computer?
Nothing worked for me.
The responses I get in the command line look like nothing I see in the examples here. Pretty hopeless I guess.
I have worked in IT before MOST of you were born and this is by far the BEST and most detailed set of instructions to restore a dead drive and keep it from becoming a brick. Kudos to the author for not leaving out a single step (including what ifs) in the process of creating this documents!
Thank you very much for this article, it helped immensly.
Thanks for the help ^^
Thank you so much for this thorough and well-written explanation for my specific issue!! You rock
God bless you man, saved my computer thanks to you, if anyone wondering works fine if you have windows 11 installed as well.
Somehow installing fedora on a completely different ssd deleted my windows boot loader.
Bcdedit didn’t gave me any output but still after i restarted it worked anyway.
My own personal JC…. never tried anything like this before. Always been a reinstall moment but I knew, as my failed motherboard was returned (fixed) to me and no hardware had changed after it failed to boot, that there had to be a better reason for it not detecting my OS. Great write up. Thanks a bunch!
Thanks a lot, very well explained, I was just able to boot again in to my Windows 11 environment
wow wow and wow. Great Job – thanks a lot, i thought that will be install again new system, but i didnt have time to configure all again. Thanks you very much!
At first try I couldn’t create the EFI partitition, not sufficient free space available. When trying to shrink the main Windows partition to create some space, it didn’t work because I had Bitlocker enabled on the main Windows partition. After unlocking and starting all over, everything went smoothly. Thank you for this excellent guide!
I noticed that the EFI partition (100 MB) now appears *after* the primary Windows partition in Disk Management, but that doesn’t seem to matter.
Thank you so much for your Guide! Everything worked afterwards and you saved me from a Windows reinstall.
Thank you so much for sharing your knowledge and mentoring a whole bunch of folks. I spent 55 dollars for tool that couldnt do what your instructions did. Almost 6 years after writing this it’s still works perfectly. I was so frustrated but you covered the key points so well that when the system failed to boot I went back and discovered a key file was not present. You had taken the time to outline all the files that must be present and so I was able to find and add the missing file. You helped me help myself. Bless you for your time and wisdom.
Words can’t express my gratitude towards all creators and contributes of this article. I successfully retrieved my windows boot manager and now it works perfectly. Thanks for all you have done. You have been an excellent source of hope and solution.
You have saved my sanity! I had been booting a few separate installs of Windows 10 on separate SSDs for testing and it happened. I was putzing around with Ubuntu and when I went to uninstall it I deleted the EFI partition. I spent the past month doing all kinds of troubleshooting steps and none of them worked. Many did not address particular caveats of running these commands and seemed more like they were copy/pasted from other sites that had equally bad or incomplete instructions. All I wanted to do was know how to recreate the EFI and MSR partitions but it was like trying to find a four leafed clover but luckily I found this page right when I was about to give up and go through the grueling process of moving about 7TB of data off the drive cause I had slacked off doing proper backups. Everything went without a hitch and I am back in my OS!!
Only two things to mention: Because I had deleted the MSR partition and was booting from a live USB, Windows would not list Disk 0, it started listing the Disks as Disk 1, etc. I think it is worth mentioning since I know many people may not be technically inclined but can follow instructions very well and not seeing Disk 0 might stump them.
Another thing is that when I reassigned the Primary Data drive the letter C the Live USB crashed and rebooted so when I went to perform the steps of copying the bootcd files to the EFI partition I got an error as if there was something wrong with the syntax. Turned out with the reboot the EFI partition no longer had the letter G assigned, so I just had to reassign it a drive letter and everything went swimmingly from there. I am bookmarking this site cause it is extremely hard today to find support sites that give good, clear information instead of just spamming the same information from other sites. I owe you a beer!….or coffee!.
Thanks you’its working
Hi Sir/Ma’am, I just wanted to say ‘thank you’ for this guide! My Windows & Linux dual boot broke and I could no longer boot Windows–this solved that.
Thank you! It’s work perfect
This worked like a charm! And it was easier for me than trying to recover the boot partition on my linux system using testdisk.
Thank you!
Aye just wanted to say thank you for making this explanation. I have so much trouble with all of those bcdboot bcdedit bootrec etc, this is the first time I’ve been able to get it fixed without giving up and just formatting the entire drive. There should be a better way to boot multiple OS on multiple systems where Microsoft can’t get their grimey hands involved and wipe the boot managers of itself and my other OS’ I hate windows I hope they go bankrupt tomorrow.