The Boot Manager in modern Windows versions uses the BCD (Boot Configuration Data) file to boot the operating system installed on the computer. This file contains information about the installed OS and boot parameters. Windows cannot boot normally if the BCD file is deleted or corrupted. Also, you won’t be able to boot your Windows if the Mater Boot Record (MBR) on the hard disk is damaged. In this article, we will show how to correctly rebuild Windows Boot Manager, BCD configuration file, and fix MBR on Windows 10 and 11.
The Boot Configuration Data File is Missing in Windows 10 or 11
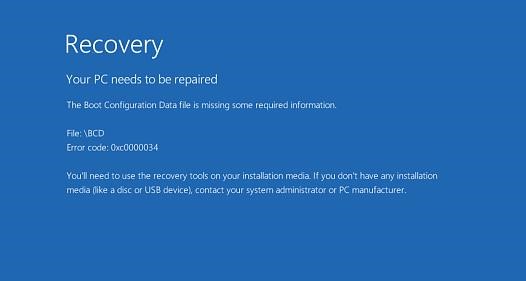
If the BCD file is missing or corrupted, if you removed/formatted a separate disk partition with the System Reserved label (and 500 MB in size) or a special OEM recovery partition, a user is likely to see the following message when trying to boot Windows:
Your PC needs to be repaired
The Boot Configuration Data file is missing some required information
File: \Boot\BCD
Error code: 0xc0000034
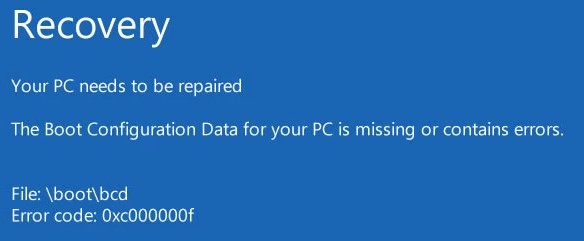
Also, the error may look like this:
The Boot Configuration Data for your PC is missing or contains errors.
File: \boot\bcd
Error Code: 0xc000000f
If the MBR is damaged, there may be an “An operating system wasn’t found” error.
How to Automatically Repair Windows Bootloader?
If this error appears, first of all, try to fix the problem with booting the OS using the Startup Repair mode that can be started from the Windows Recovery Environment (Windows RE).
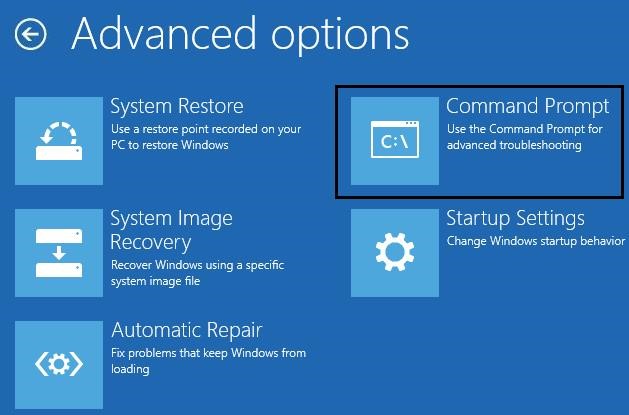
If the automatic repair using Startup Repair didn’t help, boot your computer from the Windows boot/installation media or in the WinRE environment (Repair your computer -> Troubleshoot -> Advanced options -> Command Prompt). Start a command prompt, try to create a new BCD file, and update the MBR record from scratch.
In this example, I will use the Windows 10 installation disk. Change the primary boot device to a DVD drive or USB flash drive with Windows setup files in the BIOS settings (depending on which device you want to boot the computer from). Boot your computer from the Windows install image and press Shift + F10 on the language selection screen. You will see a command prompt.
Try to repair the BCD file automatically using this command:
bootrec /RebuildBCD
Reboot your computer and check if Windows boots (don’t forget to change the boot device priority in the BIOS settings). If Windows does not boot, boot from the installation media again and open a command prompt.
Identifying Disk Partition Layout and Drive Letters
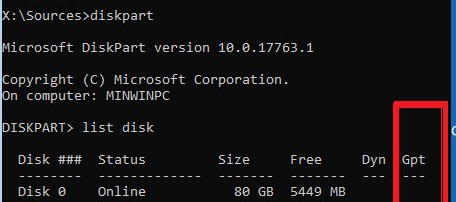
How to understand if you have a computer with BIOS or UEFI? The easiest way is to check the disk partition table on which Windows is installed: GPT or MBR. To do this, run the command:
diskpart
Then list available disks:
list disk
- If a disk has an asterisk (
*) in the Gpt column, then the GPT partition table is used on this disk. This means that you have a computer with UEFI, and to restore Windows the bootloader, you need to use the article from the link above; - If there is no asterisk in the GPT column, then you have the MBR partition table on the disk, and you can continue to follow this guide.
Next, you need to identify the local drives and volumes on your computer (most likely the drive letters assigned to them will be different from those you see when working in Windows). It is easier to do it using diskpart. Run these commands:
diskpart
 list vol
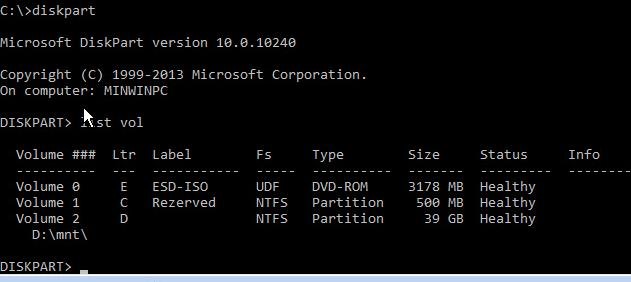
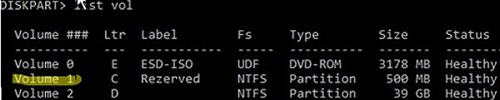
You will see a list of partitions, the drive letters assigned to them, and their sizes. In our case, there is one hard drive on the computer with the two volumes on it:
- System Reserved partition with the size of 500 MB and the drive letter C: assigned to it. By default, Windows Boot Manager and BCD file are located on this small service partition (read more);
- NTFS partition with the size of 39 GB and the letter D: assigned. This partition contains installed Windows, programs, and user data.
Repair Master Boot Record (MBR) on Windows 10/11
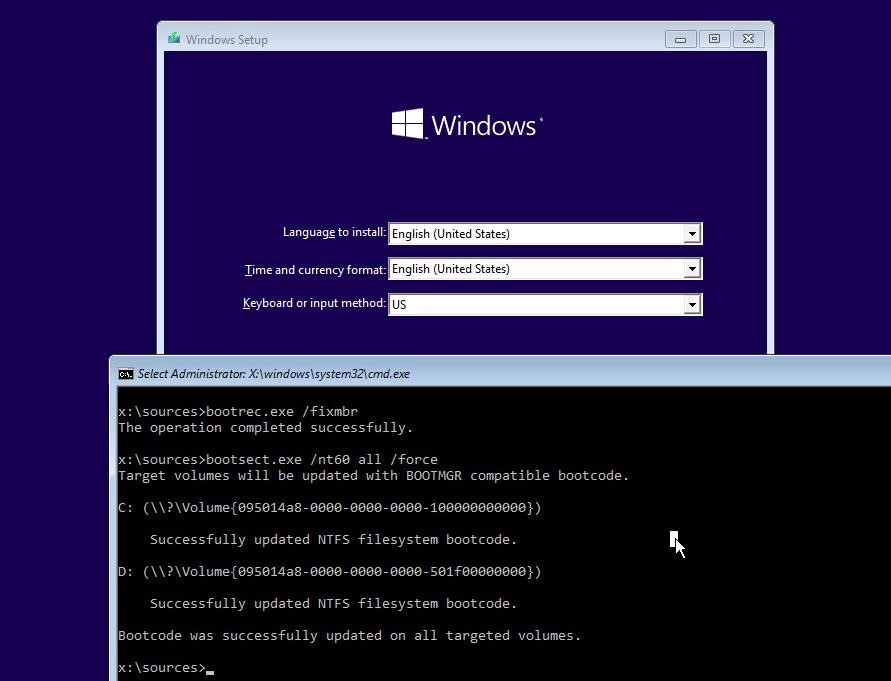
You can use the bootrec.exe tool to overwrite data in the MBR and boot sector, and add the necessary path to Windows Boot Manager.
Try overwriting the master boot record (MBR) of the system partition for compatibility with the Windows boot loader (the existing partition table is not overwritten).
bootrec.exe /fixmbr
Add code to the boot sectors of the disk to load the bootmgr (Windows Boot Manager) file:
bootsect.exe /nt60 all /force
If bootsect.exe command is not found, try to specify the full path to it:
X:\boot\bootsect.exe /nt60 all /force
bootrec /FixBoot – the command creates a new boot sector on the system partition and overwrites the boot record of the PBR partition.
bootrec /ScanOs – scan all drives and look for installed copies of Windows that are not in the Boot Configuration store
If the scan is successful, you will be prompted to add entries about found Windows instances to the BCD configuration:
Scanning all disks for Windows installations.
Please wait, since this may take a while...
Successfully scanned Windows installations.
Total identified Windows installations: 1 [1] D:\Windows
Add installation to boot list? Yes/No/All:
bootrec /RebuildBcd – recreate the bootloader configuration store and add copies of Windows found on the computer to the BCD bootloader.
After that, restart your computer and check if Windows boots properly. If the OS doesn’t boot, follow the instructions below.
How to Recreate a Windows Boot Configuration (BCD) from Scratch?
Next, use the using BCDedit command to create a new Boot Configuration Data file (it is supposed, you don’t have the BCD backup file).
Your next steps depend on whether the disk has a separate System Reserved partition or not. Run the commands:
diskpart
 list vol
Check if there is a System Reserved partition on the hard disk. It can be identified by its volume label, or more precisely by its size (500 MB for Windows 10+, 350 MB for Windows 8.1, and 100 MB for Windows 7).

- If there is no system-reserved partition (perhaps you accidentally deleted it), you can store the Boot Manager files on the system drive where the Windows directory is located. To create the Bootmgr and BCD bootloader configuration files on the specified drive, run the command:
bcdboot C:\Windows /S C:
A message should appear:Boot files successfully created.
- If you have a System Reserved partition, delete the old (corrupted) BCD file and create a new one instead:
del c:\boot\bcd
diskpartSelect your local disk (in my case, only one hard disk is connected, but you can list local disks with the list disk command): select disk 0
The screenshot above shows that the System Reserved partition is called Volume 1. Select it: select volume 1
Assign a drive letter (I assigned the drive letter C:, but you can use any other letter, in this case, change the path in the following commands): assign letter C:
exit
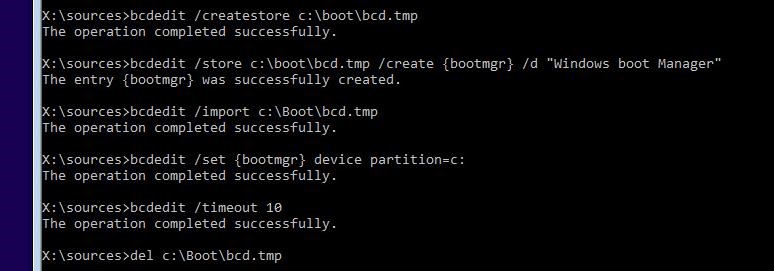
Create an empty temporary file bcd.tmp:
bcdedit /createstore c:\boot\bcd.tmp
Create an entry for the Windows Boot Manager (bootmgr):
bcdedit.exe /store c:\boot\bcd.tmp /create {bootmgr} /d "Windows Boot Manager"
Import settings from bcd.tmp to your BCD:
bcdedit.exe /import c:\boot\bcd.tmp
access denied, the store import operation has failed, the required system device cannot be found, the volume does not contain a recognized file system. please make sure that all required file system drivers are loaded and that the volume is not corrupted), try removing hidden, read-only, and system attributes from it:attrib C:\Boot\BCD -s -h -r
Specify that the Windows Boot Manager is located on the System Reserved partition (the drive letter C: is assigned to it):
bcdedit.exe /set {bootmgr} device partition=c:
Configure the timeout to select an OS:
bcdedit.exe /timeout 10
Remove the temporary file:
del c:\boot\bcd.tmp
So, you have created an empty BCD file with the bootloader settings. Now you have to add entries about the installed Windows.
Create a new entry in the BCD configuration for Windows 10:
bcdedit.exe /create /d "Windows 10" /application osloader
The command will return the unique identifier (GUID) of this bootloader entry.
The entry {8a7f03d0-5338-11e7-b495-c7fffbb9ccfs} was successfully created.

Specify that bootmgr should use this entry by default (after the timeout, this entry will be used to boot Windows):
bcdedit /default {8a7f03d0-5338-11e7-b495-c7fffbb9ccfs}
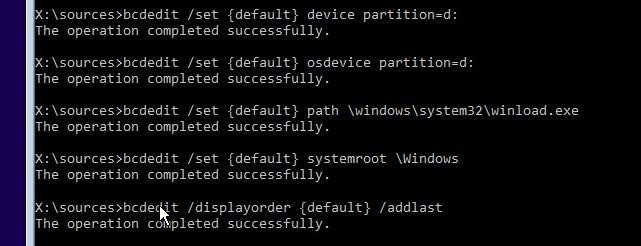
Now you have to specify the paths to the installed Windows 10 copy in the new bootloader entry. We found out earlier that the drive letter D: is assigned to the Windows partition in WinPE. Use this drive letter in the following commands:
bcdedit.exe /set {default}device partition=d:
 bcdedit.exe /set {default} osdevice partition=d:
 bcdedit.exe /set {default} path \Windows\system32\winload.exe
 bcdedit.exe /set {default} systemroot \Windows
Make this boot entry in BCD visible, since it is hidden by default:
bcdedit.exe /displayorder {default} /addlast
So we have completely recreated Windows 10 bootloader (bootmgr) and BCD file and overwritten the MBR boot sector.
Now you need to make active the partition on which the bootmgr and BCD file with the Windows bootloader configuration are located (BIOS transfers control to the OS bootloader on the active MBR partition). For example, the following partitions are available on your computer
- Volume 0 – installation flash drive (ISO image) from which you booted the computer;
- Volume 1 – System Reserved partition (500 MB size) with Windows bootmgr and BCD file;
- Volume 2 – partition with Windows system folders (%Windir%, Program Files, Users, and etc.)
In this example, you need to make Volume 1 the active partition (in your case, you need to find out your partition number). You can make a partition active using diskpart:
diskpart(bootmgr and \Boot\BCD must be on this partition )
list disk
sel disk 0
list vol
select volume 1
active
 exit
Check that volume 1 is now active:
select vol 1
 detail partition
(Active: Yes )

Now you can restart your computer and make sure that Windows boots normally.
36 comments
What if we use a restoration disc?
wow, saved my bacon! I had to format the system reserved directory then go through all this!
Is the best tutorial for restore the boot file you are the master ty for all
For anyone coming here late like I am, I tried my best to use the directions here to get windows to boot, but to no avail.
Specific circumstances: I migrated my windows installation to a samsung ssd a while ago with some issues, but the short version is the OS got migrated to the ssd, however the boot partition stayed on the original hdd. Without realizing this I did a ‘clean all’ command on the hdd, accidentally leaving me with no boot partition at all.
What worked:”format V: /FS:FAT32
bcdboot C:\Windows /s V: /f UEFI”
My best guess: The directory tree structure for this doesn’t seem to be the same as the what’s in the article on this page, so perhaps that has something to do with it.
great until … the store import operation has failed.. Requested system device cannot be found. that is where I am stuck
WOW Perfect guide so far!
many thanks!! Keep it
thank you for all your help
With all these excellent things there is one not mentioned here but may also be important. In case you’re not RESTORING but making another disc bootable, you’ll need to copy ‘bootmgr’ to the root of your target disc to boot.
You Windows folks rely heavily on the system doing the right thing? That is often seen in the way Windows tips ans manuals are written… Well you may have noticed that if it did so we would NOT need any tutorials like this one at all, would we. So — it DOES NOT do the right thing sometimes. Like in my case — Windows installer assumed WITHOUT EVER ASKING ME that it’s OK to install Windows on one disk and install boot files on another. So I’m trying now to make it boot from the one OS is installed on. And then it was that /bootmgr had to be copied over in order to make ALL THIS work. None of the commands above takes care of this. Why? Because of assuming it IS THERE ALREADY. Which is, again, by far not always the case.
Otherwise, thank you, VERY helpful as to how to recreate BCD. Oh, except that I also had that denial to import the bcd.tmp because the “device was not found”.
“The entry was successfully created” and I put the entry provided as default but when I go to the next step:
Bcdedit /set {default}device partition=h: //h is where my win10 is installed
I get this error: “An error occurred while attempting to reference the specified entry. The system cannot find the file specified.”
What should I do?
*Your help may save months of my life
Leave a space between {default} and device
Saved my day 🙂
All commands worked correctly but I am still getting the same 0xc000000f error on reboot.
This is the BEST guide when you’ve install Windows 10 (MBR) and bootrec, etc. just won’t work.
Two important notes:
1. I did this on an MBR (BIOS boot) installation of Windows 10. **Most Windows 10 users have GPT partition, not MBR, with UEFI boot, not BIOS.** Not sure if this guide will work for GPT/UEFI installs.
2. Your System Reserved Partition must be marked as active before you do these steps! Use diskpart from the installer Command Prompt. Google for directions, e.g. https://www.sevenforums.com/tutorials/71432-partition-mark-active.html
Mark the partition called “System Reserved” as active. Then reboot to the installer before trying these steps or your drive letters will be wrong and the process won’t work!
excellent guide, thank you so much for putting this together! i’ve never been happier to see a PC booting again haha 😀
i just had to disable my 2nd hard drive to make the import operation work – not sure why.
Hi there.
Really hoping you can help!
I get as far as bcdedit /import c:\boot\bcd.tmp when the import fails and I get the message “The requested system device cannot be found”.
What am I doing wrong?
Thanks!
Another worthless guide with commands that dont actually help when it says “access denied”. You always know its a classic when the “guide” never takes into account such issues and always assumes each step is flawless and foolproof LOL!
Great article!!!
Thank you very much to the writer for the complete and step-by-step instructions for the Solution of the rebuild BCD file in windows 10.
Here is what saved me – since nothing helped get my Windows to start again; I used a WINDOWS setup usb flash drive, deleted all partitions except the Windows partition with my software etc, rebooted with the installation pen drive, told it to repair the computer and suddenly it could. None of that was possible at any previous stage. Hope this helps you. Plus it was much faster than the hours of editing and checking etc.
Love OSHub although most of the time it is way above my non-tech level.
But I once fixed this problem using a Macrium Reflect Recovery Media USB key. It was fast and easy. Check out Macrium’s instructions on this issue.
Hi
Everything worked but I still get error 0xc000000f
Worked for me – thanks.
Cool stuff! I awaked my Win Server 2022 now with your advice! Thanks a lot!
Konečne poriadny poradca. Návod fungoval na 100%. Ďakujem.
Hellooooooo, WOW
I didn’t expect this much information, Such a detailed guide and It has all the thing I need.
Thanks a lot.
Awesome guide. But no space in between {default} and device:
bcdedit.exe /set {default}device partition=d:
To note, if you are using a tool like bootrec /rebuildbcd and you get “The requested system device cannot be found., Or if you run “bcdedit” and you see “The boot configuration data store could not be opened. The system cannot find the file specified.”
It’s likely the “BCD” does not exist, and needs to be remade.
Try bcdboot C:\Windows /S C:
To rebuild the BCD on the C: drive.
Running “bcdedit” should show information when before it would provide the error. Use bcdedit /help to see all the advanced commands
Here is a relatively normal bcdedit from within Windows:
C:\WINDOWS\system32>bcdedit
Windows Boot Manager
——————–
identifier {bootmgr}
device partition=\Device\HarddiskVolume1
path \EFI\MICROSOFT\BOOT\BOOTMGFW.EFI
description Windows Boot Manager
locale en-US
inherit {globalsettings}
isolatedcontext Yes
default {current}
resumeobject {8d2d2faa-8003-11ec-bc81-c78f81adee24}
displayorder {current}
toolsdisplayorder {memdiag}
timeout 30
Windows Boot Loader
——————-
identifier {current}
device partition=C:
path \WINDOWS\system32\winload.efi
description Windows 10
locale en-US
inherit {bootloadersettings}
recoverysequence {8d2d2fac-8003-11ec-bc81-c78f81adee24}
displaymessageoverride Recovery
recoveryenabled Yes
isolatedcontext Yes
allowedinmemorysettings 0x15000075
osdevice partition=C:
systemroot \WINDOWS
resumeobject {8d2d2faa-8003-11ec-bc81-c78f81adee24}
nx OptIn
bootmenupolicy Standard
hypervisorlaunchtype Auto
For example, if the osdevice value was not the partition/drive Windows is in, it might need to be changed for Windows to boot. To change that to D: you might write:
Bcdedit /set {current} osdevice partition=D:
Use bcdedit /help and bcdedit /set to verify the command syntax
If you need to edit a “bcd store” on a different computer, prefix commands with bcdedit /store “C:\pathToBCD”
I’m trying to copy the boot sector from a good working PC to a drive that won’t boot in it’s own PC. I get error 0000225 and no option to boot from CD or USB recovery disc/drive, unless I unplug the boot drive. But if the boot drive is unplugged, I can’t run tools to fix it.
So I took the drive out of the PC and used a USB dock to hook to a working Win 10 PC and I am trying to copy my good system drive’s boot partition to the defective drive, but it seems all the tools in Windows only see the C: drive and I can’t find an option to copy the partition across drives. Is there a way to do this? Else I have to wipe the drive and lose the Windows license.
Interessante articolo, il mio problema è che non posso attuarlo, perchè in ambiente di ripristino non mi da il prompt dei comandi.
Interesting article, my problem is that I can't implement it, because in the recovery environment it doesn't give me the command prompt.Thank you, you saved my OS 🙂
The guides good but needlessly confusing by assigning the letter C to the system reserved partition while in the screenshot it already is assigned to the main partition. Imagining that this entire process will need to reference the os installation (which is originally in the c drive in these screenshots) that will get confusing fast
I am stuck at the creating BCD part, command – ‘bcdboot C:\Windows /S C:’. It is giving an error saying Failure while copying boot file. Please note that I do not have the Windows installed, as I actually deleted the system partition during the custom installation. Please advise what should I do in this case. Thank you.
Thank you so much for this information! People like you have saved my skin (and computer) many times and I’m forever in your debt!
Useful guide, fixed Win 7 using it and others. Several notes:
1) Complicated “How to Recreate a Windows Boot Configuration (BCD) from Scratch?” procedure can be often (always?) replaced by running bcdboot :\windows /s . In my case it was “bcdboot D:\Windows /s E:”. Probably also add “/f BIOS” on later than Win 7 utility versions (mine was from Win 7 installation disk and didn’t have /f option).
2) As others pointed out, this works only for MBR (BIOS boot), for GPT (EFI boot) procedure is slightly different.
3) As others pointed out, System Reserved Partition must be marked as active. ‘active’ is microsoft term; another name for this is ‘boot’ flag on the partition. I used gparted to create the partition, so had to set boot flag there.
I’m so happy for this article. It saved my butt prepping my VM to upgrade from Win 10 to 11. Otherwise, I would of had to build my VM from scratch and import all my data and face other difficult application problems along the way.
you saved me!
I installed Ubuntu as dual boot, worked fine.
Resized partitions, worked fine.
Next boot, error in GRUB. Only solution I could find was to reinstall Ubuntu. But that didn’t work either due to error in installer. Aargh.
This helped me revert to just running Windows again without having to reinstall the lot.
Thank you!
This tutorial saved my butt trying to recover my win10 smarthome tableau from some fatal fiddling when i tried to clone the tableau to proxmox via clonezilla…
I started off with a blank partition table after following clonezillas recommended steps for problöem solving but I was able to recover it from scratch with a linux tool called testdisk. Highly recommended.
After partition table recovery all volume identifiers had changed so windows wouldnt boot obviously. The Windows USB Recovery startup repair didnt work either. So I had to rebuild the BCD from scratch. The bootrec /bcdrebuild option never worked because of the “the requested device was not found error”. I suppose bootrec and bcdedit always tried to edit the BCD from my USB Boot Stick, because the USB stick got corrupted several times and I had to rebuild it. Then I found out about the /store option in bcdedit, where you can specify which BCD file you want to edit. I followed all your bcdedit commands with the addition of the /store option pointing to my C:\Boot\BCD that I wanted to repair. And with this addition I managed to get my Windows setup up and running again.
So thank you very much for your tutorial!
Maybe you could add the hint to the /store option of bcdedit in case anyone encounters the same “requested system device not found” error.