This article explains how to create and configure a Windows virtual machine on a Proxmox VE hypervisor. We will examine the key recommendations and best practices for configuring optimal virtual machine settings, installing a Windows Server guest OS, and running it in a Proxmox VM.
Preparatory steps:
- Download the ISO image with VirtIO drivers for Windows guests (virtio-win.iso).
- Download the Windows installation ISO image (Windows Server 2025 in this example).
Log in to the Proxmox web interface (https://proxmox-ip:8006) and upload the ISO images to the Proxmox storage (ISO images –> click Upload -> specify the path to the ISO image file).
/var/lib/vz/templates/iso directory.Configure a Windows Server Virtual Machine on Proxmox
The next step is to create a new virtual machine on the Proxmox host for the Windows Server guest.
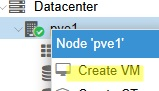
- Right-click on the Proxmox host and select Create VM

- On the General tab, specify a meaningful Name and ID for the virtual machine. You can leave the suggested ID or manually enter another one. For example, you can use the last octet of the VM IP address as VMID.
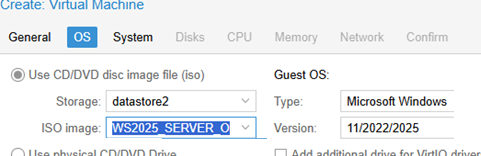
- On the OS tab, select the guest operating system type (Microsoft Windows 11/2022/2025) and the Windows installation ISO image that was uploaded to the Proxmox storage.
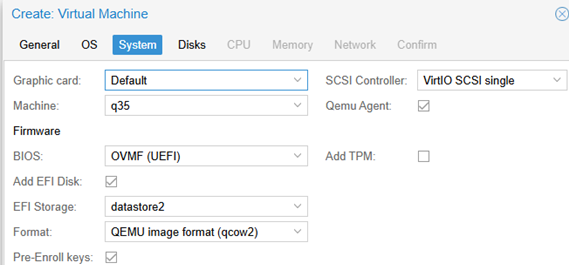
- Configure the following settings on the System tab:
Firmware: OVMF (UEFI) – it is the recommended platform type for modern versions of Windows. SeaBIOS can be used for legacy systems.
Add EFI Disk: Enable. Choose the storage for the EFI disk. Leave the disk type as the default, qcow2.
Pre-Enroll keys: Enable (add the standard Microsoft Secure Boot keys.)
Disk Controller type: VirtIO SCSI single
Qemu Agent: Enable
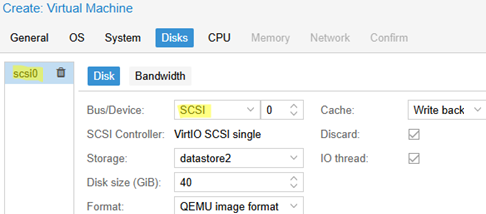
TPM: check this option if you need virtual TPM support in a virtual machine (TPM 2.0 is a mandatory requirement for Windows 11) - On the Disks tab, add a SCSI disk instead of an IDE (the SCSI protocol is faster and more efficient than the IDE or SATA). Set the disk size (for Windows, at least 40 GB).
- Select the disk image format: RAW (has the minimum features but the best performance), VMDK (compatible with VMware), or QCOW2 (advanced disk format with snapshot support). The qcow2 format is used by default (leave it as is).
- Enable the Discard option to use disk space more efficiently (it works similarly to the TRIM function on SSDs by clearing deleted data and freeing up space). To improve performance, use the Write Back mode as the caching type. If caching is disabled (Default (no cache)), this mode provides better protection against data loss in the event of an unexpected shutdown of the host or VM, but it may result in slower disk performance. The Write through mode is optimal for high read loads.
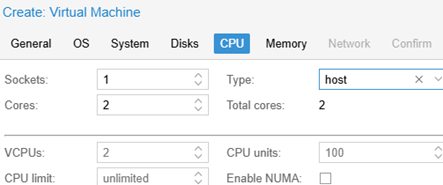
- Set the number of cores to allocate for the VM on the CPU tab (at least 2 cores of the host type for Windows). Add additional CPU sockets and enable NUMA support for high-performance Windows VMs.
The host type of CPU allows the VM to access all the capabilities of the physical CPU without using emulation. This mode allows nested virtualization to work in guest Windows. This allows both the Hyper-V and Windows Subsystem for Linux (WSL2) to be run in a Proxmox virtual machine.
- On the Memory tab, specify how much RAM to allocate to the VM. The recommended minimum is 4096 MB for Windows VM. You can reserve RAM for a VM by using the “Minimum memory” option. The “Ballooning mode” allows the hypervisor to reclaim unused memory from the VM when the amount of RAM used by the host exceeds a high threshold (typically above 80%).
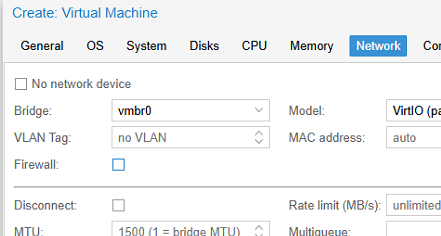
- In the Network tab, choose the VirtIO (paravirtualized) virtual network card model instead of the Intel E1000. Select the network bridge through which you want to expose your VM. In this example, vmbr0 is connected to the Proxmox host’s physical network interface.
- To prevent Proxmox firewall rules from being applied to the VM, disable the Firewall option. In this case, it is assumed that the built-in Windows Defender Firewall in the guest OS of the virtual machine will be used.
- Review the settings on the next tab, and then click Finish to start creating the VM.


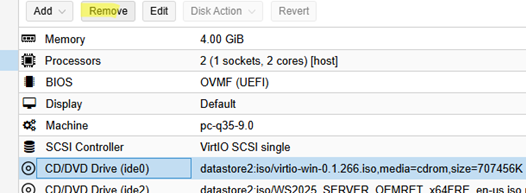
Once the VM has been created, add an additional virtual CD/DVD drive in its settings. Select VM -> Hardware tab -> Add -> CD/DVD drive. 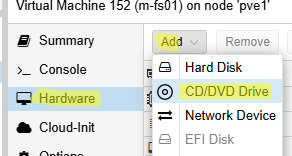
Mount the ISO image with the VirtIO drivers into the virtual drive. Everything is ready to install the guest Windows into the Proxmox virtual machine.
Installing Windows Server Guest on Proxmox VM
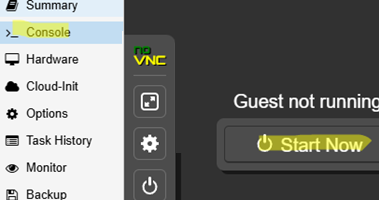
In the VM settings, go to the Console tab and click Start Now to run the VM.
Press any key to begin the Windows installation process. Next, the Windows Setup wizard will launch, where you will need to select language settings, Windows Server edition, etc.
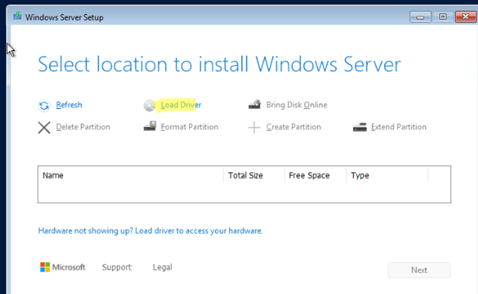
On the screen where you need to select a disk to install the OS, you will see that Windows Setup did not detect your virtual hard disk. The problem is that the Windows image does not include drivers for the VirtIO SCSI controller.
Click the Load Driver button to load the disk controller driver in WinPE mode.
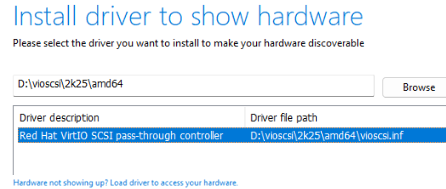
Specify the folder containing the Red Hat VirtIO SCSI pass-through controller driver on the mounted ISO with VirtIO drivers (d:\vioscsi\2k25\amd64). Install the driver.
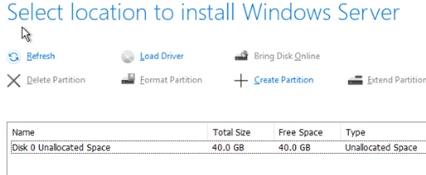
The unpartitioned local disk should now be visible to the Windows Setup. Select it to continue the installation.
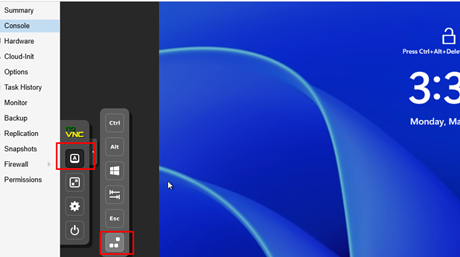
Once the Windows installation is complete, log in to the guest OS via the Proxmox console. To send the Ctrl+Alt+Del combination to the console and log on with the Windows administrator account, select Show Extra Keys in the left panel, then send the required key combination.
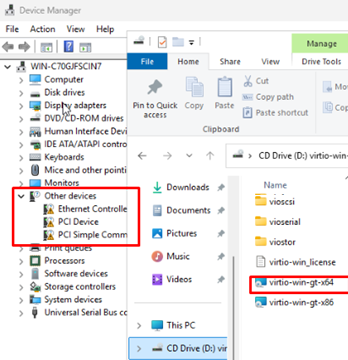
Open the Windows Device Manager (devmgmt.msc) . As you can see, several device drivers are missing and need to be installed from the VirtIO driver image. Run the virtio-win-gt-x64.msi installer from the ISO and install it with default settings.
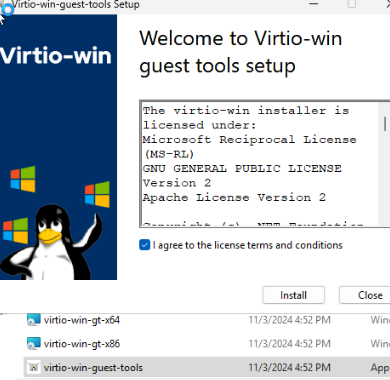
\NetKVM\w2k5\amd64 directory at the Windows Setup screen.Then, install the QEMU Guest Agent by running the virtio-win-guest-tools.exe file.
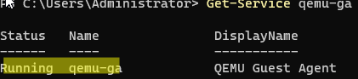
In the Windows guest, check that the QEMU agent service is running.
Get-Service QEMU-GA
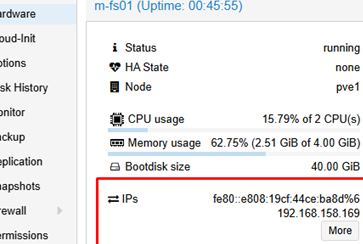
After installing the QEMU guest integration tools, the Summary tab in the Proxmox console will show the IP address obtained from the guest OS.
You can check the presence of the Qemu agent in the VM from the Proxmox host console.
qm agent <vmid> ping
Once the installation is complete, remove the VirtIO driver disk from the VM’s virtual hardware.
Complete the Windows installation and basic configuration in the guest machine: set the computer hostname, configure the static IP (if applicable), change the time and time zone, enable RDP, install Windows updates, add the necessary roles and features, etc.