To install Windows 11, your computer must meet these minimum system requirements: a TPM 2.0 chip (Trusted Platform Module), UEFI firmware + Secure Boot enabled, 4+ GB RAM, a minimum 64 GB hard drive, and a compatible 1 GHz dual-core 64-bit CPU (note that not all processors are supported). Microsoft restricts the installation of Windows 11 to non-compatible devices by performing some pre-installation hardware requirements checks. In this article, we will show you how to install Windows 11 build 25H2 on unsupported hardware by bypassing the minimum requirements for the CPU, TPM, Secure Boot, memory, and disk space.
Computer Doesn’t Meet Windows 11 System Requirements
If your computer doesn’t meet the minimum Windows 11 hardware requirements, you will see the following error during the OS installation:
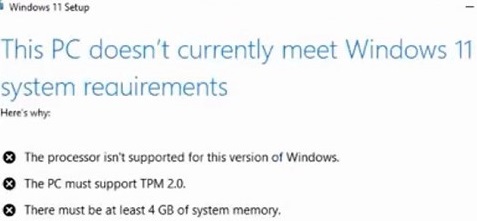
This PC can’t run Windows 11.
This PC doesn't currently meet Windows 11 system requirements. For more information, visit aka.ms/WindowsSysReq
Below you will see a list of the minimum system requirements that your computer doesn’t meet. In this case, the computer has an incompatible CPU, lacks a TPM 2.0 chip, and has less than 4 GB of RAM:
The processor isn't supported for this version of WindowsThe PC must support TPM 2.0There must be at least 4 Gb of system memory
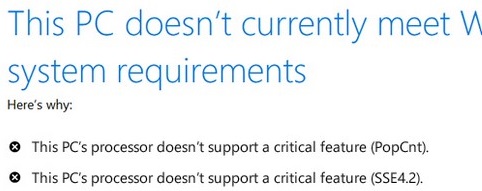
The CPU system requirements for Windows 11 version 24H2 have been updated to include support for the full SSE4.2 and PopCnt instruction sets. If your computer’s CPU is fairly old (dating from around 2007–2011) and doesn’t support these instructions, the installation of Windows 11 25H2 will be blocked, and an error message will appear:
This PC's processor doesn't support a critical feature (PopCnt)This PC's processor doesn't support a critical feature (SSE4.2)
To open the Windows Setup Error log, open the command prompt on the setup screen by pressing Shift + F10 (or Fn + Shift + F10 on laptops) and run this command:
notepad x:\windows\panther\setuperr.log
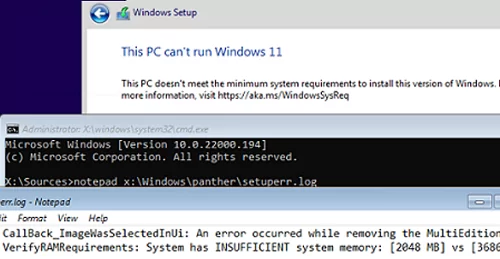
In our case, the error indicates that there is not enough RAM on the computer (only 2 GB instead of 3 GB):
2022-02-02 08:17:57, Error VerifyRAMRequirements: System has INSUFFICIENT system memory: [2048 MB] vs [3686 MB]
How to Bypass Windows 11 ‘s TPM, CPU, and RAM System Requirements
However, you can still proceed with the Windows 11 setup process, even if your device doesn’t meet all the minimum hardware requirements.
- Open the command prompt on the Windows 11 Setup screen by pressing
Shift+F10 - Run the Registry Editor
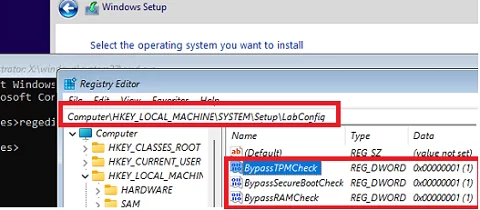
regedit.exe - Go to the HKEY_LOCAL_MACHINE\SYSTEM\Setup registry key and create a new key with the name LabConfig
- Create a DWORD registry parameter with a value of 1 for each compatibility check that you want to skip during installation.
The following options are available for installing Windows 11 on unsupported hardware:
BypassCPUCheck– for incompatible CPUsBypassTPMCheck– without a TPM 2.0+ chipBypassRAMCheck– to skip the minimum RAM checkBypassSecureBootCheck– for Legacy BIOS devices (or UEFI firmware with Secure Boot disabled)BypassStorageCheck– skip the check for the minimum system drive size requirement
For example, in order not to check the TPM module during installation, create the BypassTPMCheck registry parameter with the value 1. You can do this either using the graphical Registry Editor or by entering the following command:
reg add HKLM\SYSTEM\Setup\LabConfig /v BypassTPMCheck /t REG_DWORD /d 1
In the same way, create other registry parameters for the checks you want to skip when installing Windows 11:
reg add HKLM\SYSTEM\Setup\LabConfig /v BypassTPMCheck /d 1 /t reg_dword /f
 reg add HKLM\SYSTEM\Setup\LabConfig /v BypassSecureBootCheck /d 1 /t reg_dword /f
 reg add HKLM\SYSTEM\Setup\LabConfig /v BypassRAMCheck /d 1 /t reg_dword /f
 reg add HKLM\SYSTEM\Setup\LabConfig /v BypassStorageCheck /d 1 /t reg_dword /f
 reg add HKLM\SYSTEM\Setup\LabConfig /v BypassCPUCheck /d 1 /t reg_dword /f
Then get back to the Windows 11 Setup wizard, go one step back, and continue with a typical Windows installation without compatibility checks.
To avoid entering these commands manually, save them in a batch file named skip_hw_req_w11.bat and copy it to the root directory of your Windows 11 installation USB stick.
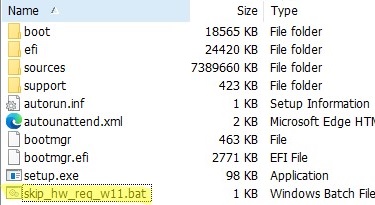
This BAT file can be executed during Windows 11 installation:
- Open a command prompt from the Setup screen ( Shift+F10 ):
- List the drive letters to find out which one has been assigned to the flash drive:
wmic logicaldisk get name - Run your BAT:
D:\skip_hw_req_w11.bat(in this case, the USB stick was assigned the drive letterD:) - This action adds registry parameters that instruct the Windows 11 installer to bypass hardware compatibility checks.


Alternatively, you can automate bypassing TPM, Secure Boot, disk, memory, and CPU hardware checks during Windows 11 installation by adding specific registry entries to an answer (unattend) file, which are applied automatically.
To do it, create a text file named AutoUnattend.xml containing the following:
<?xml version="1.0" encoding="utf-8"?>
<unattend xmlns="urn:schemas-microsoft-com:unattend">
<settings pass="windowsPE">
<component name="Microsoft-Windows-Setup" processorArchitecture="amd64" publicKeyToken="31bf3856ad364e35" language="neutral" versionScope="nonSxS"
xmlns:wcm="http://schemas.microsoft.com/WMIConfig/2002/StateMachine"
xmlns:xsi="http://www.w3.org/2001/XMLSchema-instance">
<RunSynchronous>
<RunSynchronousCommand wcm:action="add">
<Order>1</Order>
<Description>BypassTPMCheck</Description>
<Path>cmd /c reg add HKLM\SYSTEM\Setup\LabConfig /v BypassTPMCheck /t REG_DWORD /d 1 /f</Path>
</RunSynchronousCommand>
<RunSynchronousCommand wcm:action="add">
<Order>2</Order>
<Description>BypassSecureBootCheck</Description>
<Path>cmd /c reg add HKLM\SYSTEM\Setup\LabConfig /v BypassSecureBootCheck /t REG_DWORD /d 1 /f</Path>
</RunSynchronousCommand>
<RunSynchronousCommand wcm:action="add">
<Order>3</Order>
<Description>BypassRAMCheck</Description>
<Path>cmd /c reg add HKLM\SYSTEM\Setup\LabConfig /v BypassRAMCheck /t REG_DWORD /d 1 /f</Path>
</RunSynchronousCommand>
<RunSynchronousCommand wcm:action="add">
<Order>4</Order>
<Description>BypassStorageCheck</Description>
<Path>cmd /c reg add HKLM\SYSTEM\Setup\LabConfig /v BypassStorageCheck /t REG_DWORD /d 1 /f</Path>
</RunSynchronousCommand>
<RunSynchronousCommand wcm:action="add">
<Order>5</Order>
<Description>BypassCPUCheck</Description>
<Path>cmd /c reg add HKLM\SYSTEM\Setup\LabConfig /v BypassCPUCheck /t REG_DWORD /d 1 /f</Path>
</RunSynchronousCommand>
</RunSynchronous>
</component>
</settings>
</unattend>

Copy the AutoUnattend.xml file to the root directory of your Windows 11 installation USB stick, or add it to your ISO image.

Now, no compatibility checks will be performed when installing Windows 11.
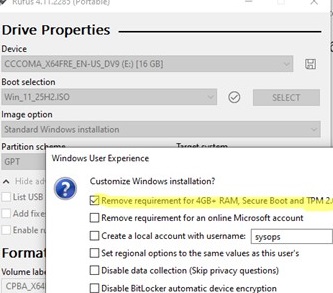
You can also disable automatic BitLocker drive encryption here or enable the option to install Windows 11 without a network connection.
When upgrading to Windows 11 on unsupported hardware, you can bypass the system requirement checks by adding the AllowUpgradesWithUnsupportedTPMOrCPU parameter:
reg add HKLM\SYSTEM\Setup\MoSetup /f /v AllowUpgradesWithUnsupportedTPMorCPU /d 1 /t reg_dword
6 comments
If you wont to install Windows 11 on a device that does not meet these requirements, you can create the following registry key values to bypass the check for TPM 2.0 (at least TPM 1.2 is required) and the CPU family/model.
Registry Key: HKEY_LOCAL_MACHINE\SYSTEM\Setup\MoSetup
Name: AllowUpgradesWithUnsupportedTPMOrCPU
Type: REG_DWORD
Value: 1
How can i update windows 11 un unsuported hardware
Windows 11 Setup now says that if I continue to update to Win 11, my Win 10 PC will no longer be supported and won’t receive updates. Is this true? What’s the point of upgrading to Win 11 if you don’t receive any updates?
Support for Windows 10 will end on October 14, 2025. After this date, Microsoft will no longer provide security updates, feature updates, or technical support for Windows 10.
Does not apply to EU, in addition, you can keep using windows if you just install a good Firewall app like Malwarebytes Windows Firewall Control, Bitdefender device security, use a VPN (like Proton|, and install AdGuard together with a safe browser like Brave Browser with UBlock Origin.
With that entire package, I will promise you, you WILL be safer than with an update to Windows 11 that is not using such a comprehensive package. By the way, that also applies to Windows 8, or even ‘7’. With an advanced security package, firewall and common sense whilst browsing, you can safely keep using those OS’es.
The bypass secure boot does not work.