Starting with Windows 11 24H2, when you perform a clean install or reinstall the OS on a device with a TPM chip and Secure Boot enabled, all drive partitions are automatically encrypted. All drives connected to the computer (including the system drive) are encrypted with BitLocker. Automatic encryption is enabled regardless of your account type (local or Microsoft account) and Windows edition (Home, Pro, or Enterprise). In previous Windows 11 builds, automatic device encryption was only enabled if the TPM was present + Modern Standby support + the device passed the HSTI test.
Device encryption is performed during the final OOBE phase of the Windows installation. The data is encrypted but is not actually protected by the Bitlocker key protector until the user logs in for the first time and the volume encryption key can be easily extracted in clear text.
- Signing in with a Microsoft account (MSA) activates the protection and sends the Bitlocket recovery key to the Microsoft cloud, Entra ID, or on-premises AD (if the Active Directory is configured to store the BitLocker recovery keys).
- When a user logs into Windows 11 with a local account, the data is not protected until a user manually configures Key Protector.
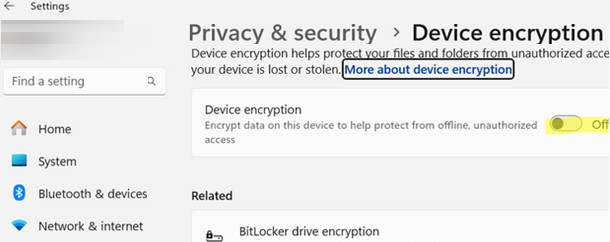
Automatic device encryption can be turned off in Settings -> Privacy & Security. Slide the Device Encryption switch to Off.
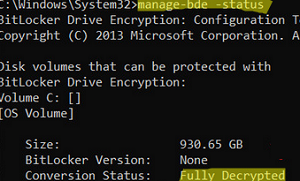
You can check whether the specified volume is encrypted using the command:
manage-bde -status
To turn off encryption for a volume:
manage-bde –off C:
Disable BitLocker encryption for all drives:
Get-BitLockerVolume | Disable-BitLocker
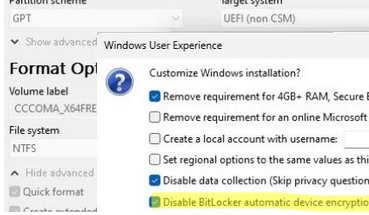
To prevent local drives from being encrypted during installation, use Rufus to write the Windows 11 install ISO image to the USB flash drive. When you burn an ISO image with Rufus, make sure that the ‘Disable BitLocker automatic device encryption‘ option is checked.
Or, disable device encryption during Windows setup.
- Once the Windows 11 installation files have been copied, your computer will restart and you will be taken to the OOBE screen (with region and language selection).
- Press
Shift+F10to open the command prompt from this screen. - To open the Registry Editor, run
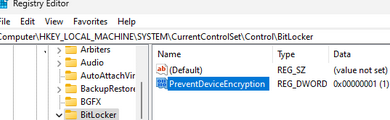
regedit.exe - Navigate to the reg key
HKEY_LOCAL_MACHINE\SYSTEM\CurrentControlSet\Control\BitLockerand create a DWORD (32-bit) parameter named PreventDeviceEncryption - Set the value to 1
 Or create a registry parameter using the command:
REG ADD HKLM\SYSTEM\CurrentControlSet\Control\BitLocker /v PreventDeviceEncryption /t REG_DWORD /d 1 - Close the command prompt and continue installing Windows 11. The BitLocker automatic drive encryption will not be enabled.
4 comments
your work (all of your website) is of next level..
Thx, this saved me lots of time.
So under Privacy and Security – Device Encryption is turned ON. But if I click on the link Manage BitLocker Encryption it brings you to the control panel bitlocker settings and has a link to Turn ON Bitlocker? So is it not encrypted?
Use the command below to check the actual Device Encryption settings:
manage-bde -status