Microsoft Defender is the built-in antivirus program on Windows 10/11 and Windows Server that is enabled and configured by default. In this article, we’ll look at how to turn off Microsoft Defender on Windows 11 completely or suspend it.
When you install a third-party antivirus in Windows 10 or 11, the built-in Microsoft Defender Antivirus is automatically disabled. In some cases, it doesn’t happen and you may need to disable Microsoft Defender manually.
Turn off Defender Antivirus Protection on Windows 11 and 10
In some cases, you may need to suspend Microsoft Defender Antivirus protection without affecting important system services. For example, when Microsoft Defender prevents a system program or tool from running or installing. To run such an app, you have to stop Windows Defender Real-time Protection.
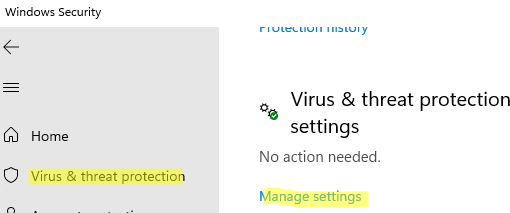
- Open Settings -> Privacy and Security -> Windows Security (or run a quick access URI command:
ms-settings:windowsdefender) in Windows 11;If the Microsoft Defender Security app doesn’t open or shows a blank screen, you can fix it by reinstallingMicrosoft.SecHealthUIUWP app. - Open Virus and threat protection and click Manage Settings;

- Move the Real-time protection toggle to Off.
- Confirm that you want to stop antivirus protection in the UAC prompt.
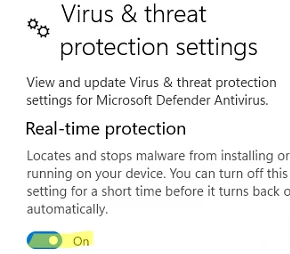
To resume Windows Defender protection, move the toggle to On. Also, Microsoft Defender Real-time Protection is enabled automatically after you restart the computer.
You can use the following PowerShell command to disable real-time protection (see how to manage Windows Defender settings using PowerShell):
Set-MpPreference -DisableRealtimeMonitoring $true
However, this command doesn’t work as expected in Windows 11 and the latest Windows 10 builds. The matter is that in Windows 10 1903 or later, a new Microsoft Defender feature is enabled by default: Microsoft Defender Tamper Protection.
You can only disable Tamper Protection manually from Windows Security GUI. Navigate to Virus and threat protection section, scroll down and switch the Tamper Protection toggle to Off.
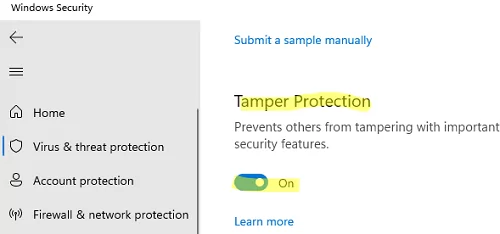
After disabling Tamper Protection, you will be able to disable Microsoft Defender Real-time Protection using the PowerShell command shown above.
How to Disable Microsoft Defender Antivirus in Windows 11 Permanently?
In earlier Windows 10 builds and in Windows Server 2016, you could completely disable Windows Defender using the Turn off Windows Defender Antivirus GPO option located in Computer Configurations -> Administrative Template -> Windows Component -> Windows Defender Antivirus section of the Local Group Policy Editor (gpedit.msc) or using the DisableAntiSpyware registry parameter under HKEY_LOCAL_MACHINE\SOFTWARE\Policies\Microsoft\Windows Defender:
New-ItemProperty -Path “HKLM:\SOFTWARE\Policies\Microsoft\Windows Defender” -Name DisableAntiSpyware -Value 1 -PropertyType DWORD -Force
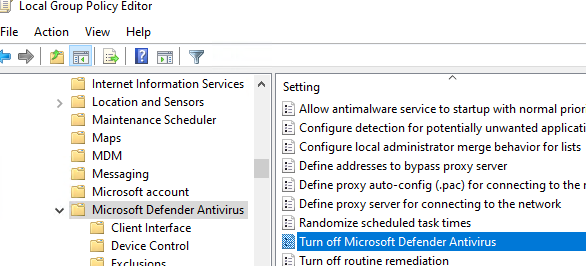
Starting from Windows 10 1903 release, you cannot use these GPO options or registry parameters to disable Microsoft Defender, because these settings are shielded by Tamper Protection. The methods previously used to disable Microsoft Defender Antivirus don’t work on Windows 11.
To completely disable Windows Defender Antivirus on Windows 11, you need to boot your computer to Safe Mode.
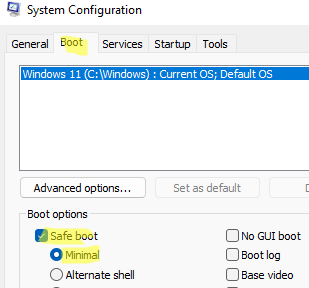
- Run
msconfig; - Go to the Boot tab;
- Select Safe boot -> Minimal in the boot options section;
- Click OK and restart your computer.
- Your computer will boot into Safe Mode;
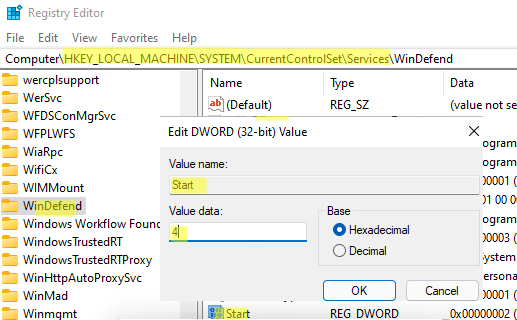
- Then open the Registry Editor (
regedit.exe), go to the reg key HKEY_LOCAL_MACHINE\SYSTEM\CurrentControlSet\Services and disable the startup of the following services:- Sense
- WdBoot
- WdFilter
- WdNisDrv
- WdNisSvc
- WinDefend
To do it, change the Start parameter value to 4.
Change the Start value for all services specified above manually or using the following PowerShell script:
$regpath='HKLM:\SYSTEM\CurrentControlSet\Services'
 Set-ItemProperty -Path ($regpath+"\WinDefend") -Name Start -Value 4
 Set-ItemProperty -Path ($regpath+"\Sense") -Name Start -Value 4
 Set-ItemProperty -Path ($regpath+"\WdFilter") -Name Start -Value 4
 Set-ItemProperty -Path ($regpath+"\WdNisDrv") -Name Start -Value 4
 Set-ItemProperty -Path ($regpath+"\WdNisSvc”) -Name Start -Value 4
 Set-ItemProperty -Path ($regpath+"\WdBoot") -Name Start -Value 4
To re-enable Microsoft Defender in Windows, set the following default values of the Start registry entry for services:- Sense — 3
- WdBoot — 0
- WdFilter — 0
- WdNisDrv — 3
- WdNisSvc — 3
- WinDefend — 2
- Run msconfig and disable the Safe Mode. Then restart your computer and boot as usual;
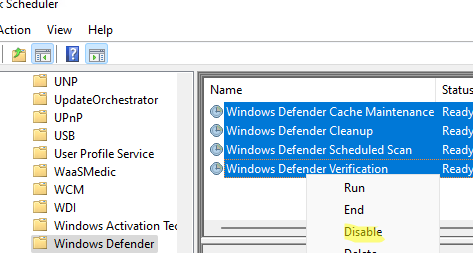
- Disable the following four tasks in Task Scheduler (
taskschd.msc): Microsoft –> Windows –> Windows Defender.
Get-ScheduledTask “Windows Defender Cache Maintenance” | Disable-ScheduledTask
 Get-ScheduledTask “Windows Defender Cleanup” | Disable-ScheduledTask
 Get-ScheduledTask “Windows Defender Scheduled Scan” | Disable-ScheduledTask
 Get-ScheduledTask “Windows Defender Verification” | Disable-ScheduledTask
Run the Windows Security app and make sure that Microsoft Defender Antivirus is now disabled. You should see the message: Threat service has stopped. Restart it now. 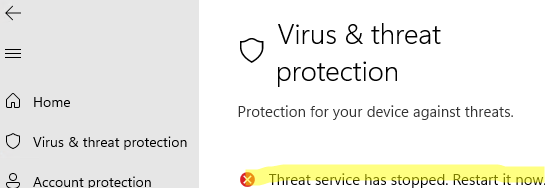
So we have looked at how to disable Microsoft Defender Antivirus on Windows 10 and 11.
16 comments
Hey, thanks a lot for this article!
I’ve finally managed to completely disable defender antivirus in Windows 11 22H2, i.e. following your instructions.
Have been fighting to achieve that goal for some time, unsuccessfully (except for blocking (in safe mode) the MsMpEng.exe via IFEO; which is hardly elegant:
reg add “HKEY_LOCAL_MACHINE\SOFTWARE\Microsoft\Windows NT\CurrentVersion\Image File Execution Options\MsMpEng.exe” /v Debugger /t REG_SZ /d “C:\windows\system32\cmd.exe /c exit 0″).
—
Only one thing: in the PowerShell script you’ve omitted one line:
Set-ItemProperty -Path ($regpath+”\WdBoot”) -Name Start -Value 4
**
with best wishes for the new year!
thanks!
Hey. This really worked! Very happy. I’m still on 10 but seeing how this works for both 10/11.
Thank you.
Cant find “Sense” on regedit on Windows 11 Home
The “Sense” service is responsible for providing insights and recommendations to users regarding Windows security and device performance. The service monitors system behaviors and reports any abnormal activities to Microsoftcloud-based security service for analysis. Perhaps it’s missing from Windows 11 Home.
Hello and thanks for the tips.
Unfortunately, whenever I apply all the steps, applications stop running, or start like 30-60 seconds later.
Not sure what exact command always broke it. Thankfully reverse commands fix the issue.
Thank you soooooooooooooooo much!
and fck Microsoft
Thanks so much! the windows defender antimalware service was eating ram ,disk and cpu usage . Not it cant do any more . thanks a lot
I did this solution Windows 10 Home and Pro PC. “Sense” is missing in Home version. However, disabling the others still works. Thanks.
Hie,
After following all the steps there is a “Getting protection info…” notification under Virus and Threat Protection. How can I solve this because the computer still isn’t installing apps from unknown sources.
Also, there was no ‘Windows Defender Scheduled Scan’ in the Tasks Scheduler.
Thanks
After many hours of having the same problem as you with windows 11 home, as programs were starting realle delayed and some could even not start, I foud the solution.
To have it fixed, apart from disabling whose services with msconfig in safe boot, (my windows is in Spanish so some texts may be different as I just thrnslated directly) you need to open “windows security”, then go to “Applications and browser security”, and finally under “Intelligent application control” click to configure, and then in the next screen on “disable”. This solved the problem for me in windows 11 home
Thanks Hector for the assistance 🙂
Unfortunately I’m using Windows 10 Pro, version 22H2 with no ‘Intelligent Application Control’ feature.
Thanks again anyways.
Thank you brother. So far, it’s working. After a few hours, Defender didn’t activate it self.
Thank you very much. For Windows 11 there is no Sense Service so you can just ignore it.
Why is Microsoft not giving the option to make your own choice of what is a virus and what is not?
My previous programs were installed were purchased software and freeware and now Microsoft is removing these programs which are not virus and not having control over your system. It seems that if your not downloading software exe launchers are classified as a virus
Is there a log of what Windows defender has removed?
Thank you so much for this guide! Windows Security went rogue and stopped letting me customise it, and it was blocking a lot of things even though I had a real antivirus installed (Kaspersky). Every other guide I found was way too basic or asked me to change settings I couldn’t access – this helped me get it to shut up for good. THANKS!