Almost all modern CPUs are multicore. Modern versions of Windows have support for multiprocessor CPUs and all cores on them are active by default.
Windows has a strict limit on the maximum number of physical CPUs and cores (logical processors) supported, depending on the version and edition:
- Windows 10 x86 (Enterprise Pro, Home) — up to 2 CPUs and 32 logical processors (both physical and Hyper-Threading virtual cores are considered)
- Windows 10/11 x64 — up to 2 CPUs and 256 logical processors
- Windows Server 2022/2019/2016/2012R2 – up to 64 physical processors with 640 logical cores
- Windows Server 2008 R2 – 256 logical cores
Find the Number of Available CPUs and Cores on Windows
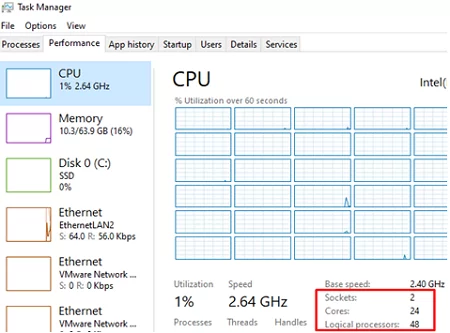
You can check the number of physical CPUs, cores, and logical processors available in Windows by using Task Manager.
- Run
taskmgr.exeand go to the Performance tab. - Select the CPU tab;
- You will see the number of available CPUs (sockets), physical cores (24 cores), and logical processors.
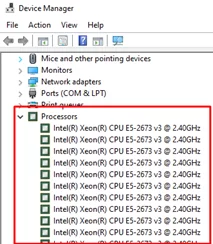
The Device Manager (devmgmt.msc) also shows the number of logical processors available.
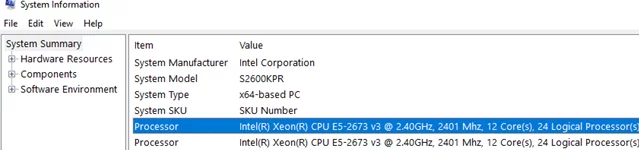
You can also find the information about physical CPUs and the number of cores on them in the Processor section of msinfo32.exe tool:
Processor Intel(R) Xeon(R) CPU E5-2673 v3 @ 2.40GHz, 2394 Mhz, 12 Core(s), 24 Logical Processor(s)
Processor Intel(R) Xeon(R) CPU E5-2673 v3 @ 2.40GHz, 2394 Mhz, 12 Core(s), 24 Logical Processor(s)
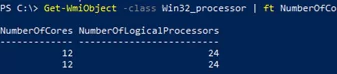
You can use PowerShell to see how many cores and logical processors are available:
Get-WmiObject -class Win32_processor | ft NumberOfCores,NumberOfLogicalProcessors
NumberOfCores NumberOfLogicalProcessors
------------- -------------------------
12 24
Special Windows environment variable also contains logical processor number information:
echo %NUMBER_OF_PROCESSORS%

How to Enable All Cores on Windows
If not all CPU cores are available in Windows, check that they are enabled in the BIOS/UEFI settings. There can be two options here:
- HyperThreading – enables the use of both logical processors of the physical CPU core
- Active Processor Cores – option to enable or disable the number of cores.
Restart Windows and enter BIOS settings (usually with the F2, Del, F10, or F1 keys).
Specific option names and availability vary depending on your BIOS version and CPU model. In my case, all the CPU options are in the Processor Configuration section:
- Hyper-Threading ALL:
Enabled - Active Processor Cores:
All

How to Restrict App to Specific Cores on Windows (CPU Affinity)
In Windows, you can configure an application to only run on one or specific CPU cores. By default, a Windows app can run on any core.
You can use the Processor Affinity feature to bind a program to specific cores. This may be necessary if you want to restrict the program’s CPU usage or run it on a single core (this may be necessary to run legacy apps that do not work properly on multi-core computers).
You can change the core affinity of a running app in the Task Manager:
- Open the Details tab;
- Find and right-click your app process. Select Set affinity;

- Mark the physical cores that are allowed to execute the app instructions.


It is only possible to run an application on a single core using the command prompt. In this example, I will restrict the app to CPU0.
cmd.exe /c start /affinity 1 "C:\MyApp\myappname.exe"
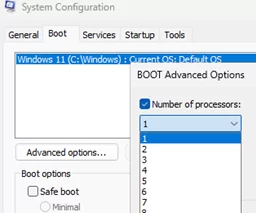
Change the Number of Cores Used at Windows Boot
Windows always uses only one core to boot. You may allow to use all cores when booting Windows using the System Configuration:
- Open
msconfig; - Click the Boot tab and select your entry;
- Click Advanced options;
- Select the Number of processors option in the BOOT Advanced Options;
- Select the number of logical processors (threads) that can be used during the boot process. .
 .
.
4 comments
Re: Change the Number of Cores Used at Windows Boot
msconfig had the cores/processors set as 1 .Don’t how it got to 1.
I set it to 4. That took care of 100% cpu useage.
Thanks, Mike
I enetred the wrong number of cores now system wont boot any suggestions?
Boot into the Recovery Environment (WinRE) and open Command Prompt.
Run the commands:
bcdedit /deletevalue {default} truncatememorybcdedit /deletevalue {default} numproc
This will reset the MSConfig settings to their defaults.
reboot the computer
win11 is simply way too slow, time for high performance Linux ….microsoft promises os that would be multiprocessing and parallel processing capable but we get nothing but slowlyness and app throttle … microsoft throttle even its own app …. conspiracy against user on global scale, for his hardware user gets performance only on paper not in real life use of …