Windows OS Hub
  • Windows
    • Windows 11
    • Windows 10
    • Windows Server 2025
    • Windows Server 2022
    • Windows Server 2019
    • Windows Server 2016
  • Microsoft
    • Active Directory (AD DS)
    • Group Policies (GPOs)
    • Exchange Server
    • Azure and Microsoft 365
    • Microsoft Office
  • Virtualization
    • VMware
    • Hyper-V
    • Proxmox
  • PowerShell
  • Linux
  • Home
  • About

Windows OS Hub

  • Windows
    • Windows 11
    • Windows 10
    • Windows Server 2025
    • Windows Server 2022
    • Windows Server 2019
    • Windows Server 2016
  • Microsoft
    • Active Directory (AD DS)
    • Group Policies (GPOs)
    • Exchange Server
    • Azure and Microsoft 365
    • Microsoft Office
  • Virtualization
    • VMware
    • Hyper-V
    • Proxmox
  • PowerShell
  • Linux

 Windows OS Hub / Windows 11 / How to Hide or Show the ‘Safely Remove Hardware’ Icon on Windows

October 1, 2024

How to Hide or Show the ‘Safely Remove Hardware’ Icon on Windows

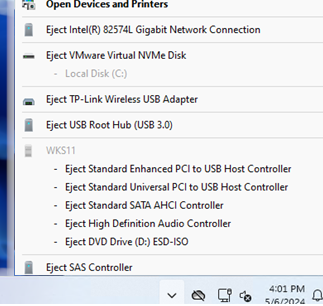
One of our regular readers complained that on his new physical Windows Server 2019 host, some internal devices (including NICs, RAID controller, CPU, and others) were showing up in the Safely Remove Hardware list. He is concerned that a user or administrator could accidentally click on the system tray and unplug a critical device from the host.

Internal devices showing in safely remove hardware list on Windows

For internal SATA/SSD drives that show up as removable in the taskbar, disabling Hot Plug mode for the drive (controller) in the BIOS/UEFI may help. If this is not possible, use the TreatAsInternalPort registry option to make Windows recognize SATA drives as internal rather than removable.

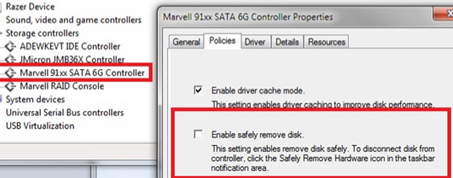
For some storage controllers, the Enable safely remove disk option may be available in the Policies tab of the driver properties.

Enable safely remove disk in storage controller driver options

It is possible to disable the presentation of virtual devices as removable for VMware virtual machines by adding a special parameter to the VMX configuration file

devices.hotplug = "FALSE"

Another option is to simply hide the Safely Remove Hardware and Eject Media icon from the Windows system tray.

Safely Remove Hardware and Eject Media icon in the system tray

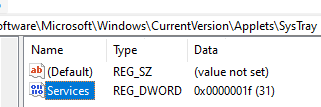
To hide the Safely Remove Hardware icon in the system tray, make a change to the registry:

  1. Run the regedit.exe and go to the registry key HKCU\Software\Microsoft\Windows\CurrentVersion\Applets\SysTray
  2. Change the Services parameter value from 31 (1F in HEX) to 29. regedit - hide safely remove device from users
  3. To update the tray icons, run the systray.exe command.
You can change the value of a registry parameter from the command prompt. First, get the current value:

reg query HKCU\Software\Microsoft\Windows\CurrentVersion\Applets\SysTray /v Services
Then make the change to the registry:
reg add HKCU\Software\Microsoft\Windows\CurrentVersion\Applets\SysTray /v Services /t reg_dword /d 29 /f && systray

This will hide the Safely Removal icon from the system tray. However, the value of this registry entry is automatically reset when the Windows user session is terminated.

Safely remove hardware icon disappeared from the Windows system tray

Create a simple scheduler task that runs when any user logs in to hide the safely remove hardware icon for all users. Create this scheduled task with this command:

schtasks /create /tn "HideSafelyRemovalIcon" /tr "cmd.exe /c reg add HKCU\Software\Microsoft\Windows\CurrentVersion\Applets\SysTray /v Services /t reg_dword /d 29 /f && systray.exe" /sc ONLOGON

scheduled task HideSafelyRemovalIcon

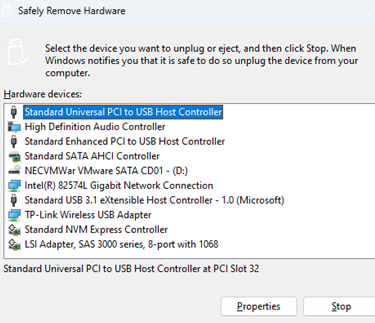
To safely remove one of the devices, run the command:

RunDll32.exe shell32.dll,Control_RunDLL hotplug.dll

Select the device in the Safely Remove Hardware dialog and click Stop. The device can then be safely unplugged.

Open the Safely Remove Hardware dialog from the cmd

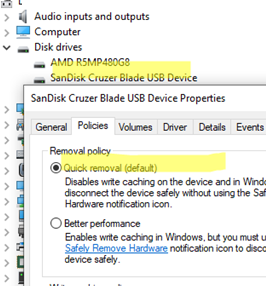
Don’t worry about safely ejecting USB sticks. Starting from Windows 10 1809, the Quick Removal option is enabled by default for external storage devices (USB flash drives). So you can physically unplug the drive at any time without using the Safely Remove Hardware process. This will not damage the file system or cause data loss.

Default media removal policy in Windows 10 and 11 is Quick removal

0 comment
1
Facebook Twitter Google + Pinterest
Windows 10Windows 11Windows Server 2019
previous post
Enable Hyper-V on Windows 10/11 Pro and Home Editions
next post
Adding Multiple Alternate DNS Names for a Windows Computer

Related Reading

Managing Windows Firewall Rules with PowerShell

March 11, 2024

Create a Custom Windows Image with Pre-installed Apps

February 28, 2024

Fixing ‘The Network Path Was Not Found’ 0x80070035...

August 31, 2023

Upgrading to Windows 11 on Unsupported Hardware

March 6, 2024

Configuring RemoteApps Hosted on Windows 10/11 (without Windows...

January 25, 2025

How to Assign (Passthrough) a Physical GPU to...

June 11, 2024

Installing Language Pack in Windows 10/11 with PowerShell

September 20, 2023

Fix: Your IT Administrator Has Limited Access to...

March 22, 2024

Leave a Comment Cancel Reply

join us telegram channel https://t.me/woshub
Join WindowsHub Telegram channel to get the latest updates!

Recent Posts

  • Encrypt Any Client-Server App Traffic on Windows with Stunnel

    June 12, 2025
  • Failed to Open the Group Policy Object on a Computer

    June 2, 2025
  • Remote Desktop Printing with RD Easy Print Redirection

    June 2, 2025
  • Disable the Lock Screen Widgets in Windows 11

    May 26, 2025
  • Configuring Windows Protected Print Mode (WPP)

    May 19, 2025
  • Map a Network Drive over SSH (SSHFS) in Windows

    May 13, 2025
  • Configure NTP Time Source for Active Directory Domain

    May 6, 2025
  • Cannot Install Network Adapter Drivers on Windows Server

    April 29, 2025
  • Change BIOS from Legacy to UEFI without Reinstalling Windows

    April 21, 2025
  • How to Prefer IPv4 over IPv6 in Windows Networks

    April 9, 2025

Follow us

  • Facebook
  • Twitter
  • Telegram
Popular Posts
  • How to Allow Multiple RDP Sessions on Windows 10 and 11
  • How to Run Program without Admin Privileges and Bypass UAC Prompt
  • Fix: BSOD Error 0x0000007B (INACCESSABLE_BOOT_DEVICE) on Windows
  • Fixing ‘The Network Path Was Not Found’ 0x80070035 Error Code on Windows
  • How to Delete Old User Profiles in Windows
  • How to Install Remote Server Administration Tools (RSAT) on Windows
  • How to Backup and Copy Local Group Policy Settings to Another Computer
Footer Logo

@2014 - 2024 - Windows OS Hub. All about operating systems for sysadmins


Back To Top