If you installed Hyper-V on a non-GUI edition of Windows (Windows Server Core or Microsoft Hyper-V Server), you can use PowerShell cmdlets from the Hyper-V module to manage your hosts and virtual machines. To make managing virtual machines more convenient, it is recommended to use the graphical interface of the Hyper-V Manager console or the Windows Admin Center (WAC) web interface. This article shows you how to enable and configure remote Microsoft hypervisor management using the Hyper-V Manager console in a non-domain (workgroup) environment.
The first step is to enable remote management on the Hyper-V host. If the Hyper-V role is installed on a Server Core or Microsoft Hyper-V Server, run the utility sconfig.cmd command, then go to section 4 — Remote Management and enable remote management.
Then, open the PowerShell console, configure the WinRM service, and allow CredSSP authentication:
Enable-PSRemoting
 Enable-WSManCredSSP -Role server
If you enabled WinRM by using the ‘Enable-PSRemoting’ command, this will automatically create the necessary rules in the Microsoft Defender Firewall.
If you want to check if the default WinRM port (TCP 5985) is available on the client side of the server, you can use the following command:
Test-NetConnection -ComputerName 192.168.21.30 -Port 5985
The next step is to configure the Windows 10 client computer from which you are going to manage your Hyper-V server.
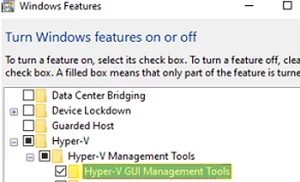
Install the Hyper-V Manager console. To do this, run the optionalfeatures command to open the Turn Windows Features on or off console. Expand the Hyper-V node and check to install the Hyper-V GUI Management Tools.
You can also install the Hyper-V Manager client using PowerShell:
Enable-WindowsOptionalFeature -Online –FeatureName Microsoft-Hyper-V-Management-Clients
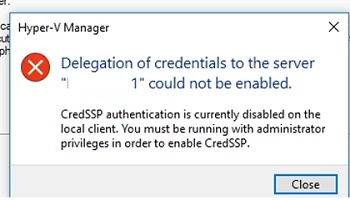
If you try to connect to the remote Hyper-V host right now, you get an error:
CredSSP authentication is currently disabled on the local client. You must be running with administrator privileges in order to enable CredSSP.
To make the Hyper-V host accessible by name from the management workstation, you must add an entry to the hosts file (C:\Windows\System32\drivers\etc\hosts) on the client computer.
You can add the entry to the hosts file using PowerShell:
Add-Content -Path "C:\Windows\System32\drivers\etc\hosts" -Value "192.168.21.30 hv19"
The hosts file should contain the following line:
192.168.21.30 hv19
Now you need to add the name of the Hyper-V server to the trusted hosts:
Set-Item WSMan:\localhost\Client\TrustedHosts -Value "hv19"
Then save the password for the Hyper-V administrator account that you will use to connect to Windows Credential Manager:
cmdkey /add:hv19 /user:Administrator /pass:HypVpaSS22
runas /user:hv19\Administrator /netonly "mmc virtmgmt.msc"
Check that your network connections in Windows 10 have a Public network profile assigned:
Get-NetConnectionProfile|select InterfaceAlias,NetworkCategory
If the command returns the connection type (location) as Public, change it to Private:
Set-NetConnectionProfile -InterfaceAlias "EthernetLAN2" -NetworkCategory Private
Enable CredSSP authentication on the client and specify the server address you trust to delegate your credentials:
Enable-WSManCredSSP -Role client -DelegateComputer "hv19"
Confirm the action: y -> Enter.
This will also change the settings of the local Allow delegating fresh credentials policy.
Now enable NTLM authentication on the non-domain computer:
- Open the local Group Policy Editor:
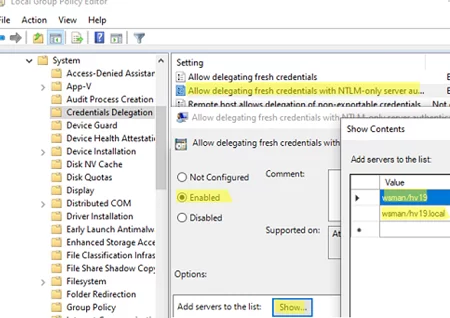
gpedit.msc; - Go to Local Computer Policy -> Computer Configuration -> Administrative Templates -> System -> Credentials Delegation;
- Enable the item Allow Delegating Fresh Credentials with NTLM-only Server Authentication;
- Click Show and add two values for the name of your Hyper-V server (in our example, it’s hv19):
wsman/hv19andwsman/hv19.local; - Close the GPO editor and update your computer’s Group Policy settings:
gpupdate /force
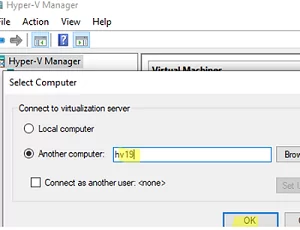
Now you should be able to connect to the remote host with the Hyper-V role. Open the Hyper-V Manager console (virtmgmt.msc) and click Connect to Server. Enter the name of the remote Hyper-V host:
If you have done everything correctly, the console should connect to the Hyper-V server and display a list of registered virtual machines.
Now you can manage Hyper-V Server settings, create/enable/disable, import/export Hyper-V virtual machines from the graphical console.



6 comments
Hello,
I want to express my appreciation to you about this Hyper-V Remote Management article. I follow your instructions and am able to connect Win 11 to Hyper-V 2019 flawless. I feel lucky today that I run into this article.
Thanks,
Anthony
You should update the article where it says to add a trusted host, what it is really doing is overriding all the trusted hosts on the server. This is not good. It’s safer to use the command with “concatenate” switch, so that it doesn’t delete the existing list.
Set-Item WSMan:\localhost\Client\TrustedHosts -Value “hv19” -Concatenate
doesnt work for domain authenticatefd
omg why do you have to just through so many hoops to get this to work?
this works only with WInRM HTTP not HTTPS correct? anyway to get this for WINRM with SSL certificate?
It is possible to use WinRM with an SSL certificate. Follow this guide: https://woshub.com/powershell-remoting-over-https/