Several times I came across a situation when files were copied much slower from/to virtual machines on a Hyper-V host running Windows Server 2019 than in a VM of the same configuration on a host running Windows Server 2016. In some tests, the read/write speed over the network to VM on Windows Server 2019 is almost three times lower than that on WS2016 (copying over SMB, SSH/SCP was tested). In this article, I tried to describe several different methods to improve the network performance of Hyper-V virtual machines running on Windows Server 2019 (and the latest Windows 10 and 11 builds).
Receive Segment Coalescing (RSC) in the Hyper-V vSwitch
First of all, you should note the Receive Segment Coalescing (RSC) feature that appeared in Hyper-V on Windows Server 2019/2022 (and Windows 10 1809+). The Receive Segment Coalescing is used at the virtual switch level (vSwitch). RSC allows to reduce CPU load and increase network throughput by combining multiple TCP segments into larger ones. Network performance is improved because large segments are processed faster than many smaller ones.
If RSC support is enabled, it may result in extra network delay in some hardware configurations.
By default, RSC is enabled for all external vSwitches on Windows Server 2019.
You can check if RSC is enabled for virtual switches using the command:
Get-VMSwitch | Select-Object *RSC*
You can disable using RSC for IPv4 traffic on the client network adapter using the following command:
Disable-NetAdapterRsc -Name "Ethernet" -IPv4
Check if the copy speed in a Hyper-V VM has increased after disabling RSC. If the network speed has improved, you can disable RSC on the virtual switch the VM is connected to.
To disable software RSC for a specific virtual switch, run the command:
Set-VMSwitch -Name vSwitchName -EnableSoftwareRsc $false

Or you can completely disable RSC on your Windows host:
netsh int tcp set global rsc=disabled
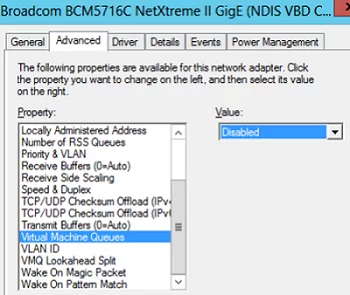
Virtual Machine Queue (VMQ) Mode in Network Adapter Driver
In some cases, if VMQ (Virtual Machine Queue) is enabled in a network adapter driver of a physical Hyper-V host, it may result in poor network performance in Hyper-V virtual machines. VMQ is a hardware feature and if it is not supported by your hardware but enabled in the driver, it can result in packet loss and increased network latency. The problem is typical to Broadcom Gigabit network adapters and occurs in all Hyper-V versions (Windows Server 2012 R2/2016/2019).
You can disable VMQ in the properties of your network adapter driver.
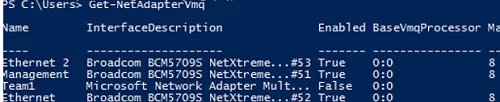
Or you can display a list of network adapters with VMQ support and their status using PowerShell:
Get-NetAdapterVmq
To disable VMQ for a specific NIC, run the command below (the network adapter will be unavailable for a couple of seconds):
Set-NetAdapterVmq -Name “NICName” -Enabled $False
After disabling VMQ, it is better to restart the host and check the network performance.
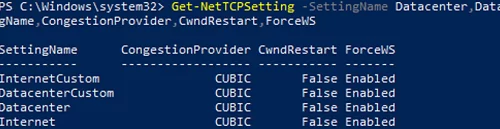
Optimize TCP Settings for Hyper-V on Windows Server 2019
Save the current TCP settings on your Hyper-V host and apply new settings that will make TCP settings in Windows Server 2019 almost similar to those of Windows Server 2016.
Save the current settings:
Get-NetTCPSetting -SettingName Datacenter,DatacenterCustom,InternetCustom,Internet|select SettingName,CongestionProvider,CwndRestart,ForceWS|Export-csv c:\backup\ws2019_network_stack_settings_nettcp_backup.csv
Apply new NetTCP settings for LAN:
Set-NetTCPSetting -SettingName DatacenterCustom,Datacenter -CongestionProvider DCTCP
 Set-NetTCPSetting -SettingName DatacenterCustom,Datacenter -CwndRestart True
 Set-NetTCPSetting -SettingName DatacenterCustom,Datacenter -ForceWS Disabled
For WAN:
Set-NetTCPSetting -SettingName InternetCustom,Internet -CongestionProvider CTCP
 Set-NetTCPSetting -SettingName InternetCustom,Internet -DelayedAckTimeoutMs 50
 Set-NetTCPSetting -SettingName InternetCustom,Internet -ForceWS Disabled
Disable network RSS and RSC network optimization methods at the TCP stack level:
netsh int tcp show global
 netsh int tcp set global RSS=Disabled
 netsh int tcp set global RSC=Disabled
or on the NIC level:
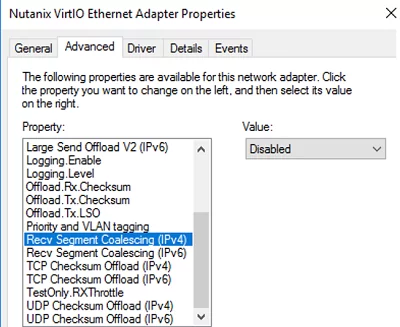
Get-NetAdapter | Set-NetAdapterAdvancedProperty -DisplayName "Recv Segment Coalescing (IPv4)" -DisplayValue "Disabled" -NoRestart
 Get-NetAdapter | Set-NetAdapterAdvancedProperty -DisplayName "Recv Segment Coalescing (IPv6)" -DisplayValue "Disabled" -NoRestart
 Get-NetAdapter | Set-NetAdapterAdvancedProperty -DisplayName "Receive Side Scaling" -DisplayValue "Disabled" –NoRestart
Disable vRSS for all VMs:
Get-VM | Set-VMNetworkAdapter -VrssEnabled $FALSE
Disable Large Send Offload (LSO) on NICs:
Get-NetAdapter | Set-NetAdapterAdvancedProperty -DisplayName "Large Send Offload Version 2 (IPv4)" -DisplayValue "Disabled" -NoRestart
 Get-NetAdapter | Set-NetAdapterAdvancedProperty -DisplayName "Large Send Offload Version 2 (IPv6)" -DisplayValue "Disabled" -NoRestart
 Get-NetAdapter | Restart-NetAdapter
- Recv Segment Coalescing (IPv4/IPv6) = Disabled
- Large Send Offload V2 (IPv4/IPv6) = Disabled
These TCP stack settings will make Windows Server 2019 network protocol settings similar to those of previous Windows Server versions.
7 comments
I am a customer engineer at Microsoft working on Hyper-V, Azure Stack HCI,…
if you want to improve Network Performance for your Hyper-V, you should follow our official recommendations:
https://techcommunity.microsoft.com/t5/networking-blog/synthetic-accelerations-in-a-nutshell-windows-server-2019/ba-p/653976
In this article , you are basically disabling every Network Optimization.
A simple file copy is not a representative way to test Network Performance as it is mainly mono-threaded, thus you could possibly not take advantage of vRSS / RSS basically.
Microsoft introduced a new feature in Server 2019 called “Receive Segment Coalescing” (RSC).
Apparently it is used for offloading tasks from the CPU to the network card. It strips the headers from packets and combines the payload of those into one packet.
It is enabled by default on all vSwitches on Windows Server 2019. Of course it doesn’t work and just causes problems on some hardware configurations.
Thank you so much! Disabling RSC seems to solve an issue that’s being bugging our CAD users!
Thank you! You saved me from buggy SMB tcp dup ack and retransmissions!
thank you, I applied the change in the network card as explained in the “Virtual Machine Queue (VMQ) Mode in Network Adapter Driver” and now it works like a charm!, before this, the maximum speed of transfer was about 10Kb/s 😊
Thank you so much for this! My host is capable of 1150Mbps down and 45Mbps up (Spectrum). Sandbox and VMs were only getting 3Mbps down and 45Mbps up. What? I then later discovered this only happens on my 10Gb NIC. Full speed on my 1Gb NIC. What? Disabling RSC fix it. Even more confusing, iperf was always full speed between client and host. It was just internet that was degraded. This was happening on Win11.
I’m curious . . . Did the research that you did for this article include reading through the following SpiceWorks post?
https://community.spiceworks.com/t/server-2019-network-performance/724968