Within your Exchange organization or Exchange Online (Microsoft 365) tenant, you can create hundreds of Distribution Groups (Distribution Lists, DLs). Distribution lists that are no longer in use should be periodically removed by the Exchange administrator. In this article, we’ll show you how to find and delete unused and empty distribution groups in Exchange.
Finding unused distribution lists differs from finding inactive AD users or computers. An Exchange DL does not have an attribute like LastLogonDate / LastLogonTimeStamp to track when an object was last used. You can use Exchange tracking logs to determine whether emails have been sent to a particular distribution group.
List Empty Distribution Groups in Exchange with PowerShell
If there are no users in the distribution group, it is likely that it is no longer needed.
You can use PowerShell to find empty distribution groups in an Exchange organization. Connect to your Exchange Server using PowerShell and run the following one-liner:
Get-DistributionGroup –ResultSize Unlimited |Where-Object { (Get-DistributionGroupMember –Identity $_.Name –ResultSize Unlimited).Count -eq 0} | select Name, PrimarySmtpAddress

Analyze the resulting list of distribution groups and remove (hide) the DLs you don’t need using the Remove-DistributionGroup command.
Get-DynamicDistributionGroup -ResultSize Unlimited | Where-Object { (Get-Recipient -RecipientPreviewFilter (Get-DynamicDistributionGroup -Identity $_.Identity).RecipientFilter).count -eq 0} | select Name, PrimarySmtpAddress
How to Find Inactive Distribution Groups in Exchange Server
The Get-MessageTrackingLog cmdlet is used in Exchange Server to analyze transport logs. For example, you may count the number of e-mail messages sent to a distribution group for the last 90 days using the command below:
Get-MessageTrackingLog -Start (Get-Date).AddDays(-90) -ResultSize unlimited -Recipients "dl-it_admins@woshub.com"| measure-object
Set-TransportService MUN-Ex01 -MessageTrackingLogMaxAge 180.00:00:00
To find unused distribution groups, you can use the following PowerShell script:
- Get a list of all distribution groups in a domain and export it to a CSV file:
Get-DistributionGroup | Select-Object PrimarySMTPAddress | Sort-Object PrimarySMTPAddress | Export-CSV all-exchange-dls.csv –notype - List DLs that received e-mails in the last 30 days:
Get-MessageTrackingLog -Start (Get-Date).AddDays(-30) -EventId Expand -ResultSize Unlimited |Sort-Object RelatedRecipientAddress | Group-Object RelatedRecipientAddress |Sort-Object Name | Select-Object @{label= "PrimarySmtpAddress";expression={$_.Name}}, Count | Export-CSV exchange-active-dls.csv –notypeIf your Exchange organization has more than one server with a transport role (you can get a list of them usingGet-TransportService), you will need to search for each of them:Get-MessageTrackingLog –Server Exh01 …. - Then compare the two lists and find inactive groups:
$alldl = Import-CSV -Path all-exchange-dls.csv
 $activedl = Import-CSV -Path exchange-active-dls.csv
Compare-Object $alldl $activedl -Property PrimarySmtpAddress -SyncWindow 500 |Sort-Object PrimarySmtpAddress | Select-Object -Property PrimarySmtpAddress |Export-Csv inactive-dls.csv –NoType - You may hide unused distribution groups in the Global Address List:
$currentdate = Get-Date
 $notes = "Inactive: hidden in the address list at $currentdate"
 $inactiveDL = Import-CSV -Path inactive-dls.| foreach-object
 {
 Set-Group -identity $_.PrimarySmtpAddress -notes $notes
 Set-DistributionGroup -identity $_.PrimarySmtpAddress -HiddenFromAddressListsEnabled $true
 }
Identify Inactive Distribution Lists in Microsoft 365 (Exchange Online)
In Microsoft 365, you can trace e-mail logs using the Exchange Admin Center (Mail Flow -> Message Trace) or using Start-HistoricalSearch or Get-MessageTrace PowerShell cmdlets. The last command has a significant limitation – it only allows you to search for e-mails that were sent in the previous 10 days. This is not suitable for our task.
Install the Exchange Online PowerShell (EXO) module and connect to your tenant:
Connect-ExchangeOnline
The following command displays the number of e-mails sent to a distribution list’s SMTP address:
Start-HistoricalSearch -ReportTitle "Global Admin DL" -StartDate 04/20/2023 -EndDate 06/20/2023 -ReportType MessageTrace -RecipientAddress global_admins@ woshub.com -NotifyAddress maxb@woshub.com
To start the search for inactive DLs, you can use the following script::
foreach ($group in Get-DistributionGroup)
 {
 Start-HistoricalSearch -ReportTitle $group.PrimarySmtpAddress -StartDate 04/20/2023 -EndDate 06/21/2023 -ReportType MessageTrace -RecipientAddress $group.PrimarySmtpAddress -NotifyAddress maxb@woshub.com
 }
Once the search is complete, you can check how many e-mails have been sent to DL:
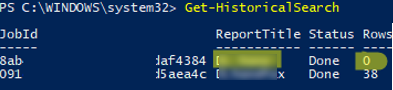
Get-HistoricalSearch "Global Admin DL"
If the message list is empty (Rows = 0), it means that the distribution group has not been used in Exchange Online in the last 90 days. Such a distribution list may be considered inactive.
1 comment
“Such a distribution list may be considered inactive.” So your saying that any DG that has not been used in 90 days can be deleted? Pretty sure you should say something like “May or may not be inactive, ask it’s members if you can delete it or not” or at least “May or may not be considered inactive”