Windows OS Hub
  • Windows Server
    • Windows Server 2022
    • Windows Server 2019
    • Windows Server 2016
    • Windows Server 2012 R2
    • Windows Server 2008 R2
    • SCCM
  • Active Directory
    • Active Directory Domain Services (AD DS)
    • Group Policies
  • Windows Clients
    • Windows 11
    • Windows 10
    • Windows 8
    • Windows 7
    • Windows XP
    • MS Office
    • Outlook
  • Virtualization
    • VMWare
    • Hyper-V
    • KVM
  • PowerShell
  • Exchange
  • Cloud
    • Azure
    • Microsoft 365
    • Office 365
  • Linux
    • CentOS
    • RHEL
    • Ubuntu
  • Home
  • About

Windows OS Hub

  • Windows Server
    • Windows Server 2022
    • Windows Server 2019
    • Windows Server 2016
    • Windows Server 2012 R2
    • Windows Server 2008 R2
    • SCCM
  • Active Directory
    • Active Directory Domain Services (AD DS)
    • Group Policies
  • Windows Clients
    • Windows 11
    • Windows 10
    • Windows 8
    • Windows 7
    • Windows XP
    • MS Office
    • Outlook
  • Virtualization
    • VMWare
    • Hyper-V
    • KVM
  • PowerShell
  • Exchange
  • Cloud
    • Azure
    • Microsoft 365
    • Office 365
  • Linux
    • CentOS
    • RHEL
    • Ubuntu

 Windows OS Hub / PowerShell / Export-CSV: Output Data to CSV File Using PowerShell

April 3, 2023 PowerShellQuestions and AnswersWindows 10Windows Server 2019

Export-CSV: Output Data to CSV File Using PowerShell

You can use the Export-CSV cmdlet in PowerShell to export data arrays to CSV files. In this article, we will show you how to export data to a CSV file and how to add additional rows or columns.

The CSV file is a plain text file format used to store tabular data, where values are separated by a special character (delimiter). The Export-CSV cmdlet converts the resulting PowerShell object to a comma-separated list of strings and saves the strings to the specified file.

The following command exports the list of Windows services to a CSV file:

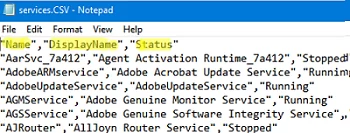
Get-Service |select-object Name,DisplayName,Status | Export-CSV "C:\PS\services.CSV" -NoTypeInformation -Encoding UTF8

You can now open the CSV file you have received in any text editor. As you can see, the first row contains the column names (attributes of the PowerShell object) that we selected by using the Select-Object cmdlet, and then we can see the data line by line, separated by commas.

csv file format with delimeter

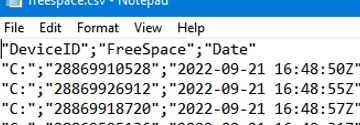
The comma is used as a separator (delimiter) in CSV by default. You can specify another CSV delimiter character (for example, semicolon, colon, etc.) with the –Delimiter option.

For example, let’s use a semicolon as a separator:

Get-Service | Export-CSV "C:\PS\services.CSV" -NoTypeInformation -Encoding UTF8 -Delimiter ";"

You can use the delimiter depending on your Windows regional settings. Use the -UseCulture parameter for this.

Get-Process | Export-Csv "c:\ps\process.csv" -UseCulture

You can also find out the default separator character from the regional settings of Windows:

(Get-Culture).TextInfo.ListSeparator

By default, the Export-CSV cmdlet creates a new CSV file (if the file already exists, it is overwritten/replaced by the new one). Use the -Append option, if you need to add new rows to the existing CSV file

For example, you want to schedule a PowerShell script that checks the free disk space and adds the current value to a CSV file:

$cur_time=get-date -Format u
$freedisksize=Get-CimInstance -Class Win32_LogicalDisk |Where-Object {$_.DeviceID -eq "C:"} |select DeviceID,FreeSpace

Now you need to add the current date to the table (object) as one of the fields (attributes):

$freedisksize| add-member -membertype NoteProperty -name Date -value $cur_time

Export your PowerShell object to a CSV file:

$freedisksize| Export-Csv -Path C:\ps\freespace.csv -Delimiter ";" -NoTypeInformation -Append

Powershell Append CSV file

You can also use the following additional Export CSV options:

  • -Encoding – allows to set CSV file encoding (utf8NOBOM is used by default). In most cases, I specify UTF8 here;
  • -Force – allows overwriting the read-only file;
  • -NoClobber – if the file already exists, do not overwrite it;
  • -Header – add a header to the CSV file (if it is missing);
  • -IncludeTypeInformation/-NoTypeInformation – add or skip the #TYPE line with object type data to the file header (for example, #TYPE System.Diagnostics.Process or #TYPE System.Service.ServiceController). In PowerShell 6+, the header TYPE information is not displayed by default;
  • -UseQuotes (introduces in PowerShell Core 7.x) – whether to quote values or not (AsNeeded/ Always (default)/Never)

You can then process the CSV file you receive in Excel or other programs.

You can write data directly to an Excel file from within PowerShell.

The Export-CSV cmdlet is often used to create various tabular exports and reports. Below are some examples of useful system administrator reports that can be generated using the Export-CSV command:

  • Exporting a list of computers in AD using the Get-ADComputer cmdlet;
  • Extract user information from Active Directory using the Get-ADUser;
  • Find out inactive users or computers in an AD domain
  • Getting user sign-in logs from the Azure AD;
  • Export RDP connections history (logs);
  • Script to check the Windows activation status on computers in a domain.
You can use the Import-CSV cmdlet to read (import) data from a CSV file into PowerShell.

0 comment
0
Facebook Twitter Google + Pinterest
previous post
How to Force Remove a Printer That Won’t Uninstall on Windows
next post
Security Tab Missing from File/Folder Properties in Windows

Related Reading

How to Use Ansible to Manage Windows Machines

September 25, 2023

Installing Language Pack in Windows 10/11 with PowerShell

September 15, 2023

Configure Email Forwarding for Mailbox on Exchange Server/Microsoft...

September 14, 2023

How to View and Change BIOS (UEFI) Settings...

September 13, 2023

How to Create UEFI Bootable USB Drive to...

September 11, 2023

Leave a Comment Cancel Reply

Categories

  • Active Directory
  • Group Policies
  • Exchange Server
  • Microsoft 365
  • Azure
  • Windows 11
  • Windows 10
  • Windows Server 2022
  • Windows Server 2019
  • Windows Server 2016
  • PowerShell
  • VMWare
  • Hyper-V
  • Linux
  • MS Office

Recent Posts

  • How to Use Ansible to Manage Windows Machines

    September 25, 2023
  • Installing Language Pack in Windows 10/11 with PowerShell

    September 15, 2023
  • Configure Email Forwarding for Mailbox on Exchange Server/Microsoft 365

    September 14, 2023
  • How to View and Change BIOS (UEFI) Settings with PowerShell

    September 13, 2023
  • How to Create UEFI Bootable USB Drive to Install Windows

    September 11, 2023
  • Redirect HTTP to HTTPS in IIS (Windows Server)

    September 7, 2023
  • Add an Additional Domain Controller to an Existing AD Domain

    September 6, 2023
  • How to Install an SSL Certificate on IIS (Windows Server)

    September 5, 2023
  • Managing Windows Firewall Rules with PowerShell

    August 31, 2023
  • Fixing ‘The Network Path Was Not Found’ 0x80070035 Error Code on Windows

    August 30, 2023

Follow us

  • Facebook
  • Twitter
  • Telegram
Popular Posts
  • Fix: Remote Desktop Licensing Mode is not Configured
  • Manage Windows Updates with PSWindowsUpdate PowerShell Module
  • Configuring Port Forwarding in Windows
  • How to Install Remote Server Administration Tools (RSAT) on Windows
  • Start Menu or Taskbar Search Not Working in Windows 10/11
  • How to Delete Old User Profiles in Windows
  • Configuring SFTP (SSH FTP) Server on Windows
Footer Logo

@2014 - 2023 - Windows OS Hub. All about operating systems for sysadmins


Back To Top