For Windows to properly interact with and access the computer’s physical hardware, the operating system must have the appropriate device drivers installed. In this post, we will explore how to manually install any device driver on Windows 10/11 and Windows Server.
Device Driver Automatic Installation on Windows
The Windows image includes basic drivers for the most common types of devices. After connecting the device to the computer, Windows will automatically search the local driver store for the most suitable driver. Windows can automatically search the Microsoft Update catalog for drivers for certain devices and install them.
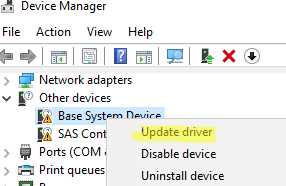
- Try using the Device Manager to search for suitable drivers automatically. Run the Device Manager (
devmgmt.msc). Right-click on the device for which the driver is missing, then select Update Driver -> Search automatically for updated driver software.
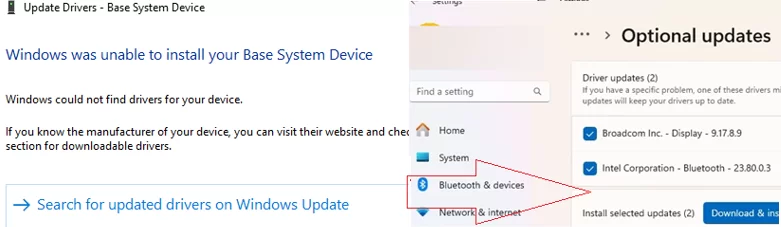
- If the Device Manager cannot find the driver, it will offer to search for it automatically in Windows Update. Click Search for updated drivers on Windows Updates or go to Settings -> Windows Update -> Check for Updates.
If Windows cannot automatically select the correct drivers, you will need to find and install them manually.
How to Find Drivers for Unknown Devices
First, identify the manufacturer and model of the connected device. A yellow exclamation point icon will appear next to a device in Windows Device Manager if a device driver is missing.
- Open the properties of the unknown device and go to the Details tab
- In the drop-down list, select the Hardware IDs property
- Copy the identifier. In this example, it is
VID_2357&PID_010C
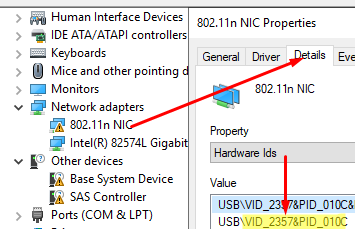
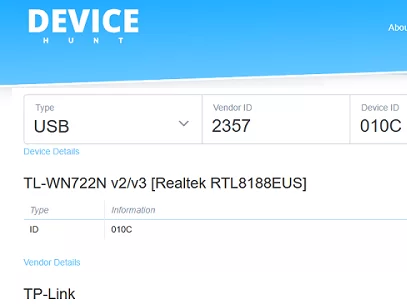
The device hardware identifier contains the Manufacturer ID (VID) and the Product ID (PID). The VID is 2357 and the PID is 010C in this case. Then, find out the model name of the device by its VID and PID on https://devicehunt.com/. In this example, the device is a TP-Link external USB network adapter (TL-WN722N v2/v3 [Realtek RTL8188EUS]).
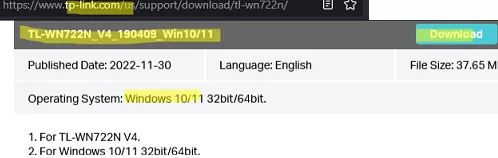
Find the driver for your Windows version and hardware model on the vendor’s website. In my case, this is the driver Windows 10/11 (TL—WN722N_V4_190409_Win10/11). Download the driver.
Manual Driver Installation Using an INF File on Windows
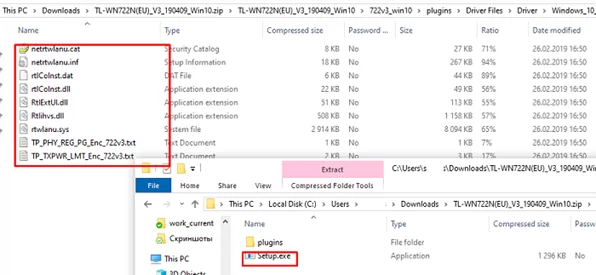
In our example, the driver is compressed into a ZIP file that contains the automatic installer (setup.exe). It is used to automatically install drivers, as well as various additional tools from the vendor. In this example, we will not use this installer for driver installation.
If you extract the installer using 7-Zip, you will find a folder containing only driver files. The driver directory must contain an INF file, which is a text file containing the driver configuration, description of dependent files, and installation rules. It may also contain optional CAT, DAT, SYS, and/or DLL files.
There are several ways to manually install a driver from an INF file.
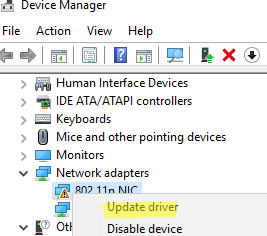
Install the driver using the Device Manager.
- In Device Manager, right-click on your device and select Update Driver.
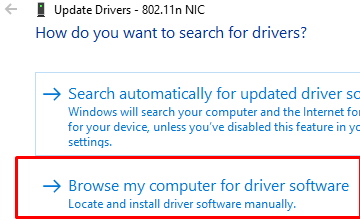
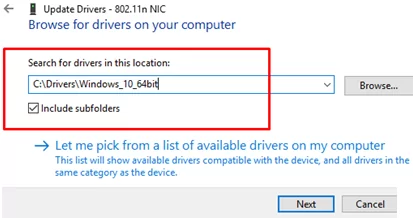
- Select Browse my computer for driver software
- Click the Browse button and specify the path to the folder containing the driver. To automatically scan subfolders for drivers, check the Include subfolders option.
- Click Next to proceed with the driver installation.
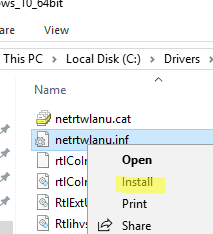
You can also manually add a driver to the Driver Store. To do this, right-click on the driver INF file in File Explorer and select Install.
Another option is to install the driver using the command prompt with the pnputil command:
pnputil /add-driver c:\drivers\windows_10_64bit\netrtwlanu.inf
pnputil /add-driver C:\Drivers\*.inf /subdirs /install
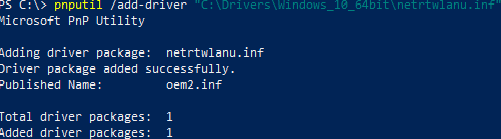
The third-party INF does not contain digital signature information.

This will add the driver to the Windows Driver Store ( C:\Windows\System32\DriverStore\FileRepository ). In Device Manager, select the Update Driver option to automatically install the driver for your device from the local drive store.
After identifying the device in Device Manager, you can move on to the next device for which drivers are missing.
How to Export and Import Drivers in Windows
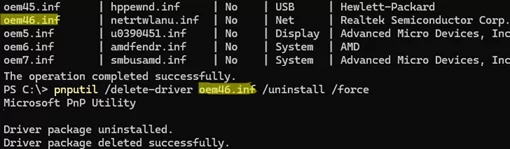
You can list all the third-party drivers installed in the Windows driver store (except for the built-in drivers):
DISM /online /get-drivers /format:table
To uninstall a driver from the Driver Store, specify its INF file name in the oemxx.inf format in the following command:
pnputil /delete-driver oem46.inf /uninstall /force
If you have multiple identical computers (same hardware model), you can export all the drivers installed on a reference machine and import them to the others. This streamlines driver deployment and ensures consistency across devices.
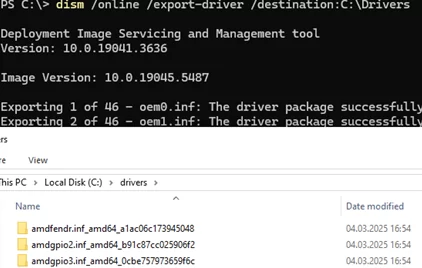
Export all installed Windows drivers to the C:\Drivers directory:
dism /online /export-driver /destination:C:\Drivers
Now, you can copy the Drivers folder to another computer and install (import) all the drivers with a single command:
pnputil.exe /export-driver * c:\drivers
These drivers can also be integrated into the Windows installation image. In this case, all hardware devices will be detected automatically upon operating system installation, eliminating the need for manual driver installation.