Modern Windows versions include a built-in NFS client. This Windows feature enables direct mounting of NFS directories from Linux hosts or NAS devices. It provides transparent access to files and folders on NFS volumes from Windows File Explorer, similar to accessing SMB mapped drives. This guide explains how to enable the NFS client in Windows, mount an NFS network volume, and handle the mapping of Windows users to Linux UID/GID
How to Enable an NFS Client on Windows
There is a built-in NFS client available in all Windows versions starting with Windows 10. It enables users to directly mount NFS network volumes. By default, the NFS client is not installed. You can enable it through the Windows Features control panel: run the (optionalfeatures.execommand, expand Services for NFS, and enable the Client for NFS including the management tools.

Or you can enable the NFS client optional feature using PowerShell.
On the desktop operating systems (Windows 10 and 11):
Enable-WindowsOptionalFeature -FeatureName ServicesForNFS-ClientOnly, ClientForNFS-Infrastructure -Online -NoRestart
On Windows Server:
Install-WindowsFeature NFS-Client

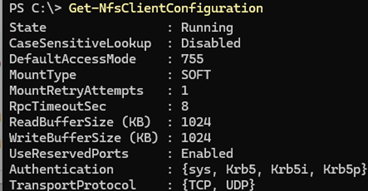
List the available NFS client settings in Windows:
Get-NfsClientConfiguration
Mount an NFS Share on Windows Using File Explorer, PowerShell, or CMD
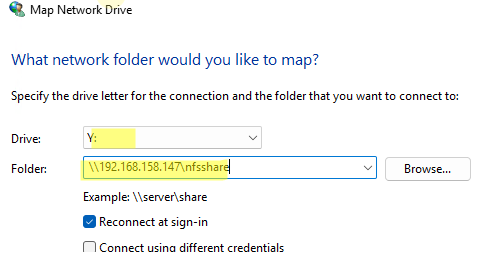
Mounting NFS network volumes in Windows is possible through the Windows Explorer graphical interface, similar to mapping standard shared network folders (SMB shares). Select the Map network drive option in File Explorer, specify the network path to the NFS share ( use the UNC format, for example \\192.168.123.123\nfsshare), and specify the driver letter to assign.
However, in this mode, it is not possible to set additional options for mounting the NFS share.
It is more convenient to mount NFS shares from the command prompt using:
mount.execonsole commandNew-PSdrivePowerShell cmdlet
mount.exe). This is because in PowerShell, the mount command is an alias for the New-PSDrive cmdlet.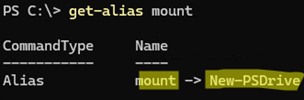
Open a command prompt (or PowerShell console) as the current user. Don’t run it as an administrator, otherwise, the mounted NFS drive will not be visible in the user’s File Explorer (see the post “Accessing Network Mapped Drives with Administrator Permissions” for more details).
Run the following command to mount the NFS share:
mount.exe -o anon \\192.168.123.123\nfsshare N:

-o anon– mount an NFS folder using an anonymous user192.168.123.123– the NFS server’s DNS name or IP address/nfsshare– local path to a directory on the NFS server. If using a Linux host with NFSv3 as the NFS server, specify the full local path to the NFS directory from the root of the file system. For example:srv01:/mnt/nfs/publicN:– the drive letter you want to assign to the mapped folder
casesensitive=yes .Or use the PowerShell equivalent of the NFS mount command:
New-PSdrive -PSProvider FileSystem -Name N -Root \\192.168.123.123\nfsshare -Persist

Use the Persist option to ensure the NFS directory connection automatically restores after a computer reboot (the mount.exe command does not have this option)
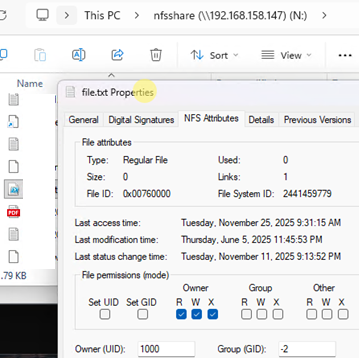
Note that Explorer displays a new tab, NFS Attributes, in the properties of objects in the NFS folder. There, you can find information about file permissions and owners.
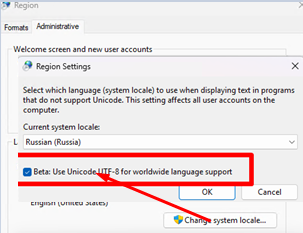
Note that files on NFS network shares with Cyrillic, Asian, Western European, or other non-Latin characters may not be shown at all or may appear as garbled text (mojibake). This is because the built-in Microsoft NFS client defaults to using a legacy ANSI codepage rather than Unicode for filename translation. As a workaround, you can enable UTF-8 support in Windows (which is still in beta): open intl.cpl -> Administrative -> Change system locale -> check the option “Beta: Use Unicode UTF-8 for worldwide language support“.
Unmount the NFS network share:
Remove-PSDrive N
or
umount.exe M:\
Run the mount.exe command to display the options with which the NFS directory is mounted.
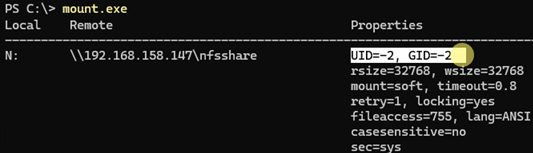
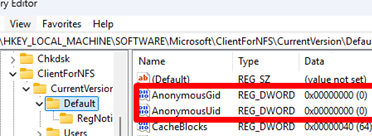
When connecting anonymously to an NFS server, Windows uses UID=-2 and GID=-2 by default to map the current user to a user on the NFS server. If you want to use a specific Linux UID (User ID) and GID (Group ID) for mounting an NFS volume anonymously, you can override these values in the AnonymousUid and AnonymousGid parameters of the HKLM\SOFTWARE\Microsoft\ClientForNFS\CurrentVersion\Default registry key.
For example, the following options will force the NFS client to use UID=0 and GID=0 (the Linux root user) for anonymous connections instead of the default -2.
reg add "HKLM\SOFTWARE\Microsoft\ClientForNFS\CurrentVersion\Default" /v AnonymousUid /t REG_DWORD /d 00000000 /f
 reg add "HKLM\SOFTWARE\Microsoft\ClientForNFS\CurrentVersion\Default" /v AnonymousGid /t REG_DWORD /d 00000000 /f
After making the change, restart the NFS services:
Restart-Service nfsrdr,nfsclnt -Force
Configure NFS Client Mapping of Windows Users to Linux Users/Groups
However, anonymous NFS access is not secure. It is better to configure the mapping of Windows users to Linux user UID and GID.
To enable user mapping in the AD domain:
Set-NfsMappingStore -EnableADLookup $true
 Set-NfsMappedIdentity -MappingStore AD -UserName "j.smith" -UserIdentifier 1000 -GroupIdentifier 100
uidnumber and gidnumber parameter values in the AD user attributes.Set-ADUser -identity j.smith -replace @{uidNumber="<user_uid>";gidNumber="<user_gid>"}
You can get the UID and GID of a user in Linux using the command:
$ id username
On stand-alone machines (in workgroups, or when you don’t want to use AD mapping), you can configure Windows username to Unix UID/GID mapping via the passwd and group files in the C:\Windows\System32\drivers\etc directory.
For example, for a local user maxadm1:
Add to the passwd file:
user1:x:1000:100:maxadm1:C:\Users\maxadm1
File group:
users:x:100:maxadm1
To check the mapping of a specific Windows user to a Linux UID/GID, use the following command:
Get-NfsMappedIdentity -AccountName user1 -AccountType User
